Calcium Reactors
Calcium reactors
Calcium reactors (or as I like to call them mineral reactors) are one of the best ways to maintain natural sea water levels in a marine aquarium. Once adjusted, they are also the easiest way to maintain NSW (Natural Sea Water) levels. Not only do they maintain Calcium and alkalinity levels, but also Magnesium and several trace elements This article will describe each component of a Calcium reactor as well as setting up and adjusting one. With a properly adjusted Calcium reactor and good media, daily dosing becomes a thing of the past, which give you more time to enjoy your reef.
—–Here is a list of the equipment you will need:
Reactor
Co2 tank
Regulator with solenoid and bubble counter
Check valve for Co2 feed line
pH controller (not required but highly recommended)
Calcium and Alkalinity test kits. Also good to test for Magnesium
High and low range pH test kits (if you do not use a pH controller)
—-
Co2 and Regulators
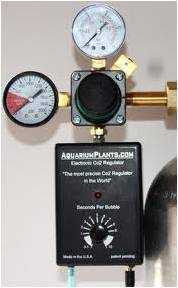
Without Carbon Dioxide, a Calcium reactor would not be possible. Co2 reduces the pH in the Calcium reactor which dissolves the media so it can be dripped into your tank in liquid form. The ideal reactor pH is 6.5-7 depending on the type of media you are using. To control the Co2 flow you need a regulator with a solenoid and a bubble counter. The regulator controls the working pressure and the solenoid is a safety device which stops the flow of Co2 in the event of a power outage, for instance. The solenoid can also be used to regulate the pH in the reaction chamber when used with a pH controller. A pH probe is placed inside the reactor (most have a place for one) and it will turn the Co2 solenoid on or off depending on what the ph is inside the chamber. A pH controller is not required to run a Calcium reactor, but it is highly recommended that you use one as it makes adjusting the reactor much easier.
Typical Co2 regulator, solenoid and bubble counter
Bubble counter
Bubble counters are used to control the rate at which Co2 enters the Calcium reactor. The are two main types of bubble counters, needle valve and electronic.
Needle valve are the most common and cheaper of the two, and have a water (should be distilled or RO/DI) or oil-filled chamber so you can see the amount of Co2 being used in bubble form, and adjust the rate of bubbles with the needle valve. The downside to this type of counter is changes in Co2 or air pressure can change your bubble count, not usually by much, but you will want to check your bubble rate every so often. I have personally used this type of bubble counter for over 2 years and have not had any problems with it, other then having to fill the chamber with water every few months.
The newest type of bubble counters are electronic. They use an electronic solenoid to control the amount of bubbles, and you can adjust bubble rate from 4 per second to 1 every 10 seconds. They are the most accurate and consistent counters, but they come with a high price tag and usually cost between $200 and $300 US.
Typical electronic bubble counter
Reaction Chamber
The reaction chamber is where everything happens. In most reactors it consist of a recirculation pump and a chamber to hold the media. It also usually has a water intake line (some have 2), Co2 intake line, and a return line. Some also have a vent to vent off extra Co2. Water is drawn into the chamber via the recirculation pump through the intake line (or lines), and the pH is reduced with the Co2, which dissolves the media, which is dripped back into you tank. The water coming out of the reactor is called effluent, which is super-concentrated Calcium, alkalinity, Magnesium and all of the trace elements in your media, but it is also at a low pH due to the Co2, and may reduce the pH in you tank. There are a few ways to raise this pH before it enters your tank, which I will explain in the next section
Raising Effluent PH
There are several ways to raise the effluent pH. The most common way is by adding a second reaction chamber filled with the same media as in your first. This will allow the effluent to dissolve more media, boosting its alkalinity, which raises the pH. Some reactors come with a second chamber, or you can build one yourself using a water filter cartridge. Another thing you can do is drip the effluent into your skimmer. The bubbles in the skimmer will gas off the Co2 before it has a chance to enter your tank. You can also have the effluent drip into some sort of container that overflows into the tank, and place an air stone in the container to gas off the Co2
Media
The most common reactor media is aragonite, which is basically fossilized coral skeletons. When it dissolves, you get every element that went into making that skeleton. Aragonite comes in many forms to suit your tank and reactors needs. Another media used Dolomite, which is Calcium Magnesium carbonate, and is primarily used to raise Magnesium levels, but also raises alkalinity and Calcium. It is generally paired with aragonite because when used alone, it will usually increase Magnesium levels too much.
Initial Set-up
First you need to find a safe spot for your Co2 cylinder. It needs to be in a spot where it will not get knocked over, but also in a spot where you can easily access it to change it out and to make adjustments to the regulator. Before attaching your regulator, open the valve on the bottle for a second (facing away from you) to clear out any debris. Now attach the regulator, but leave it off turned off at this time. Next you need a good spot for the reactor, either under your stand or off to the side. Assemble the reactor as per the manufactures directions. Fill the reactor with clean water and make sure it doesn’t leak and make sure the pump works. If it passes the leak test, drain it and add your media as per the directions and install your ph probe if you are using one. I would also recommend you rinse the media with clean RO/DI before adding it to the reactor. Place the intake line in the sump (or display if you do not have a sump) and put your effluent line just above the water level. If your reactor has a vent place it as high as you can. Attach the Co2 line to the reactor, and make sure to have a check valve inline to prevent water from back-feeding into into the regulator. Next fill the reactor with saltwater and turn on the pump. Make sure the effluent line is open and let the reactor run several hours to get all of the air out. Leave the Co2 off at this time.
Now take the initial readings of Calcium, alkalinity and Magnesium and write them down. This will be your base line before starting the reactor. The ideal Calcium level for a reef is between 380 and 450 ppm, alkalinity between 7 and 11 dKh and Magnesium between 1200 and 1350 ppm. I highly recommend bringing these levels up by dosing before starting the reactor because it will make the adjustment process quicker and easier. If you are not using a media with extra Magnesium you will need to maintain it using another method. Magnesium levels are important for keeping alkalinity and Calcium levels balanced.
Now the fun begins. Once the air is out of the reactor you can turn on the Co2. Adjust the regulator so its at 15-20 psi. Make sure the needle valve is completely closed and then plug the solenoid into your controller or into any outlet if not using a controller. Next I will describe adjusting the reactor with and without a pH controller. Again I highly recommend using a controller to make your life easier. Dialing the reactor is tedious and can take several weeks, but after its set you don’t have to touch it all that often
Adjusting with pH Controller
Dialing in a calcium reactor is best done with a pH controller. Install the pH probe into the reactor and set the controller so it will turn on between 6.5 and 7. If it is set much above 7, the media will not dissolve, but too much below 6.5 and it will dissolve too quickly and can cause pumps and lines to become blocked. I personally keep mine set at 6.75. Now adjust the bubble rate with the needle valve. I would start low and adjust as needed. A good starting point is 1 bubble every 3 seconds. Next open up the effluent line. You want this to be at a steady drip, almost a steady stream. This will help prevent excess air from building up in the reactor and causing the effluent to stop flowing. Keep it at this low setting for 24 hours.
After 24 hours, see what the reactor pH is at. If it’s where you set it to, keep the same bubble rate. If its not there yet, then increase the bubble rate and check the pH again after a few hours. Once the pH is stable and where you want it, take Calcium and alkalinity readings again and write them down. Now over the next several weeks, monitor Calcium and alkalinity levels. If they are not changing toward the ideal, slightly decrease the pH in the reactor by increasing the bubble rate, which will dissolve the media at a faster rate. Wait 24 hours between each adjustment and test again. As you approach your ideal levels, increase the pH in the reactor slightly to keep the levels consistent, again waiting 24 hours before each adjustment. Soon the levels will remain consistent and the adjusting is done. At this point you can start checking Calcium and alkalinity every other day, and if they remain consistent, you can begin to check less often. Once it’s adjusted, all you need to do is check you Calcium and alkalinity levels every so often, and make adjustments accordingly. A properly set-up pH controller should maintain natural sea-water levels without you having to make any adjustments, even with increased growth or new additions
Adjusting without a pH Controller
The basic steps are pretty much the same as adjusting with a pH controller, except you will need to test the effluvient manually a few times a day, either with a liquid test kit or a hand-held pH tester. To do this, just collect the effluent from the reactor’s return line and test the pH using your test kit. Make adjustments the same way you would with a pH controller, except you will want to make smaller adjustments since you cannot keep watch on pH all the time. The biggest downside to not using a controller is the Co2 runs 24/7 where if you use a controller it will turn off from time to time. Because of this you will go through Co2 at a faster rate then if you were using a controller. I have our reactor set-up on a controller and the solenoid will stay off for 10-15 minutes at a time sometimes. Also if something goes wrong with the needle valve and you get a blast of Co2, a controller will see the sudden drop in pH and turn off the solenoid, stopping the flow of Co2. Without a controller the Co2 can quickly fill the reactor and build up too much pressure which could cause a catastrophic failure of the reaction chamber. Or if you get a sudden drop in pH and you don’t notice it it can quickly turn you media to mush, or if the pH goes too high and you don’t notice it, you can stop dissolving media which will cause a drop in alkalinity and Calcium levels.
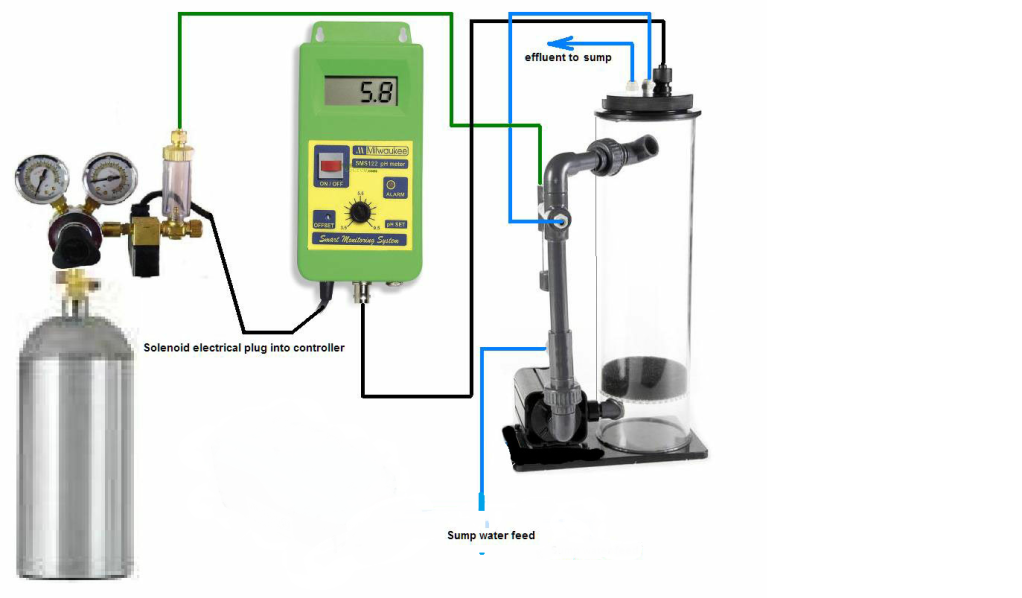
typical calcium reactor set-up
Calcium Reactor Maintenance
Other then occasional adjustments, a Calcium reactor requires little maintenance. You will need to fill the media chamber when it is low. We have a moderately stocked SPS-dominated 100 gallon system and have to fill our reactor once a year, and it holds a little over 8 pounds of media. You should also clean the reactor when you fill the media. Your Co2 levels will need to be checked from time to time. You do this by weighing the bottle and not by reading the gauge, as the gauge will only go low when its too late. The bottle will have a tare weight stamped onto it which is how much an empty bottle weighs. Remove the regulator and weigh the bottle. Then subtract the tare weight from the total weight and that will tell you how many pounds of Co2 you have remaining. With average use, expect to use around 2.5-3 lbs of Co2 a year, but this varies from reactor to reactor. You may use more and you may use less.
I recommend keeping a second full Co2 bottle on hand for two reasons; it can be used as a backup in case you run out, and the other is so you have no reactor downtime when taking the bottle to be filled, as most welding shops need 24 hours to fill it.
The other thing to keep in mind is Co2 is corrosive, so you will need to replace the Co2 and effluent lines on occasion, they become hard and brittle and may start to leak. I make it a habit to change them once a year before they become a problem. You shouldn’t have any problems with the intake line as it doesn’t really come in contact with the Co2. They do make a Co2-rated line made of silicon which will last a lot longer then plastic line, but also cost a little more then plastic. The regulator is another thing that may corrode over time. The time it takes for this to happen will vary, but better quality regulators will last a lot longer then cheaper regulators.
In conclusion, Calcium reactors are one of the best ways to maintain natural seawater levels in a reef aquarium. They may seem intimidating at first, but after the initial investment and set-up, they will allow you to spend less time testing and dosing and more time enjoying your reef.
Excellent post Labnjab!
Nicely done Labnjab. You make it sound easy !