Monthly Archives: May 2013
Dosing Supplements.
Many new people to the hobby read about how to dose supplements and want to start dosing their tanks as they feel they may not be completing something that is required for a healthy and stable set-up. Or maybe they do not even not completely understanding why/if we need to dose supplements to begin with, just as I did (or did not) when I started out in the hobby. The truth of the matter is, whether or not you will need to dose will depend completely on the specific requirements of your set-up. The ultimate goal of dosing is to replace the elements within your water that will get used up by your set-up and to maintain stable water parameters like that which are found around the coral reefs in the ocean (where most of the fish and corals that we keep come from). Before going any further, I would suggest reading the below article which contains many suggestions for what basic levels you should aim for to maintain a healthy set-up. https://www.reefaquarium.com/2013/the-basics-of-marine-aquarium-water-parameters/
The first step to determining if you need to dose supplements or not, would be to ensure you have a good maintenance routine in place along with a good and disciplined water change schedule. Most people have very good results with 10% weekly water changes. Removing old water from your set-up and replacing it with freshly made salt water will also replace at least some of the used elements along with used trace elements in your aquarium. In FOWLR and very low demanding mixed reef set-ups, most hobbyists may never need to dose any supplements at all as their water changes will provide the needed supplements to replenish what was used. Corals, invertebrates with hard shells, and different types of algaes will all use different elements in the aquarium water. In my experience, testing your alkalinity, calcium, and magnesium levels weekly with a good quality test kit will allow you to determine when these more common elements are becoming depleted and let you know when/if you will need to dose anything at all. Once any of these three levels start dropping, even with a good a disciplined water change schedule, you will need to consider dosing.
In most set-ups, the first parameter that will typically start to become depleted is your alkalinity. At the least, this has been my experience. There are many good supplements out there as options to use to bring your alkalinity levels back up. At first, I would strongly recommend using a commercially sold aquarium alkalinity supplement that you can purchase at a local fish store or from on line vendors. I would not recommend making your own supplements until you have more experience using readymade ones. When it comes to dosing, I would caution you about using the recommended dosing amounts that are listed within the instructions for use on the bottle. These listed amounts are only to be used as guidelines as everyone’s set-up will have different demands. I have had great success in the past by starting with ¼ of the recommend dosing amount, only using that as a starting point to determine my actual daily dosing amount. As a example, in the first marine tank that I had set-up, my alkalinity levels had dropped from 9.6 to 8.2 in 3 or 4 weeks. This started to happen a few weeks after the aquarium matured and I started adding more corals and fish. It was at that point that I wanted to start dosing to not only bring that level back up to 9.6 (which is the alkalinity level of the salt that I like to use) but to keep this parameter stable. The instructions on the alkalinity supplement that I chose to use suggested dosing 10 ml every second daily. I used ¼ of that amount and started dosing 1.25 ml every day (1/4 of the 10 ml is 2.5ml every second day, which means 1.25 ml each day). After two weeks of dosing at this level, the alkalinity only increased to 8.4. I doubled the dose to ½ of the recommended amount and started dosing 2.5ml every day for the next two weeks. This amount kept my alkalinity levels stable at 8.8 to 9.0. It took another ¼ dose increase to get it back to between 9.4 and 9.6. You will have to keep in mind that when you start dosing, you also want to make the changes in your parameters slowly over time (days or weeks).
For set-ups with sumps, it would be best to add your supplements in the last compartment (return pump compartment) of your sump to allow the additives to become mixed in with your tank water as it makes it way up to the display tank. In set-ups without a sump, it would be best to take a container of tank water and add your additives to this water so you can slowly add it to your set-up as you pour this water back into your tank. Once/if you get to the point of having to dose for more than one element, the timing of adding these supplements to your aquarium will be important as you do not want any two supplements to mix together before they can become fully diluted into the water. I prefer to dose my alkalinity early in the morning and then my calcium late in the evening to make sure I can avoid any potential problems from theses additives mixing together in their concentrated form.
One good option to help simplify daily dosing is to use a automated dosing pump. After a few years of manual dosing by hand, I had got a automated dosing pump. I just program in the time of day I want each pump with to come one and the amount I want each pump to put in the set-up. Each pump draws a dosing supplement from its own container and pumps supplement into my sump. It certainly can make dosing supplements a lot easier as you do not have to remember (or forget) anything. If you can fit one into your budget and your set-up, they will certainly make things a lot more easier for you. I now only check to make sure the containers hooked up to the dosing pump are full and the dosing pump is still working.

Another good option is a calcium reactor. As I have yet to use a calcium reactor, I would refer you to the below article for more information. https://www.reefaquarium.com/2012/calcium-reactors/
Always remember that when it comes to dosing supplements, the best approach is to always: keep it simple, stick to the basics (dKH, Cal, & Mag), and never dose anything you can’t test for. In order help you keep it simple, I have listed below, what I would suggest as the best approach for elements to test for and potentially dose for to maintain your target levels and help you have a healthy and stable set-up. I had great success by only focusing on the top three parameters in my last reef tank with mostly SPS corals.
The below recommendations are from a article on Reefkeeping magazine. I have always had very good luck focusing on the basics elements (listed below).
A) Critical elements to test for and the most common to find requiring at least some dosing. These are what I often refer to as the basic elements to focus on.
-Alkalinity
-Calcium
-Magnesium
B) Potentially useful elements to test or dose for in more advanced or set-ups with special requirements
-Iron (required in most set-ups with large quantities of macro algaes)
-Silicates (required for a wide range of sponges if kept in large enough quantities)
C)Elements potentially not required to test or dose for in aquariums with very few exceptions
-Iodine
-Strontium
-Borate
-Certain amino & fatty acids
The below link will take you to article that I quoted above.
http://www.reefkeeping.com/issues/2004-05/rhf/index.htm
http://reefkeeping.com/issues/2007-04/rhf/index.php
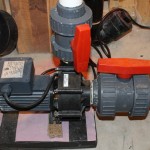
ReeFlo Dart/Snapper Hybrid Return Pump
Overall assessment: 4 out of 5

The below links will take you directly to the ReeFlo website for more detailed information
http://www.reeflopumps.com/dimsmanuals.html
http://www.reeflopumps.com/lowspeedhighflow.html
This is one of the best external return pumps that I have tried. Based on the manufacture’s stated flow rate, the reeflo return pump would have a maximum flow rate of up to 3600 GPH at zero head height. I would have no concerns using this pump for up to a 200 to 250 gallon aquarium (display tank size). The wide range of flow rates is based on the options of using one of the two impellers that comes with the pump. By using the smaller impeller, you will get lower flow rates and the pump will consume less energy. Using the larger impeller will give you a lot stronger flow rates but it will also use more energy. The above link to the manufacture’s web site contains detailed information about the exact flow rates. The impellers are easy to change by disconnecting the plumbing lines and removing the impeller cover which also makes routine maintenance easier than most external return pumps. The use of different sized impellers is a very smart approach to balance energy consumption while allowing for future flow changes/increases without having to buy another return pump or making changes to your plumbing lines.
The reeflo return pump is also one of the quietest return pumps that I have used and produces very low level of heat. The fan built into the back of the pump is both extremely quiet and keeps the pump nice a cool.
The reeflo return pump takes a 2 inch input line and has a single 1.5 inch return line. I also like the small overall size of this return pump for the flow it produces, measuring at: 11″ x 6.57″ x 7″ (L x W x H). The reeflo return pump can also be a very expensive pump ranging in price from $350 to $450 depending on where you live in North America.
I have been using my reeflo return pump nonstop on a 180 gallon aquarium with a 100 gallon sump for about a year now without a single problem. Even though these pumps come at a high price, I would highly recommend them to anyone who is setting up a larger aquarium where a external return pump is best suited. In my opinion, you will get what you pay for.


Quietone Internal/External Return Pumps
Overall Rating: 3 out of 5

The below information is taken directly from the manufacture’s website
http://www.lifegardaquatics.com/products/product.php?id=88
Features
- Extremely quiet operation…noise level less than 45 decibels.
- Ease of service through simple snap on/off covers and removable magnetic drive impellers.
- Patented “Uni-Direction” impeller eliminates need for noisy mechanical device. Allows pumps to always turn in correct direction immediately.
- High quality corrosion resistant bearings help ensure quiet operation and longer life.
- Innovative “cooling chambers” provide air-cooling during dry use and water cooling in wet applications.
- 115v 60 Hz or 220V 50 Hz models in all sizes.
My own assessment of the Quietone return pump is below and is based on three different Quietone 6000 return pumps that I have used in a submerged (internal) set-up:
Noise Level: Ironically, the Quietone return pump is not among the more silent return pumps that I have used. Under normal conditions use, this pump produces what I would refer to as slightly above an average amount of noise. Once the impeller gets dirty, or the pump is in need of maintenance, it can get really loud requiring a complete and detailed cleaning before the noise level can be lowered again.
Flow Produced: This pump produces fairly good flow which is one of the pump’s better qualities. I have not had one produce the same level of flow as stated by the manufacture, but it is reasonably close and is stable over time.
Heat Produced: The Quietone return pumps can produce a lot of heat when used internally (in the water). I once had a Quietone 6000 return pump that I used for mixing salt water in a 35 gallon container. Within 24 to 36 hours, the temperature of the 35 gallons of water in this container would increase from around 68F to around 83F and stay at that level as long as the pump was running. As the model 6000 pump would typically be used on a sumped set-up of up-to 90 gallons, it would not raise the temp that much in an actual set-up.
Ease of Maintenance: The pump does come apart fairly easy for maintenance. However, it has a ceramic impeller shaft which is easily broken if you are not careful.
Price Point: This is one of the quietone return pump’s better qualities. They are among the more reasonability priced return pumps out there which are also commonly found in most major cities in North America. Prices will vary based on return pump size
Likeliness of recommending this return pump: I would recommend this return pump to anyone setting up a sumped aquarium of up- to 90 gallons or less and who is also on a very tight budget.


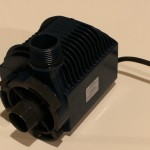
Koralia Evolution Powerhead Product Review
Rating Overview: Overall product rating of: 4 out of 5

Details of my ratings along with the manufacture’s specifications are contained below.
The below is taken directly from the manufacture’s website: http://www.hydor.com/prodotti/show/famprod/46/list/14
Finally a compact, energy saving controllable pump with amazing, never before seen performance! Even the exclusive magnet suction-cup support has been improved with vibration reduction technology. Find the model that best suits your needs, position it, plug it into a timer or directly into your electrical supply and watch your aquarium benefit from the powerful yet gentle flow.
|
MODEL |
W |
FLOW RATE |
FOR AQUARIUMS * |
|
|
fresh water |
marine |
|||
|
115V – 60 Hz |
||||
|
KORALIA 550 |
4 |
550 gph |
from 30 to 50 gal |
from 15 to 30 gal |
|
KORALIA 750 |
4 |
750 GPH |
from 50 to 90 gal |
from 30 to 50 gal |
|
KORALIA 1050 |
5 |
1050 gph |
from 70 to 125 gal |
from 45 to 70 gal |
|
KORALIA 1400 |
6 |
1400 gph |
from 90 to 160 gal |
from 55 to 90 gal |
*Aquarium sizes in the above chart are suggested by Hydor. Each Hobbyist should choose the Koralia model that better suits the needs of the inhabitants (plants, fish, corals, etc) of the aquarium in which the pump(s) will operate.
The below information is my personal assessment of the Koralia evolution powerhead.
Overall Size and Appearance
Although they are not a eye sore in your aquarium, they can be larger than other comparable powerheads. The Koralia evolution powerheads are a little large for my personal preference, but that would not stop me from using them
Mounting Set-up
The Koralia evolution using a combination of a suction cup and magnet mounting system. I personally do not like using any powerhear with a suction cup in the mounting system as over time, the rubber on the suction cup will fail
Flexibility of Adjustment
The Koralia Evolution has limited angles you can adjust the direction of the flow. This may or may not be a limiting factor based on the needs of your set-up.

Ease of Maintenance
These powerheads are easy to take apart and clean as apart of your routine maintenance. I have been using two Koralia Evolution powerheads for a few years now without a single problem. They are highly dependable with properly maintained
Price-Point
This is one of the best features of the Koralia Evolution powerheads. They are among the lower priced powerheads commonly available in the hobby. .
Likeliness of Recommending this Powerhead
I would highly recommend this powerhead to anyone who is on a tight budget and only needs fairly straight flow coming from the aquarium wall the powerhead is mounted to.


The Koralia Evolution powerheads also come with rubber posts built into the base to help prevent noise from vibration. Although I have never noticed any vibration coming from any of the Koralia powerheads that I have used in the past years, this is a nice feature to have.


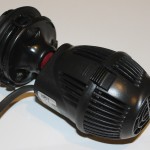
Tunze Turbelle® stream Powerhead Product Review
Rating Overview: Overall product rating of: 4 out of 5

Details of my ratings along with the manufacture’s specifications are contained below.
The below is taken directly from the manufacture’s website: http://www.tunze.com/149.html?&L=1&C=US&user_tunzeprod_pi1[predid]=-infoxunter052
Turbelle® nanostream® 6045(6045.000)
For aquariums from 40 to 500 litres (10 to 135 USgal.)
Flow rate: 1,500 to about 4,500l/h (400 to 1,175 USgal./h)
Energy consumption: 5 to 7W
Voltage / frequency: 230V/50Hz (115V/60Hz)
Cable length: 2m (8.7 in.)
Dimensions: diam. 70mm (2.75 in.)
Ejection: diam. 40/15mm (1.5/.59 in.)
Magnet Holder with Silence clamp up to a glass thickness of 12mm (3/8″)
The above specifications is just one of the models of the Tunze Turbelle Powerhead. Different models with vary in size and flow capacities. The below is my assessment of the Tunze Turbelle powerheads and only applies to the: 6015, 6024, 6045, 6055 and 6095 models.
Overall Size and Appearance
Although this is not the most compact design of powerhead that I have used, it is not the worst either. I do not mind the design and look of the powerhead at all
Mounting Set-up
Tunze uses a strong magnetic base on both sides of the glass to hold the powerhead to in place. No suction cups are used at all. This make for a very strong base held in place which will not move over time. I have been using them for years now and have never had a single move at all. They also have a rubber insulating base to prevent the vibrations and/or noise inside the aquarium. There are some pictures at the end of this review that show what I am taking about
Flexibility of Adjustment
This is another feature of the Tunze powerheads that I really like, and (in my opinion) is one of their better qualities. Due to the design of the power mounting bracket, you can angles of 90 degrees with this powerhead. This will give you a lot more flexibility in were you place the powerhead in your aquarium while still getting the direction of flow that you want.

Ease of Maintenance
These powerheads are easy to take apart and clean as apart of your routine maintenance. I have been using some of my tunze powerheads for three years now without a single problem.
Price-Point
For me this is the biggest drawback of these powerheads and is just about the only thing that I really do not like about Tunze. The price of the Tunze powerheads can often by as much as 60% more than compared to comparable powerheads. However, I still feel the other positive qualities of this powerhead outweigh the additional cost. The price point can also limit the number of distributors in a given area that are willing to stock Tunze products.
Likeliness of Recommending this Powerhead
I would highly recommend this powerhead to anyone who is not on a tight budget. In my experience, Tunze powerheads: produce excellent flow, are easy to maintain, are long lasting, and are highly adjustable for both the direction of the flow and the strength of the flow. They certainly are my favorite powerhead.


A few years back, Tunze added the rubber posts to help ensure no noise is created through vibration being transferred from the powerhead to the glass. I do like this feature, although, I had never noticed any vibration in the other or current models.


One certain models, the Tunze powerhead will also have a mechanical flow control option to reduce the flow of the powerhead. This will allow for some manual flow control without using a controller. Simply move the blue knob shown in the below picture and you can reduce the flow by as much as 33%. This feature is very useful on the models with higher flow rates making them more adaptable to different set-ups or if your needs change over time. By moving the blue knob towards the body of the skimmer you will be moving the blue sleeve towards the impeller which will restrict the amount of water the impeller can draw into the powerhead. That will restrict the flow without building up pressures that can lead to premature wear.


Please Note: In all the above pictures I have only shown you one half of the magnet mounting base. The reason being is that this is a very strong magnet. When I accidently have these magnets make contact, I have found them very hard to separate.