Monthly Archives: August 2013
Acclimating Corals
In my experience, corals need to be acclimated, just as fish or inverts would need to be when adding them to your aquarium.The below process is what I would typically follow when acclimating corals to my tank.Although I do not quarantine my corals, I will give them a preventative treatment dip to rid them of potential hitch hikers.I also carefully inspect any coral before purchasing it when I buy it from a store or even from another hobbyist.If I do notice hitch hikers on the coral, or the tank the coral doesn’t look healthy to me, I will not buy the coral.This is also the reason why I do not like to buy corals on-line as I want to personally inspect the coral before I decide to buy it. If you do choose to quarantine your corals, I would suggest to use the below process to acclimate the coral to your quarantine tank repeating the same process when you move the coral to your display tank.
Step 1 – Float the bag
I will keep the bag I got the coral in closed and let it float in tank water for about 30 to 45 minutes allowing the temp of the water in the bag to become the same as the tank water.If I am floating the bag in the tank, I will lower the lighting level to about 10% of normal.Most of the time I will float the bag in the sump were the lighting level will be very low just so I do not have to change the lighting in my tank more than what I have to
Step 2 – Remove the coral and water
Once I am confident the temp of the water in the bag matches the tank water, I will remove the coral and the tank/bag water from the store and place them both in a separate container. I have a few different sized containers that I use to accommodate different sizes of corals and different amounts of water.
Step 3 – Acclimate the coral to your water parameters
Now that I have the coral in a different container with the tank water from the store, I will start adding tank water to this container. I will typically add about ½ cup of water about every five minutes or so. Once the container has become full, I will remove and discard about half the water from the container so I can continue adding water from my tank to this container. I will repeat this about three times or until I am comfortable that I have replaced all of the water from the store with water from my tank
Step – 4 Observation
While I am adding water from my tank to the container with the new coral in it, I will be carefully watching the coral for any hitchhikers.
Step -5 Treatment dip
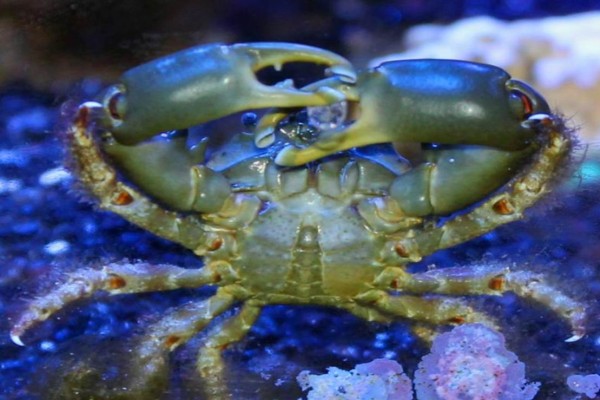
I will always give the corals a preventative treatment with a coral dip before placing them in my display tank.The below is the coral dip that I like to use. Just make sure that whatever coral treatment dip you choose that you careful follow the instructions on the bottle.If I noticed any hitch-hikers while acclimating the coral to the tank water, I will ensure they are removed / killed off by the coral treatment dip.If I see any harmful SPS crabs, I will get a pair of tweezers and manually remove them as these crabs are very hardy and some of them can survive the coral treatment dip.
I can not stress the importance of using a coral treatment dip enough. I once skipped this step and introduced flat worms into my tank. It took me a very very long time and a lot of effort to get the flat worms under control.I will never make that mistake again.So far, I have been very successful keeping hitch hikers out of my tank by using a coral dip.
Step 6 – Add the coral to the tank
Once I am confident the treatment has removed any potential hitch hikers, I will lower the lighting level in the tank to about 1/3 of normal (if not already lowered). Next I will remove the coral from the current container and place it in a second container of water that I just removed from my display tank.The reason for this is to remove any trace amounts of the coral treatment before placing the coral in my tank.I will gently swish it around a little in this second container before removing the coral by hand and placing it in my display tank.All corals will initially be placed on the bottom of my tank
Step 7 – Acclimate the coral to my tank lighting
Now that the new coral is in the tank at a lower lighting level, I will leave the lighting at this current level for a few hours.I will slowly increase the lighting level back to its normal level over the next 2 or 3 hours.Before switching to LEDs, I would place 4 or 5 layers plain of white paper on top of the tank lids to block out some of the light and slowly remove one layer at a time allowing more and more light to get to the tank.
The next day, once the tank lights are on at their normal setting, I will place the coral in its intended spot.If the coral is a sensitive or high light demanding coral requiring it to be placed higher in the tank (closer to the lights), I will take a few days to move it up to its intended spot, placing it a little higher on the rocks until it has reached its intended spot.
NOTE: I will never add any of the water that I used to acclimate a coral back into my tank.Once I am done acclimating the coral, I will top up my tank with some freshly made salt water to replace what I had removed during the acclimation process. I will always discard all water used to acclimate a coral.
Aiptasia Anemones
What is Aiptasia
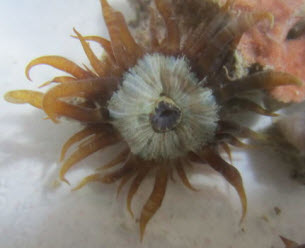
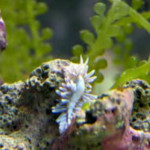
Aiptasia anemone. Picture by Smithsonian Institute.
Aiptasi sp is a type of pest anemone that infest reef aquariums and it should although beautiful be removed from an aquarium as soon as possible. The longer it takes to start treatment the worse the infection will be. Aiptasia is most often introduced to an aquarium with live rock. The most common species in aquariums is Aiptasia pallida but other species are also regularly introduced.
It is common that beginner reef keepers anxiously is observing their live rock to see what types of life it might have brought with it. One day they see a small baby polyp. The right thing to do at this point is usually to remove it since most polyp hitch hikers are either Aiptasia or the equally problematic Majano Anemone. Most reef keepers do however want to see what it develops into and before long they are the happy owners of a beautiful anemone. Fast forward in time and the reef keeper will before he knows it have a rapidly growing Aiptasia colony and start to realize that he has a problem. At this time it is a lot harder to get rid of the Aiptasia than it would have been if it had been removed straight away. It is therefore important to try to identify any polyp and anemone you see as early as possible. You can read more about identifying Aiptasia further down in the text.
In the wild Aiptasia is a common sea anemone found in temperate and tropical waters. They live in the benthic zone where they can be found growing on mangrove roots and hard surfaces. Many species of Aiptasia contain symbiotic dinoflagellate unicellular algae of the genus Symbiodinium living inside nutritive cells. The algae helps the Aiptasia by providing fats and sugars produced through photosynthesis. In return the Aiptasia provides protection and inorganic nutrients. Some species that feeds on Aiptasia such as the Berghia nudibranch absorbs these algae and benefit from the symbiotic relationship. The algae do however normally survive less than one week after having been absorbed by Berghia nudibranches.
Aiptasia species are hardy and beautiful but they are still considered aquarium pests and it is easy to see why. The Aiptasia is very fast growing and aggressive. If left alone they can quickly out compete everything else living on the live rock. They have stinger cells (filled with nematocysts ) filled with a very potent poison that cause corals and other polyp animals to retreat The Aiptasia is also capable to kill corals, shrimp, crabs, snails and even fish. It is not very common that Aiptasia kills fish or desirable invertebrates but the risk is more than serious enough to warrant their immediate removal and the risk get higher the more the Aiptasia is allowed to spread. Aiptasia stings for both offensive and defensive purposes.
Aiptasia is very hard to remove once established due to their ability to regrow from very small segments left on the rock after the removal of the poly. Each of the small segment regrows into a new polyp. Aiptasia can sometimes regrow from one single cell left on the substrate after the removal of the rest of the polyp.
Identifying Aiptasia
 It is important to identify Aiptasia as early as possible so that treatment can start as early as possible. It is also very important to identify Aiptasia correctly if you want to use biological methods to control the Aiptasia. Berghia nudibranches will as an example only eat Aiptasia and not Majano Anemones. Another type of very common aggressive pest anemone.
It can be hard to identify Aiptasia and other polyps while they are still small but once they are fully formed it gets a lot easier. It can however sometimes still be a challenge.
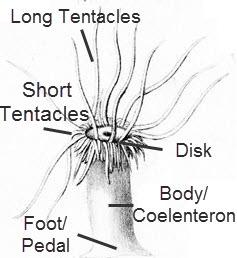
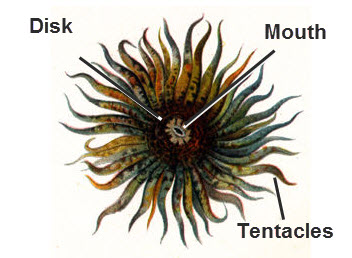 Aiptasia species looks like small palm trees with a disk of tentacles at the top. The disc contains both long and short tentacles attached at the edges of the disc. In the center of the disk is the mouth. It looks like an elongated slit. The tentacles are usually slender and have very pointed tips. If the tentacles are more chubby with bulbous tips you are most likely looking at the similar but very different Majano pest anemone. The “stalk” or the coelenteron (polyp body) as it is more correctly called of the Aiptasia can grow up to 5 cm / 2 inches long. The disk at the top can grow to be 2 cm / 3/4 inch wide.
The coloration in the Aiptasia is caused by the dinoflagellate alga living in it. The color of the Aiptasia will hence vary with the lighting conditions under which it grows. In a well lit area Aiptasia will usually be dark to greenish brown. The tone of the Aiptasia will grow lighter the less light that is provided. This can give them a tan or even almost transparent look in low light conditions. It is common that the body of the Aiptasia features lightly marked parallel lines. These lines are however not always present. It is also not uncommon that white or light green flecks are present near the tentacles. Juveniles specimens can sometimes be entirely cover in flecks.
Aiptasia Species
Aiptasia mutabilis – Picture also used in article header.
© Alfiero Brisotto cc2.0
The following 16 species of Aiptasia is currently accepted:
- Aiptasia californica (Carlgren, 1952)
- Aiptasia carnea (Andrès, 1881)
- Aiptasia diaphana (Rapp, 1829)
- Aiptasia erythrochila (Fischer, 1874)
- Aiptasia insignis (Carlgren, 1941)
- Aiptasia inula (Duchassaing & Michelotti, 1864)
- Aiptasia leiodactyla (Pax, 1910)
- Aiptasia mimosa (Duchassaing & Michelotti, 1864)
- Aiptasia minuta (Verrill, 1866)
- Aiptasia mutabilis (Gravenhorst, 1831)
- Aiptasia pallida (Agassiz in Verrill, 1864)
- Aiptasia parva (Carlgren, 1938)
- Aiptasia prima (Stephenson, 1918)
- Aiptasia pulchella (Carlgren, 1943)
- Aiptasia saxicola (Andrès, 1881)
- Aiptasia tagetes (Duchassaing & Michelotti, 1864)
Aiptasia Care
There are a number of reason to actively keep and care for Aiptasia. The most common reason is likely as food if you are breeding Berghia nudibranches. Berghia only eat Aiptasia and is commonly sold to control Aiptasia
If you for some reason want to actively keep and care for Aiptasia you will find it to a be a very easy and hardy anemone. That is the reason they are considered a pest. It will not require any special care to grow as long as you keep decent water quality. I do not recommend keeping any other small fish or invertebrate in aquarium where you plan to grow Aiptasia. There is always a risk that they will get killed.
Acquiring Aiptasia can sometimes be hard since no one want to have it in their aquarium. It should however usually not be to hard to get some from an infested aquarist or aquarium store. Worst case scenario you might be able to get some from one of the many Berghia sea slug breeders that sell their slugs online.
Avoid keeping species that are known to eat Aiptasia such as peppermint shrimp and butterfly fish if you want to keep Aiptasia in your aquarium.
Aiptasia Reproduction
Aiptasia can reproduce both sexually and asexually.
- Asexual reproduction
Asexual takes place through pedal laceration. This happens when a small group of cells are somehow separated from the pedal disk of the Aiptasia. These small groups of cells grows into buds. These buds will then develop mouths and tentacles of their own. A miniature Aiptasia is normally formed within a week or two from the cells being separated from the parent polyp. This polyps can release their grip on the surface and float with the waters current to colonize a new spot. Colonies of Aiptasia form and grow primarily through asexual reproduction. Sexual reproduction play a larger role in spreading them to new locations. Aiptasia can as earlier mentioned regenerate an entire new anemone from a single cell. This is why they are so hard to eradicate and why methods that only destroys the polyp without killing all the cells such as manual Aiptasia removal are so contra productive.A surprising ability in at least some Aiptasia species (A. diaphana) is that pedal laceration can produce both male and female polyps. In other words, even though the new polyps created through asexual reproduction are clones of the original poly they can still developed into different sexes. Clones can reproduce with each other through sexual reproduction. Some clones have even been shown to develop into hermaphroditic polyps. - Sexual ReproductionThe Sexual reproduction in Aiptasia works different in different species. Some species such as the common Aiptasia pallida and Aiptasia pulchella have external fertilization. Other species supposedly have internal fertilization that takes places within the Aiptasia.Lets start by having a look on sexual reproduction in Aiptasia species such as Aiptasia pallida and Aiptasia pulchella. The reproduction in these species are well researched. The Aiptasia belong to one of two genders. The two genders release their gametes into the water where the fertilization occurs. The resulting zygote turns into free swimming planula larva. These free swimming planula larva flows with current for a while before they settle down on a hard substrate. Once they have attached themselves they grow and metamorph into tiny polyps. The symbiotic dinoflagellate alga found in Aiptasia is absorbed into the tiny polyp from the water.Lets now look on internal fertilization in Aiptasia. This is believed to occur in some species but I have been unable to find an concrete scientific evidence or documentation to verify this. It is however know that some species of anemones are capable of internal fertilization so it would not be surprising if the reproductively very versatile Aiptasia genus contained species that is capable of internal fertilization. Internal fertilization takes places when the male Aiptasia release their sinking gametes into the water. They settle down and fertilizes the gamets within the coelenteron of a female Aiptasia. Planula Larva are then developed and grows within the Aiptisia. The Planula Larva are released when the conditions are right or if the mother polyp is attacked. They then go on to colonize new locations on the reef.
Aiptasia will reproduce more asexually during poor conditions such as when under attack from predators, during poor lighting, in low oxygen situations etc. During good conditions they reproduce more sexually. In the wild there is also evidence that the season affects the preferred reproduction method in Aiptasia. Many chemical Aiptasia remedies also causes increased asexual reproduction.
References
Schlesinger A, Kramarsky-Winter E, Rosenfeld H, Armoza-Zvoloni R, Loya Y (2010) Sexual Plasticity and Self-Fertilization in the Sea Anemone Aiptasia diaphana. PLoS ONE 5(7): e11874. doi:10.1371/journal.pone.0011874
http://lanwebs.lander.edu/faculty/rsfox/invertebrates/aiptasia.html
Berghia (Aeolidiella) Nudibranch – Natural Aiptasia Control
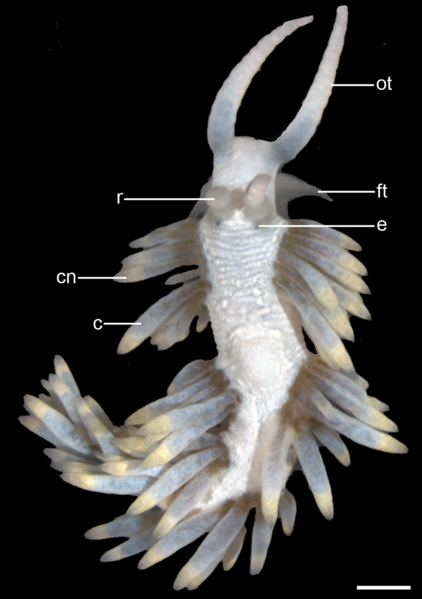
Aeolidiella stephanieae
ot = oral tentacles,
ft = foot tentacles
e = eye,
r = rhinophores,
cn =cnidosacs at the cerata tips.
c = cerata.
Picture by: Alen Kristof & Annette Klussmann-Kolb
Aiptasia can be a big problem in a reef tank and there are plenty of different methods available for getting rid of Aiptasia ranging from chemical products to spot application with lemon juice. Click to learn more about Aiptasia and how to get rid of Aiptasia. In this article we are going to focus on the Berghia nudibranch and how it can be used to exterminate Aiptasia from your reef.
Berghia (Aeolidiella) Nudibranch
The Berghia nudibranch is a small nudibranch that is commonly kept in aquariums to control Aiptasia, a type of pest anemone. In is the most commonly kept and sold sea slug in America. Almost all sold specimens are bred in captivity.
The Berghia nudibranch grows to be no more than 20 mm in length and has a soft sensitive body. This species should not be handled more than necessary since it is very easy to harm these fragile creatures.
The Berghia nudibranch kept in aquariums is native to waters around Southern Florida and the Florida keys where it is found in shallow water. It is only one of many species of Nudibranches that eat Aiptasia. It is however the only species of Aiptasia eating sea slug common in the aquarium trade.
Aeolidiella stephanieae not Berghia verrucicornis
The Berghia nudibranch is called the Berghia Nudibranch because it was believed that the Sea slugs kept in aquariums belonged to the species Berghia verrucicornis. This is however not the case. The species commonly kept in aquariums as the Bergia nudibranch or the Berghia sea slug is actually Aeolidiella stephanieae, another species belonging to the same family (but another genus). Aeolidiella stephanieae was described by science in 2005 (Valdés A. (2005). “A new species of Aeolidiella Bergh) . The Berghia nudibranch should in other words more correctly be called the Aeolidiella nudibranch. The common name Berghia nudibranch have however stuck in the trade due to the fact that it had been used for a long time before the sea slug was re-categorized as a new species.
It is not unlikely that it in time will be discovered that there actually is several similar looking species of Berghia nudibranches kept in aquariums to control Aiptasi. I am basing this statement on differences described from observations of the life cycle and reproduction of different nudibranch populations kept in aquariums. Another factor that suggest that there might be several species kept in the aquarium trade is that Aeolidiella stephaniea is said to reach a maximal length of 20 mm, less than one inch while some Berghia Nudibranch populations kept in aquariums reach up to 1 ½ inch in length. Almost twice the length of Aeolidiella stephanieae. It is however also possible that these differences are due to from different environmental factors or that there is different populations originating from different collection sites with different behavior and size although belonging to the same species.
Scientific classification
Kingdom: Animalia
Phylum: Mollusca
Class: Gastropoda
Family: Aeolidiidae
Genus: Aeolidiella
Species: stephanieae
Berghia Life Cycle

larva in metamorphosis (25% of development) of Aeolidiella stephanieae. Scale bar is 100 μm.
e = eyes
cil = cilia
s = shell.
Picture by:Alen Kristof & Annette Klussmann-Kolb
The Berghia has a rather short life cycle. Their development from egg to sexual mature adult takes a mere 60 days at 22°C / 72°F. Warmer temperatures makes them develop faster. Colder water slows down the development. The eggs hatch after about 10-14 days. Some eggs hatch as fully metamorphosed sea slugs and can start searching for food right away. Other eggs hatch in to larvae that float in the water for about 24 hours before they settle down and start their metamorphosis. The metamorphosis usually take about 48 hours and the juvenile Berghia sea slugs usually start crawling looking for food around 24 hours after the metamorphosis. They are usually actively feeding 48 hours after metamorphosis. Juvenile Berghia are usually about 600 microns long when they start feeding actively. The Berghia nudibranch can live about 10 months with a good food supply.
Keeping Berghia Sea Slugs
Berghia (Aeolidiella stephanieae) is easy to keep and care for in a reef aquarium as long as there is food, Aiptasia, to eat and the water quality is kept high and stable (<25ppm of nitrates, 0 ammonia and 0 nitrites). They will do well in most established reefs aquarium. Do not get too worried if you do not see much of your Berghia. They are small, primarily nocturnal and in some aquariums with a lot of corals and live rock you might hardly ever see any. If you want to spot them I recommend that you use a flash light to light up Aiptasia infested areas during night time. If your Sea slugs are introduced to the tank correctly you should start to see a reduction in the amount of Aiptasia in a couple of weeks.
Berghia are very small and add a very small bioload to your tank.
 It is important to remember that just because a fish or invertebrate is reef safe it does not mean that they will not eat Berghia sea slugs. Many popular fish species do sometimes eat them including some wrasses, filefish, butterfly fish and dottybacks. This is not a complete list of fish that might eat Berghia and it is important that you keep an eye on your tank to see if your sea slugs are being left alone. There is also a lot of invertebrates that will eat them including emerald crabs, sally lightfoot crabs, arrow crabs, pom pom crabs and peppermint shrimps. Emerald crabs seldom eat Berghia if there is plenty of algae around for them to eat.
The fact that peppermint shrimp eat Berghia can be a problem since peppermint shrimp often are added to aquariums to control and eat Aiptasia in reef aquariums. They do however enjoy eating berghia and will therefore need to be removed from the tank before you add the sea slugs. Peppermint shrimps are easy to remove using a trap constructed from a PET bottle. Simple cut the top of the bottle and but it back in backwards to create a entrance that becomes more narrow as they go into the trap. Shrimps will find their way out of the trap if you give them enough time so you will need to to check on and empty the traps on a more or less hourly basis. It is not a problem if you leave it longer but it can take longer before you catch all the shrimp if you do.
It is not uncommon for the Berghia to start breeding in your tank. This is nothing that you have to worry about since most of the eggs will be eaten and the population will only grow as the Aiptasia infestation allow. The slugs will start dying of when the Aiptasia has been removed. They can live for 5-7 days once the Aiptasia has been removed.
Berghia sea slugs only eat Aiptasia. There is no point trying to feed them anything else. They get their color from the Aiptasia they eat. They absorb the pigment from the Aiptasia. If you see Berghia that are completely white than this mean that they haven’t eaten in 24 hours. This means that their either is no more Aiptasia in their tank or (in a large tank) that they cant find them. If this is the case you can help the sea slugs by moving them to the Aiptasia. Remember that they are fragile.
It is important that to remember that they will start dying of once the Aiptasia has been eradicated and that this can cause some stress on the water. If you see an ammonia spike at this point than you know that dying sea slugs are the like reason. It can for this reason be good to reintroduce your peppermint shrimps to the tank 2-3 days after you saw the last Aiptasia. Or ideally 24 hours after your Berghia turns white. (IE haven’t eaten in 24 hours) They can then eat some of the sea slugs before they die of. The Berghia die off will however normally not cause a big problem since they are very small and you should only have a small number of them.
Introducing Berghia to your tank
Berghia nudibranch can be rather sensitive when first introduced to a new aquarium and it is important that you acclimatize them well. They should be drip acclimatized for at least two hours before they are put into their new tank. Keep an eye on them during the entire acclimatization process.
Aiptasia anemone. Picture by Smithsonian Institute.
If you acquired your Berghia Nudibranches by ordering online they might not have eaten for at least 10-14 hours (sometimes longer) when they arrive in your home. It can therefor be a good idea to feed them during the acclimatization process. Put a small part of Aiptasia in the bag.
Berghia sea slugs are very sensitive to touch and you should never try to move them into the tank by touching them. There is a great risk that you end up damaging them. The best way to move them into your tank is to use a suitable sized pipette and place them directly on the rock in the vicinity of Aiptasia so that they easily can find food.
Turn of the light and filtration system before introducing the slugs. This will give them the ideal conditions to settle in and grab hold of the live rock. It will also make it easier for them to find the Aiptasia. You can turn the light and filter back on one hour after you introduced them.
Aiptasia will eat these sea slugs if they end up in the mouth area of the Aiptasia. It is therefore very important that you make sure not to put the Berghia directly on the Aiptasia when you introduce them to the tank.
Breeding Berghia Nudibranches
Berghia Nudibranches are easy to breed if you keep them in an aquarium with good stable water quality. They will commonly breed in reef aquariums while being used for Aiptasia control. Since you are reading this text we will however assume that you want to breed Berghia on a more productive and more long term level than simply having them spawning in your main tank. The best way to achieve this is to have a tank where you only keep Aiptasia and Berghia (Aeolidiella stephanieae).
The main problem when breeding these Nudibranches is that you need a stable access to Aiptasia anemones since that is all they eat. The Berghia sea slugs are likely to eat all the Aiptasia in the breeding tank so you will need on or two other tanks for growing Aiptasia as food.
Berghia Nudibranches are hermaphroditic but are not capable of asexual reproduction. In other words they are both male and female but need to mate with another specimen to reproduce. Each Berghia will produce between 1000 to 2000 eggs per batch. Almost all eggs will be fertilized. You can read more about the development of the eggs by reading above under Berghia life cycle. It normally takes between 4-6 weeks before you can see the juvenile Berghia with the naked eye.
Using Berghia to control Aiptasia
Bergia Eating Aiptasia. Watch the video
Berghia is one of the best ways of getting rid of and controlling Aiptasia in a natural way. The sea slugs will find the smallest part of Aiptasia and eat them leaving no trace of them in your tank. You do not have to worry about them growing back unless you reintroduce them into the tank somehow.
Berghia Nudibranches have evolved methods of approaching the Aiptasia that prevent the defensive mechanics of the Aiptasia to kick in. Aiptasia will not attack with their stinger cells nor release planula larva into the water when Berghia slugs approach like they do when other dangers approach. It is believed that this is caused by a the chemical composition of their mucus.
The Berghia nudibranch is able to find all Aiptasia regardless of size using organs called rhinophores and this guarantees that all Aiptasia will be eradicated. Not just larger visible specimens.
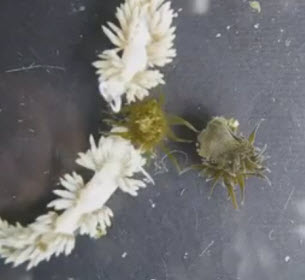
It is important to make sure that your aquarium is infested with Aiptasia and not Majano Anemones before you get Berghia. Berghia sea slugs only eat Aiptasia, they do not eat Majano. Both are common pest anemones but the Majano have shorter more stubby tentacles. The tentacles on Aiptasia is longer and more slender.
Berghia can not get into filters and other equipment. It is therefore important that you clean these areas to make sure that no Aiptasia is hiding there.
These sea slugs are not suitable to treat light infestation (less than 10 polyps) in large tanks over 30 gallons. There is a risk that the Berghia will starve before they can find all Aiptasia.
https://www.youtube.com/watch?v=5caLVzwM-1g
Why it is better to use Berghia to control Aiptasia
Aiptasia is according to me the best way of getting rid of Aiptasia. I like that it is a natural method and it avoids a lot of the problems that is associated with other methods. Some of the most important benefits with Berghia are:
- Berghia nudibranch will find all the Aiptasia in the tank. Even the ones hidden in crevices or too small for the aquarium owner to see and spot treat against.
- Chemical treatments are often sold as reef safe despite containing chemicals that are harmful to other marine life. It might not kill them but it will still disturb their biological processes. For this reason I prefer not to use any chemicals in my aquariums if not absolutely necessary. In the case of Aiptasia it is not because there is a better biological solution.
- Chemical treatments causes the Aiptasia to die more or less all at once. This causes a lot of stress on the water. When you spot treat you can to a degree lessen this problem by treating different patches of Aiptasia at different times but you still get an entire patch dieing all at once and polluting the water. Using Berghia you do not get the water pollution problems since the Aiptasia is slowly consumed over a couple of months.
- When the Aiptasia is gone you know it is gone. The sea slugs will not miss any Aiptasia and you do not have to worry about it growing back.
How many do I need
How many Berghia snails you need to control and eradicate the Aiptasia in you tank depends on how severe the infestation is. You should usually have 8-10 slugs per 100 gallons of water but if you have very severe infestation (more than 100 Aiptasia per 100 gallon) you might want to consider a higher number of snails.
How long does it take
Berghia snails is not a quick solution to Aiptasia control. It is however a natural method that will be able to remove all Aiptasia. The ones you see and the ones you do not see. It usually take a couple of weeks before you start seeing a noticeable difference. In 2-3 months the tank should be completely free of the infestation. Berghia is a great way of getting rid of Aiptasia without having to use chemicals.
References:
Valdés A. (2005). “A new species of Aeolidiella Bergh, 1867 (Mollusca: Nudibranchia: Aeolidiidae) from the Florida Keys, USA”. Veliger 47(3): 218-223.
Felder, D.L. and D.K. Camp (eds.), Gulf of Mexico–Origins, Waters, and Biota. Biodiversity. Texas A&M Press, College Station, Texas.
WoRMS (2013). Aeolidiella stephanieae Valdés, 2005. Accessed through: Tunnel, W.; Moretzsohn, F. (2013) Gulf of Mexico register of marine species at http://www.marinespecies.org/aphia.php?p=taxdetails&id=389717
Responsible Fish Keeping
There certainly can be many conflicting opinions whether or not you can keep certain marine fish (most notably tangs) in certain sized aquariums. This can even become an emotional topic for many hobbyists. However, as the plural of anecdotal is not “fact”, I would challenge some of the commonly accepted facts / opinions that you read about on-line and further suggest to you to research these topics for yourself. In my opinion, completing your own research from credible sources is the only way to demonstrate responsible fish keeping though focusing on the facts. The below is a few examples of how I will approach keeping tangs to help give you better understanding of what I am talking about.
1) Proper Sized Aquarium
Don’t be fooled, conventional rules of thumb on tank size should not be considered a hard fast rules, but only used as a starting point to determine proper tanks size. That is why most people state tank sizes as “minimum aquarium size” and not as “ideal aquarium size”. I have seen tangs which appeared to do well in a 120 gallon tank for many years, and yet I have seen the same type of tang suffer to the point of eventually dyeing in a 230 gallon tank. So which tank is was the correctly sized one? And just to make matters a little more complex, different tangs have different requirements so you do have to keep in mind, not all tangs will have the same needs. How long and wide a tank is along combined with how much swimming space they would need is what you will need to determine in order to find a properly sized tank for the specific tang you would like to keep. I have always found the amount of open swimming space was one of the most critical factors to think about. Having a tang in properly sized tank will do no good if you use up the space in the tank by placing large amounts of rock and/or large amounts of tall corals. In the example I just mentioned above, the 230 gallon aquarium had far too much rock in it (at least in my opinion) and had a lot of extremely large SPS corals which limited the amount of swimming space to less than what was in the 120 gallon tank. That is why I choose to stock based on the open swimming space (open water area) within the tank after I have all my planned rock and corals in there. I will typically refer to published research papers and books written by credible authors in the field when determining the proper aquarium size and swimming space required.
2) So how big will my tang get?
Many sites will list the maximum scientifically measured size of a fish as their adult size. I think it is more realistic to look at the average size of a fish. After all, the tallest person in the world was well over 9 feet tall, yet all of the doorways into our homes we build today are around 7 feet with around 8 to 9 foot tall ceilings inside the home. This doesn’t mean you or I were stunted by our home, just that we are closer to average height as compared to the tallest person in the world. There are a few other factors that also make the average size of a fish size as a better approach to use
– In the wild the more dominant male, or “super male” will tend to get larger than normal which will not occur within a home aquarium
– Fish will not get as large in captivity as they do in the wild. I have read studies that showed fish in captivity typically get to between 66 and 80% of the normal or average size in the wild. These same studies also concluded these same fish were not stunted due to their: healthy appearance, normal behaviors, and long life span.
Once again, I will typically refer to published research papers and books written by credible authors in the field when determining how big a fish will become over time.
3) What about keeping multiple tangs?
For long term success, you should either keep a single tang, or a group of around 5 or more assuming your tank size and filtration can accommodate them. Many different types of tangs will typically not tolerate other tangs of the same species or a species that look very similar to themselves, while others can be just plain bullies. You will always have at least a small element of risk with keeping multiple tangs as these fish can be a lot like people, each with their own personality and disposition. Sometimes you can complete more than enough research but you just won’t know for sure how it will work out until you try it. Just be prepared to watch carefully and react quickly should things not work out the way you expected. Once appropriate tank size, fish size, and swimming space has been validated, you will need to determine what type of territorial needs each fish has if you are keeping more than one, and what would be the best approach to take when adding these fish to your set-up. I would include all fish (and not just tangs) into this part of the process.
Many have suggested keeping tangs in odd numbers, like 5 or 7. I have often wondered about how important this actually is, after all, can tangs count? I would guess the most critical element would be to keep them in higher numbers, the more the better (assuming you are not overstocking the tank as already mentioned). However, I will typically refer to published research papers and books written by credible authors in the field when considering keeping multiple tangs in a single aquarium.
4)Are there other things to consider ?
Putting all personal opinions aside, we can all agree that good aquarium husbandry will be just about the most important aspect of keep in any fish. The two other critical elements that will also have to be considered are:
1) Water parameters
2) Diet
This can be just about the easiest part of your research to complete. As the tangs that I keep come from the in or near our coral reef, I try to keep the water parameters as close as that of the coral reefs as I can. The below link can explain that in a little more detail. The proper diet is also fairly easy to identify with a little research from published research papers and books written by credible authors in the field.
https://www.reefaquarium.com/2013/the-basics-of-marine-aquarium-water-parameters/
5) How do I know when I have made the correct choices?
When you have completed the proper research, things should be going great and you will be enjoying your aquarium for years to come. So, what does it look like when things are going good? Basically, you should have a healthy fish that looks and acts normal. The below list are just a few things that will give you a indication when things are going well:
-No signs of chronic disease.
-No signs of abnormal coloring or body shape.
-No signs of abnormal behavior.
-Strong appetite when offered a proper diet.
-No signs of abnormal stress, which is typically shown as higher than normal respiration rates.
There can be many different signs to watch for which can be a indication that you may not be providing a proper home for your tang, or any other type of fish as well. You can take the list above and watch for the opposite. However, there are a few other things to watch for that could be a indication your fish is in a aquarium that is too small. These things can include:
-Bruised nose.
-Bent or torn fins.
-Shortened life span.
I’m not trying to make things seem more complicated for you when trying to determine proper aquarium size and environment for your planned fish. I just want to give you some guidelines to think about when completing this research for yourself based on what I have learned completing my own research along the way. There is a lot of information available on line and in forums, but not all of it is good. You need to be able to find credible information from experienced people and start form there. The better quality information that you find, the easier the research will become and you will have a better and healthier aquarium because of it.
Some additional references:
http://coralmagazine-us.com/content/arrested-tang-police-i-refuse-confess
http://microcosmaqx.typepad.com/jay_hemdal/2009/01/beware-the-tang-police.html
http://www.tfhmagazine.com/saltwater-reef/feature-articles/putting-fish-back-into-the-reef-tank.htm
CSC 450 in Sump Skimmer – Product Review
Rating Overview: 4.5 out of 5

Details of my ratings along with the manufacture’s specifications are contained below.
Manufacture Specifications
The below is taken directly from the distributor’s website for this skimmer:
http://www.aqua-digital.com/skimz/
SKIMZ specializes in designing and building the most advanced marine equipments for professionals and hobbyists. Their are committed to bringing you the widest range of excellent equipments at an affordable price for your marine and reef aquariums.
SKIMZ Singapore LLP begun in early 2000, focusing the initial years in aggressive product research and development, with the aim of bringing the best possible marine equipment to professionals and hobbyists. Today, Skimz carry the widest range of outstanding equipment to suit your needs. They even customized a whole range of equipment for aquaculture farms and the marine industry.
SKIMZ uses the best material and latest technology in the manufacturing of their equipment. The result: To bring to you equipment of the finest quality! All SKIMZ protein skimmers undergo the prestigious TÜV Rheinland testing, a testimony of quality products meeting the highest technical requirements. SKIMZ strives for continual improvements to our products. Lots of useful information are available on the Skimz website.
|
Technical Data: Technical Data: two SICCE PSK1200 needle wheel pumps (110V/60Hz) 0.938A/52W Dimension: Volumn rating 500 gallons This skimmer is made from taking a Skimz SK251 skimmer (link below) and replacing the original pumps with Sicci PSK1200 pumps. http://www.skimz.sg/products/protein_skimmers/kone_subpage/sk251.html |
The below is my own assessment using a CSC 450 in sump skimmer
Price Point (4 out of 5):
While this skimmer is still reasonably priced for a skimmer of this size, it is a little bit lower priced than other skimmers that perform just as well or at least close to the CSC 450 skimmer. You can typically find these skimmers brand new ranging anywhere between $650.00 and $800.00 throughout Canada and the USA.
Ease of Use and Set-up (4 out of 5)
This is not exactly “plug-n-play”, but it is not that hard to set-up and use. The instructions are clear and this skimmer should take you less than 5 minutes to assemble even if you have never assembled a skimmer before. There are a few pictures showing some of the steps involved in stepping up and maintaining this skimmer at the end of this review.
Overall Size (5 out of 5)
This is one of the qualities that I really like about the CSC 450 skimmer. It has a very small foot print as well as being shorter than most other skimmers with similar capacities.
Noise Level (5 out of 5)
This is another good aspect of the CSC 450 skimmer. It makes very little noise when running and I would even say it would be the quietest of the skimmers with this type of capacity, but that is only my opinion.
Ease of on-going Maintenance (4 out of 5)
The one thing that I both like and dislike at the same time is how the CSC 450 skimmer is designed to be taken apart. I do really like how easy it is for everything to come apart and be cleaned very well, but I do not like the amount of screws that are needed to remove in order to take it apart. I find the large size of the cup to be of great benefit to this skimmer. I have it set for a thinner skimate and I have to empty the cup every 2 to 3 days.
Effectiveness of Operation (5 out of 5)
The CSC 450 comes with two Sicci PSK1200 needle wheel pumps which very efficient and top rated skimmer pumps. They can produce a very fine and thick layer of bubbles once the air intake is adjusted correctly. This skimmer is a 6 out of 5 in my books. The only draw-back to this skimmer that I have come across so far is the length of time it took to break in. My skimmer took about 2 weeks to break in and another 2 weeks for me to find the best depth of water for this skimmer to sit in. It can be a very touchy skimmer to set-up, but when it`s broken in and you have it set for your tank, it will perform amazingly well.
I found the best place to start this process is to have the skimmer in 7 inches of water with the gate valve 80% open and both air valves 100% open. After a week of running, adjust the gate valve slowly closing it until you get a good amount of skimate in the cup. If you want a thicker skimate, raise the skimmer slightly so it is sitting in less water. This skimmer safely run in as little as 6 inches of water, and will produce a very thick skimate in lower levels like that.
Likeliness of Recommending this Skimmer to Others (4 out of 5)
This would be one of the true ways to really assess how well this skimmer preformed for anyone. In short, this is among the best of the larger skimmers that I have used and I typically recommend this skimmer to people that have enough room in their budget for one. This is also one of the few skimmers that I would at least somewhat agree with the manufactures recommend tank size for use. I have been using this skimmer on my heavy stocked 180 gallon aquarium with a 100 gallon sump and I am very happy with the performance and resulting water quality. I feel this skimmer would be capable of a handling a larger set-up with a much larger bioload.
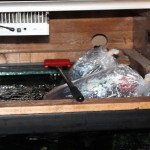
Below are a few pictures of when I had set-up my CSC 450 skimmer


And the below picture was taken 3 or 4 days after a skimmer cup cleaning
