Some Algae Scrubber Basics
Sometimes there just is no substitute for Mother Nature. You could make an argument that this is one of those times. While the use of algae scrubbers as a form of filtration certainly is not a new concept in the hobby, it remains a very effective and easy approach to reducing nitrates and phosphates from your marine aquarium. I thought I would share my approach to building and using an algae scrubber and what I have learned about some algae scrubber basics
There are different approaches and styles of algae scrubbers out there, some are better than others. I will only be discussing the most common style of algae scrubbers, the vertical waterfall style as in my opinion that is the most efficient design as well as the one that I have the most experience with.
There are companies out there that will build and ship an algae scrubber to you. Even if you are not handy enough to build your own scrubber, it would be worth your while to understand the key elements of an efficient scrubber so that you will know what you are purchasing. If you have some skills with do it yourself projects, building an algae scrubber should not be a problem. I will briefly explain the most important elements of an algae scrubber then show you how I had built a scrubber for one of my tanks.
Planning
This is one of the more critical parts of building a scrubber. The three most important aspect of an effective scrubber are: the size of the screen, water flow, and lighting. By designing your whole scrubber around these three elements, you will end up with an efficient and effective method of removing nutrients from your set-up. Based on my experiences, you cannot cut corners here and expect good results.
1) The size of the screen:
The screen is what provides the algae with a surface area to grow on and will limit the total amount of algae you can grow. The bigger the screen the more algae can be grown, and the more nitrates and phosphate can be consumed and removed from your set-up. There is a simple formula that I had found for this that has allowed me to be very successful. If your screen will have lighting on both sides, then you should have one square inch of screen for each gallon of your display tank. If the screen will only be lit form one side, then you should have 2 square inches of screen for each gallon of your display tank. These would be the minimum sizes for an algae scrubber screen.
For example: if you are planning a algae scrubber for a 90 gallon aquarium using a screen lit from both sides, you will need a 90 square inch screen. That could measure 9” X 10”, 10” X 9”, 6” X 15”, or even 5” X 18”. You just need to choose the size that best fits the space you have and can be lit form both sides.
2) Flow:
The most common rule of thumb that I have found is to have a minimum of 35 GPH for each inch of screen width that you have. If you have a screen that is 9 inches wide, then you will need 315 GPH of flow getting to the screen (9 inches X 35 GPH = 315 GHP). Keep in mind; this is the minimum flow that you should aim for. I would recommend a slightly higher flow as more can certainly be better as algae performs best with higher levels of flow. More flow typically results in more nitrates and phosphates being removed from the water.
3) Lighting:
The two important aspects of lighting to keep in mind is the intensity of the lighting, and the color temperature. Marine algae will do best with warmer color tones, ranging between 2,700K and 3,500K. As for the intensity of the lighting, you should be planning for 0.5 to 1 watt per square inch of screen size as a minimum. If you have a 9” X 10” screen lit from both sides, then you should have 90 watts of lighting on each side of the screen. If you have a 9” X 20” screen lit only on one side, you would need 180 watts of lighting on that side of the screen. And as almost all of you can appreciate, the more light you put on something, the more algae it can grow, and increased growth results in more nitrates and phosphates being taken out of the water.
A Few Examples from my Algae Scrubber Build
The below is an example of screen that I had put on a scrubber for a 180 gallon tank. I had to learn the hard way to use a properly sized screen. I originally had a 12 X 10 inch screen but only got limited results. Once I increased the screen size, I noticed improvements in the results.
The screen size I ended up with was 12” X 15”. As with anything you place in your aquarium, it needs to be safe for using in your set-up. Most people (like myself) have been able to find plastic screens that are sold to be used for knitting / needle point which are available in most arts and crafts stores or in the arts and crafts section of most big box stores.
When you find a plastic screen to use, you will notice it has a nice smooth surface which will not provide a good enough surface for the algae to grab on to and grow. You must ensure that you rough up the screen very well. I got the best results by using a hole saw drill bit. I took the bit in my hand and ran it over the screen many times and from many different directions.

Now that my screen was ready to go, I build the scrubber frame to attach it to. I prefer using PVC pipe for this as it is a little stronger than ABS pipe and less likely to wrap over time. I built the frame big enough to hold the algae screen, and the lights. Wither or not your frame will need to be strong enough to hold your lights will depend on how you would like to set up your scrubber and lighting.
One of the most difficult parts of building a scrubber can be cutting the 1/8 inch wide slit in bottom edge the PVC pipe for your screen to fit into. Many people have found it easy to use a dremel power tool with a cutting blade for this. As I have a table saw, I just set the blade to the proper height and used the table saw to cut the slit along the bottom of the pipe (pick below). Once that was done, I could assemble the rest of the scrubber frame.
As my screen is 12 inches while, I need to make sure the slit in the pipe was exactly 12 inches wide as well. This also meant I will need a minimum of 420 GPH (12inches X 35gph = 420 GPH) which will work as I will get between 500 and 550 GHP flow by using one of the spare ½ inch lines from my return pump line back into the display tank
When you attach the screen to the frame, make sure your screen is inserted at least ¼ inch inside the slot you cut before attaching the screen to the pipe. I like to use plastic strap ties to hold the screen in place.

I also used two small sheets of clear acrylic to make a splash guard. The reason for this is that I wanted to put the lighting very close the screen. Having lighting close to running water can be dangerous without anything in place to protect the light fixture from getting splashed with water. As a special safety note here, I would also suggest you use a GFIC circuit to plug your lighting into to help prevent any electrical accidents

For lighting I had taken a little different approach as compared to the traditional method. As I already had two 16” square LEDs panels, I decided to use them. Each panel produces 240 watts of 6700K lighting. Ideally I should have 180 watts of 2700K to 3500K. I can compensate for the higher than ideal color temperature with the higher wattage of lighting. Having the lighting as close to the screen as possible also helps a lot here.
Many people use CLF bulbs for lighting on their algae scrubbers as you can easily find warmer color temps closer to the ideal color temperatures that marine algae grows best on. I have also seen a few people using red LEDs which also seem to provide good growing results in a well planned scrubber.
If I did not already have these LEDs, I would have used CFL bulbs (likely two bulbs per each side of the screen).

Once I had everything assembled, I put the scrubber in the sump, hooked it up to the return line, and ran it a for a few days to make sure there were no leaks and it worked as it should

When I was happy with the leak free performance, I added the lighting to the scrubber so I could start growing algae.

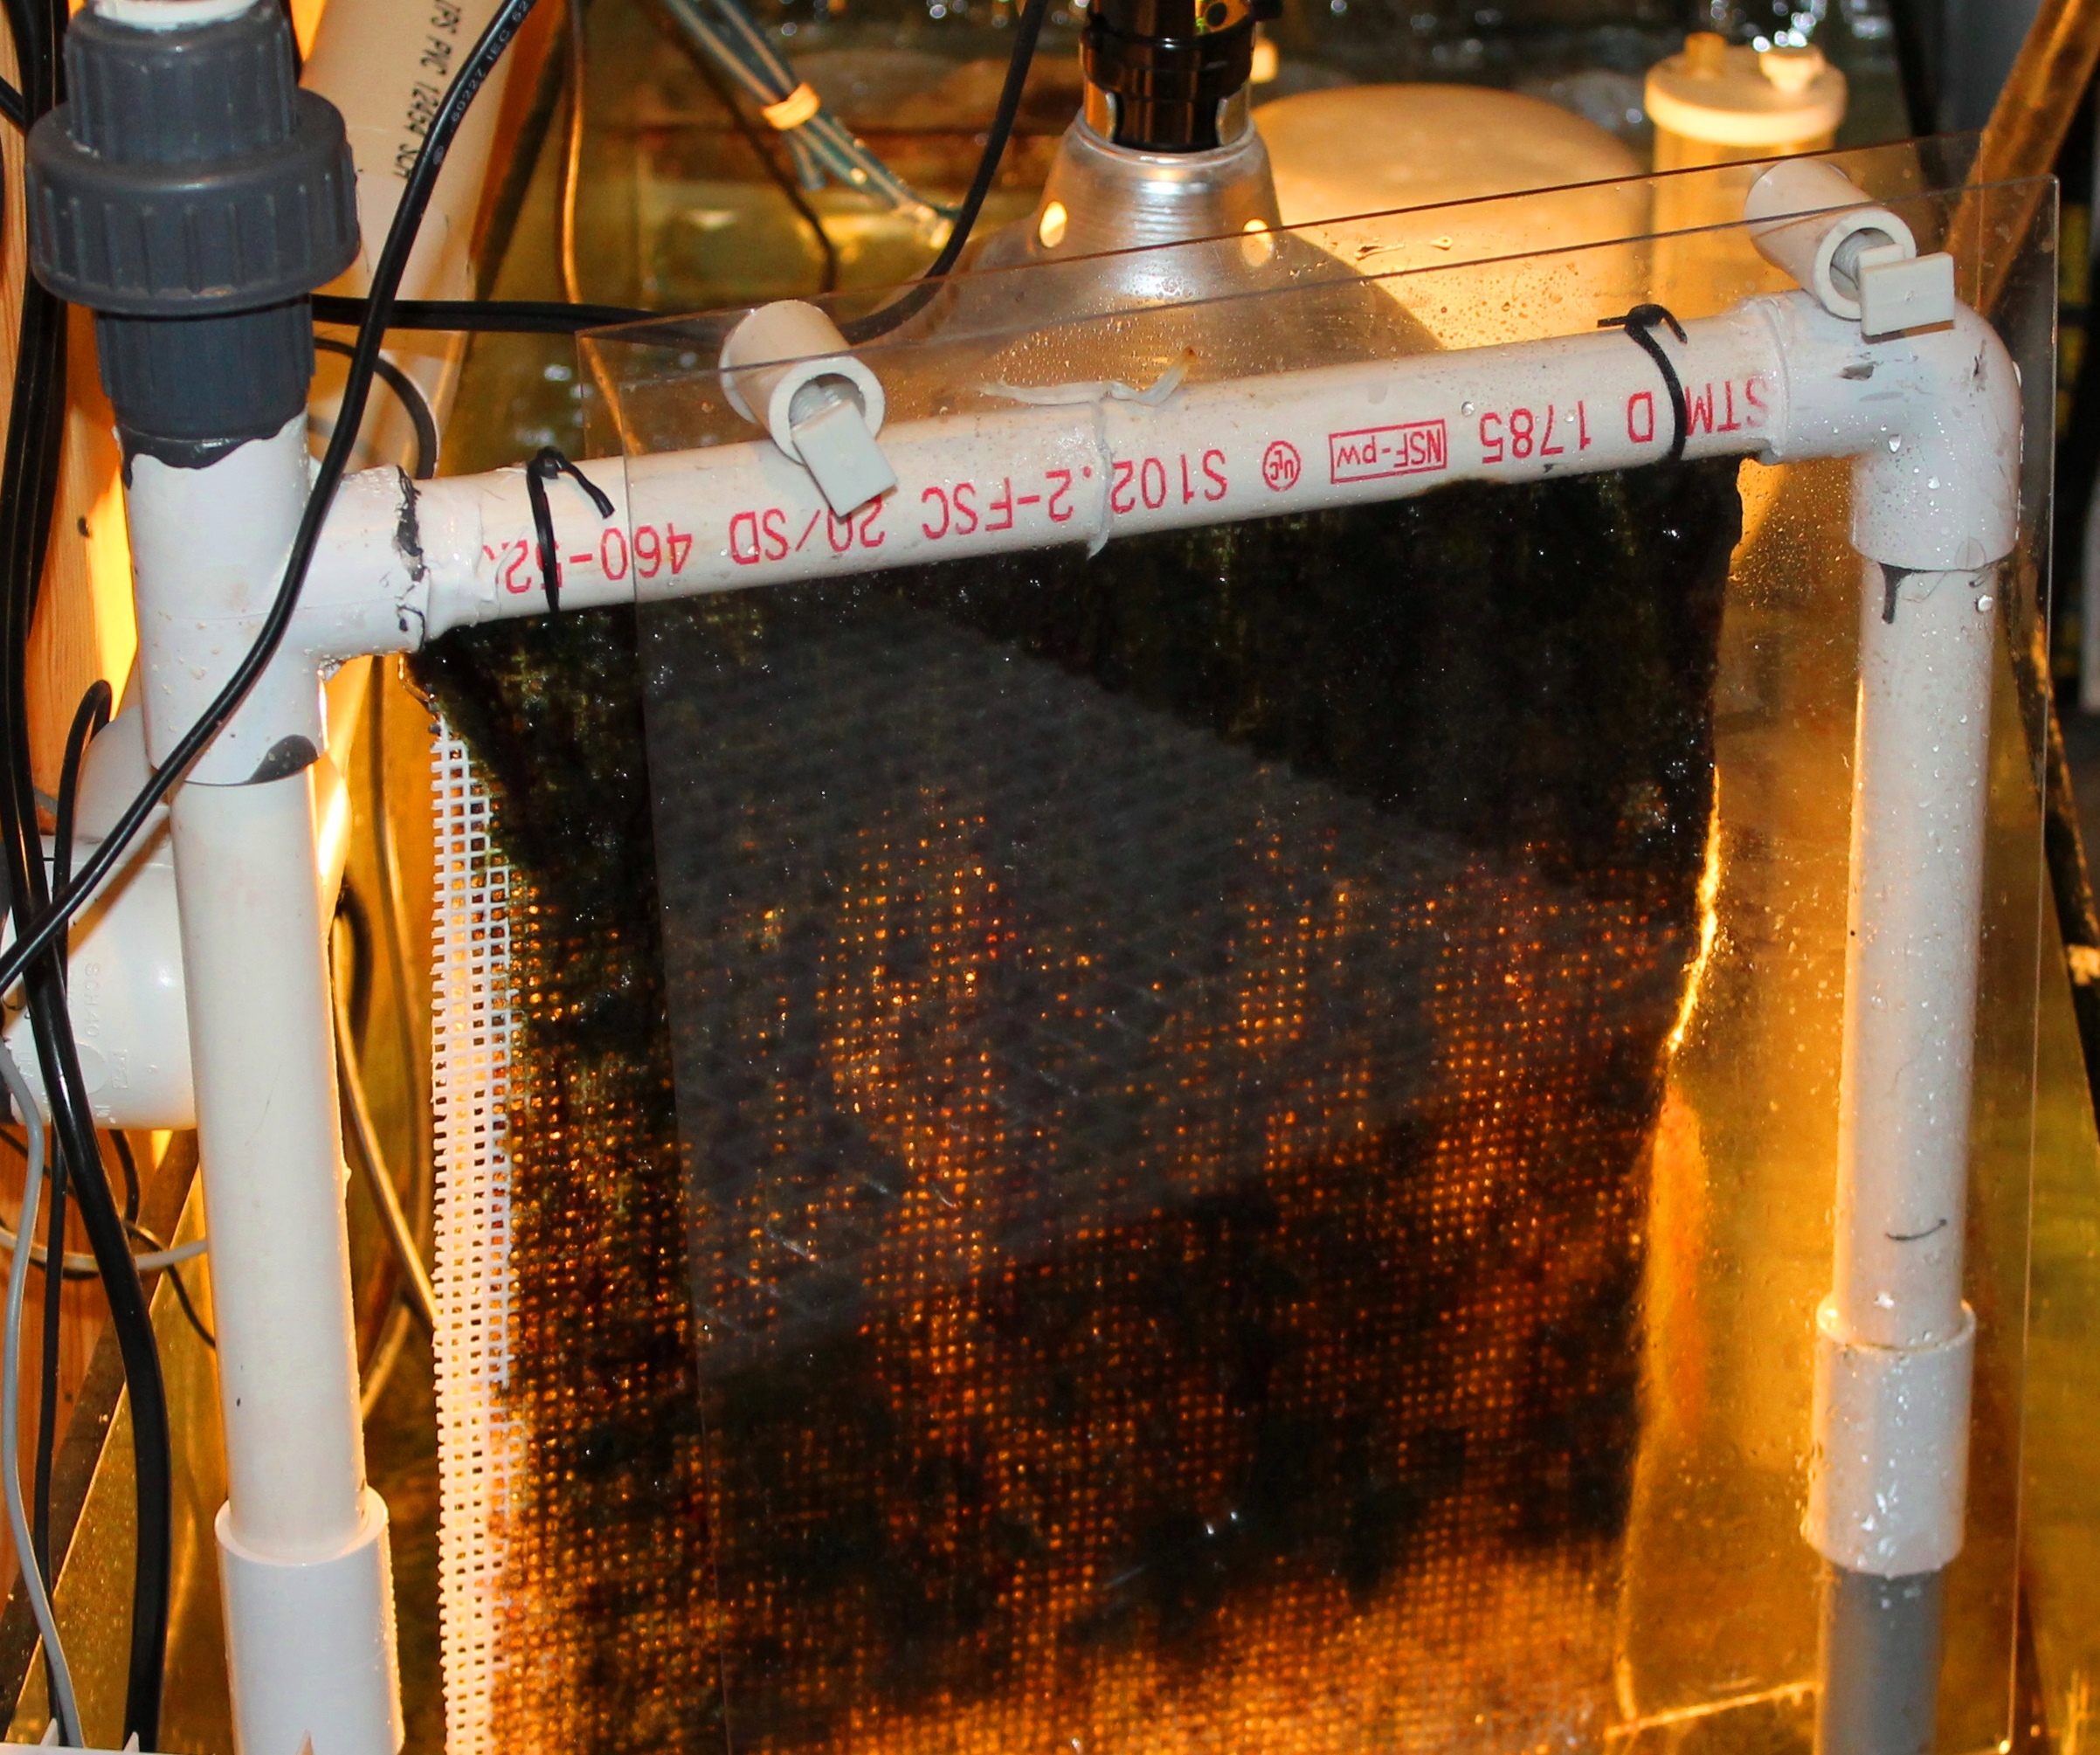
After two or three weeks, I was getting some very good algae growth and I started seeing improvements in my water parameters. I had to remove the lights in order to show the algae growth. In the few weeks that followed after this picture was taken, the algae developed even more of a green color to it, as well as developing a texture very similar to the hair algae that you can get in your marine aquarium.

It is also best to have the algae scrubber lights on a timer to help maximize their efficiency. They will work best if you have you scrubber lights on for around a maximum of 18 hours. All forms of life need some “down-time” and algae is no exception. It is also best to have the algae scrubber lights on a reverse schedule from your main tank lights to spread out the photosynthesis processes over a 24 hour period allowing for a more stable pH.
Routine Maintenance for an Algae Scrubber
As you algae develops and begins to grow, it can be very common to see it go through a few different stages of development. It will typically start off looking like a brown or black slimy sludge like substance. With time it will get less and less slimy in texture and start to develop more of a brown to green like color. Once the algae has mostly green coloring to it, you are now starting to grow the more efficient nitrate and phosphate eating algae.
While the algae is still in the brown(ish) color stage, you should clean off the scrubber screen about twice a week (once every three or four days). Once the algae is most green in color, I would suggest cleaning off one half of the scrubber screen one week, and the second half the next. This will help to maintain constant performance from your scrubber and allow you to clean off all of the algae every two weeks. When I clean my scrubber screen, I will take a plastic scrapper and remove the excess algae only leaving very small amounts of it in the spaces in the screen.
Also, make sure you are checking the slot in the pipe to ensure there is nothing there which could slow down the flow to the screen.
Note:
I would also like to mention that many hobbyists also use a algae scrubber on their freshwater aquariums and have reported some very good results. I have no firsthand experience with fresh water scrubbers, but you will be able to find some good information on this topic in the references listed below
There are many different approaches to building an algae scrubber as well as scrubber designs for aquariums without sumps that you can try. The below link and reference for this article can give you a lot more detailed information then what I have provide in this document.
If you have questions related to aquarium plumbing and how that can effect flow rates, the below link should be able to answer most of your questions
https://www.reefaquarium.com/2012/aquarium-plumbing-basics/
The below Algae Scrubber References are some of the best that I have found anywhere.
http://algaescrubber.net/forums/showthread.php?1291-Algae-Scrubber-Basics-The-Summary
http://algaescrubber.net/forums/forum.php
And some detailed reference material for those of us who want to dive very deep into some of the details
http://mysbfiles.stonybrook.edu/~ngownaris/MacroalgaePoster.pdf
http://www.int-res.com/articles/meps/134/m134p207.pdf
And some links to show you some of the other approaches to building a algae scrubber if a more traditional approach is not practical for your situation
http://algaescrubber.net/forums/showthread.php?2638-My-AquaClear-110-UAS-build
http://algaescrubber.net/forums/showthread.php?1687-The-new-Upflow-Algae-Scrubber-%28UAS%29
http://algaescrubber.net/forums/showthread.php?28-Hundreds-of-Waterfall-Scrubber-Designs
Good writeup, came across it on a random Google search!
I was the one who wrote the “Algae Scrubber Basics” summaries (Floyd R Turbo). Just a few comments, you sized your screen to be 2 sq in for each gallon, this is actually twice the size of the old volume-based guideline which was 1 sq in per gallon, but now screens are recommended to be sized according to the amount you feed. About a year and a half ago, the recommendation changed to 12 sq in (LxW) for each cube of food fed per day.
Also you’re a little off on the lighting, it’s 1W CFL per sq in split between both sides for “normal” level (LxW=90 sq in = 90W total, or 45 per side) or 2x that for “high” level light (which would be 90W per side) but then 1/2 of the photoperiod.
For the single sided screen, go right to the high wattage level because single sided screens are weaker due to shading happening quicker, meaning a 180 sq in screen would have 180W of light, all on one side.
For LEDs, it’s a different game, one 3W Deep Red (not 2700K Warm White) LED on each side of every 8 sq in of screen for normal level light, and one on each side of every 4 sq in for high level light (recent guideline recommendation). For low-power LED panels, there really is not much of a guideline because in general they are not considered to be very effective per unit area. So for your build, with a very much oversized screen that is underlit, it will work fine, but it will have limitations on capacity, meaning that 90 sq in / 12 = 7.5 cubes/day is not what the screen can handle, probably 1/4 of that at best – or about 2 cubes/day. Which is great, if that is what you feed, and if it works for your tank – keep it as is!!
Hey Bud
Thank you very much for taking the time to add your comments. I am very grateful that someone with you vast knowledge and experience has offered some of their insight here.
I am actually experimenting right now with a pair of red CFL spot lights, 23 watts each, one on each side. I know that is a little lower level than what I should have, but I want to see the effects of a red specturm of light. So far the growth rates have improved, however, I have also increased the stocking level and total amount of feeding in the tank as well. 4 weeks in and I still have nitrates and phosphates are undetectable by my salifert test kits and minimal (almost no) algae in the display tank. I will up-date this post once I have a few more weeks of use with the red CFL lights
Excellent information. I am presently running with CFL lights and getting good results with following details.
Screen size – ( 6 x 7 ) 42 sq.in.
Light – 15 Watt CFL light each from both side.
Feeding – 2 cubes per day.
Flow rate – 150 GPH
Tank Capacity – 50 Gallons.
Glad you found the information helpful
How long has your scrubber been up and running, what type of growth are you getting ?
For 4-5 months but often I try to redesign the thing as per guideline from net. Every day I am educating myself for the basics of Algae Scrubber. Sometime I try to change the screen from plastic net to thin synthetic pad used for power head filtration which is very much rough and surprisingly I get far better green algae growth . Presently I am trying to increase the flow rate by changing the pump itself.
However I am very much grateful to the information collected from yours as well as from others web site also.
I am running scrubber successfully. After running the scrubber with CFL light presently I am running LED light which normally used for hydroponic with red and blue LED and it seems to be O.K. I have some question. I used to put off the light as well as stop the water flow at a time for 7 hours and start at a time both water flow and light for 17 hours. I don’t know whether I am correct or not. But my system seems to be O.K. pl. answer.
Do not turn off the flow of water on your scrubber. In order for your algae to grow as it should, it will need water flow 24 hours a day 7 days a week
As for your lighting, I have found the best results to have the lights on for about 18 hours and off for 6 hours. Just make sure when the scrubber lights are off, that your main tank lights are on in order to help better stabilize your pH.
Many thanks for your valuable reply. I will do so as per your recomendations.
Best regards,
A K Banerjee
Presently I am running FW 50 Gallon tank with only algae scrubber filter successfully as per your guideline. Now after gaining experience in FW I like to switch to SWFOLR setup or SW with reef only. But in this setup also I like to put only ALGAE SCRUBBER as a filter which is nicely working in my FW setup. What is your recommendation so that I can start up as per your guide line. Do I need any other filtration? Pl. help.
Banerjee
Glad to hear things are going well for you
I would suggest using an algae scrubber, live rock, and a skimmer when you set-up your salt water tank. The scrubber will allow you to control you nutrient levels helping to keep your set-up free of nasty algae, the live rock will help you to not only filter the water, but help to maintain calcium and other needed trace elements in your water, and the skimmer will help with both your water quality and your oxygen levels. Based on the different aquariums that I have set-up over the years, I have found that approach to filtration to be the best, hands down.
Assuming you are startiung with a empty set-up, fill the tank with saltwater mixed to correct salinity and add your live rock first along with your powerheads, allowing the rock to cycle. Once the tank has cycled, add the algae scrubber. Once that is working OK, add the skimmer and the rest of your planned equipment (keeping the lights turned off on the display tank only). Once the skimmer is broke in, then you should start stocking the tank and run it like you plan to. You will likely get good initial growth on the scrubber, but that will be limited only until you start stocking your tank. Taking this approach to getting it all set-up has always worked grate for me. I have never had to worry about water quality problems
The below links can also help
https://www.reefaquarium.com/2013/common-approaches-to-filtration-in-marine-aquariums/
https://www.reefaquarium.com/2012/cycling-a-marine-aquarium/
https://www.reefaquarium.com/2012/protein-skimmers/
https://www.reefaquarium.com/2013/selecting-a-new-skimmer/
Thanks for your guided reply. I will try my best to follow. But before that I require some time for shifting from one setup to other and I will inform you for your final guideline.
Best regards,
A K Banerjee
Is ATS suitable for planted tanks?
Yes, but it will compete with the plants for nutrients
Cliff are you on the wast coast? Socal (I hope) i am planing a reef tank and would love to take you out to lunch or dinner. jst want to pick your brains before i spend a dime.
I am in Canada