Tag Archives: skimz E-series SK181 Protein Skimmer
Skimz SK181 in Sump Skimmer – Product Review
Rating Overview: 4.5 out of 5

Details of my ratings along with the manufacture’s specifications are contained below.
Manufacture Specifications
The below is taken directly from the manufacture’s website:
http://www.skimz.sg/products/protein_skimmers/kone_subpage/sk181.html
Skimz E-Series SK181 Protein Skimmer features the highly efficient Skimz ES2000 needlewheel pump, suitable for aquariums up to 750 litres. With the combination of the conical body and bubble plate, it is the most effective skimmer in its class by significantly reducing turbulence, bubble bursting and surface agitation.
|
The SK181 protein skimmer draws an air intake of 540 litres per hour. Low power consumption and superior performance makes the SK181 an excellent choice for reefers looking for a value-for-money, attractive yet powerful protein skimmer. No feed pump required. Skimz Sk181 draws water directly from sump. |
|
Technical Data: Skimmer pump: 1 Skimz ES2000 needlewheel |
The below is my own assessment after a few years of using a SKIMZ SK181 in sump skimmer
Price Point (4 out of 5):
While this skimmer is still reasonably priced, it is a little bit higher priced than other skimmers that perform just as well or at least close to the SK181 skimmer. You can typically find these skimmers brand new ranging anywhere between $375.00 and $475.00 throughout Canada and the USA.
Ease of Use and Set-up (4 out of 5)
This is not exactly “plug-n-play”, but it is not that hard to set-up and use. The instruction are clear and this skimmer should take you less than 5 minutes to assemble even if you have never assembled a skimmer before. When following the instructions to adjust this skimmer, you should have it dialed into your set-up after about 15 to 20 minutes of minor adjustments and abservation. I do like the fact that once you have your skimmer adjusted correctly, it will need almost no routine or even minor adjustments from that point on. The Skimz SK181 also started pulling some pretty nasty looking crub out of my water within about 2 to 4 hours of taking it out of the box and setting it up. There are a few pictures showing some of the steps involved in stepping up and maintaining this skimmer at the end of this review.
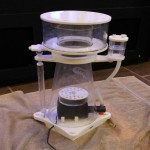
Overall Size (5 out of 5)
This is one of the qualities that I really like about the Skimz SKS181 skimmer. It has a very small foot print as well as being shorter than most other skimmers with similar capacities.
Noise Level (5 out of 5)
This is another good aspect of the Skimz SKS 181 skimmer. It makes very little noise when running and I would even say it would be among the quietest of the skimmers with this type of capacity.
Ease of on-going Maintenance (4 out of 5)
The one thing that I both like and dislike at the same time is how the Skimz SKS181 skimmer is designed to be taken apart. I do really like how easy it is for everything to come apart and be cleaned very well, but I do not like the amount of screws that are needed to remove in order to take it apart. I find the cup to be on the small size. I have it set for a thicker skimmate and I have to empty the cup every 5 to 7 days. However, these are very minor complaints when compared to the other aspect of this skimmer.
Effectiveness of Operation (5 out of 5)
The Skimz SK181 needle wheel pump design is very efficient, producing a very fine and thick layer of bubbles once the air intake is adjusted correctly. It comes with the Skimz ES2000 needlewheel pump in it. This skimmer is a 6 out of 5 in my books. Within hours of taking this skimmer out of the box, it started removing a lot of gunk from the water and it just kept getting better from there. Even after a few years of use, it is still removing an amazing amount of stuff from the water. The below picture is what I get in the cup after around 36 hours of use, even after running this skimmer for a few years.

Likeliness of Recommending this Skimmer to Others (4 out of 5)
This would be one of the true ways to really assess how well this skimmer preformed for anyone. In short, this is among the best skimmers that I have used and I typically recommend this skimmer to people that have enough room in their budget for one. This is also one of the few skimmers that I would at least somewhat agree with the manufactures recommend tank size for use. I have been using this skimmer on my moderate to heavy stocked 180 gallon aquarium with a 100 gallon sump and I am very happy with the performance and resulting water quality. Although I do feel that is seriously pushing the limits of this skimmer with my set-up, this is not the only form of filtration and nutrient export that I have on that set-up. I would have absolutely no concerns using this skimmer on heavily stocked set-ups up to 150 gallons in size (combined display tank and sump water volume) or lighter stocked tanks slightly larger.
This skimmer is also an excellent choice for a smaller or limited size sumps due to the small foot print taken up by the skimmer and its relatively shorter height.
Some Additional Information:
The skimmer pump can be maintained by removing the four screws (two on each side of the pump) from the front plate allowing you to remove the front plate and then the needle wheel assembly for cleaning. When you purchase a Skimz Skimmer the motor will come fully assembled.


The below shows all the parts of the skimmer as you would unpack them when you purchase this skimmer. I never did think to take any pictures before assembling my skimmer when I purchase it new. These are pictures taken after a detialed cleaning a did a little while ago.

Start by adding the bubble plate chamber to the pump


Slide the pump onto the skimmer base. It will lock into place.

Attach the skimmer body to the skimmer base

Attach the micro adjustable valve to the skimmer body

Attach the air intake assembly to the skimmer body and the skimmer pump

This only leaves the skimmer cup and skimmer cup lid and you are done.


When picking out a skimmer for your set-up, I would refer you to the below article which may help you select the correct skimmer for your aquarium