Author Archives: Cliff

Tip of the Week #1
When I took survival training while I was in the army, we were always instructed to get enough firewood to last you through the night and to complete this task before sunset.Once you had what you thought was enough firewood, get three times more fire wood that what you have. I have found this same simple principle should be applied to planning and learning about your marine aquariums.Once you think you have read and researched enough, you could stand to research some more (me included).
I have found the best way to accomplish this is by reading books and articles published by credible and experienced hobbyists combined with talking to fellow hobbyist and taking a good look at how they have set-up their aquariums. Forums and blogs can be very helpful for you fill in the gaps or help you decide between the many options and approaches you are going to become exposed to. This also is one of the aspects of the hobby that many people enjoy almost as much as they enjoy their aquariums itself.
The below are some articles that I found interesting and I thought I would share them.
http://reefbuilders.com/2013/09/09/gobiodon-species-red-sea/
http://reefbuilders.com/2013/09/09/life-spectrum-max-feeding-finicky-fish/

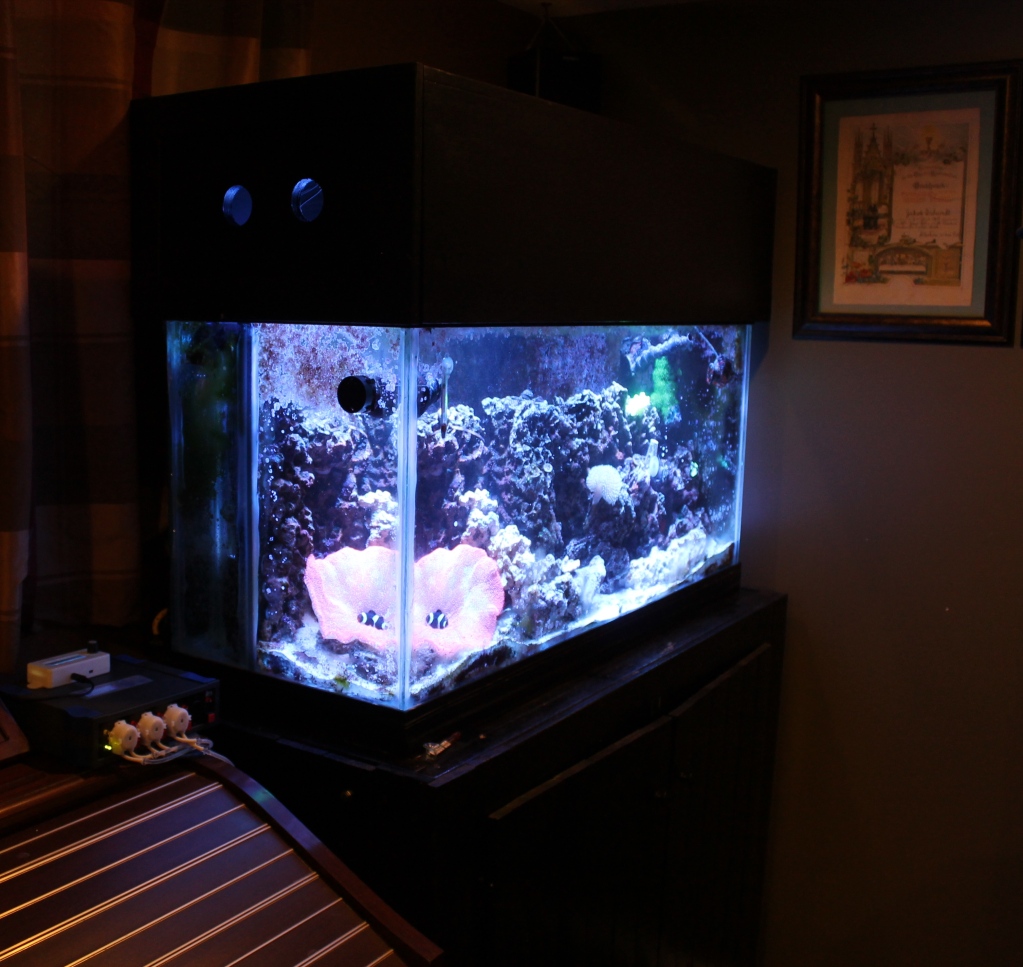
Building a Aquarium Canopy
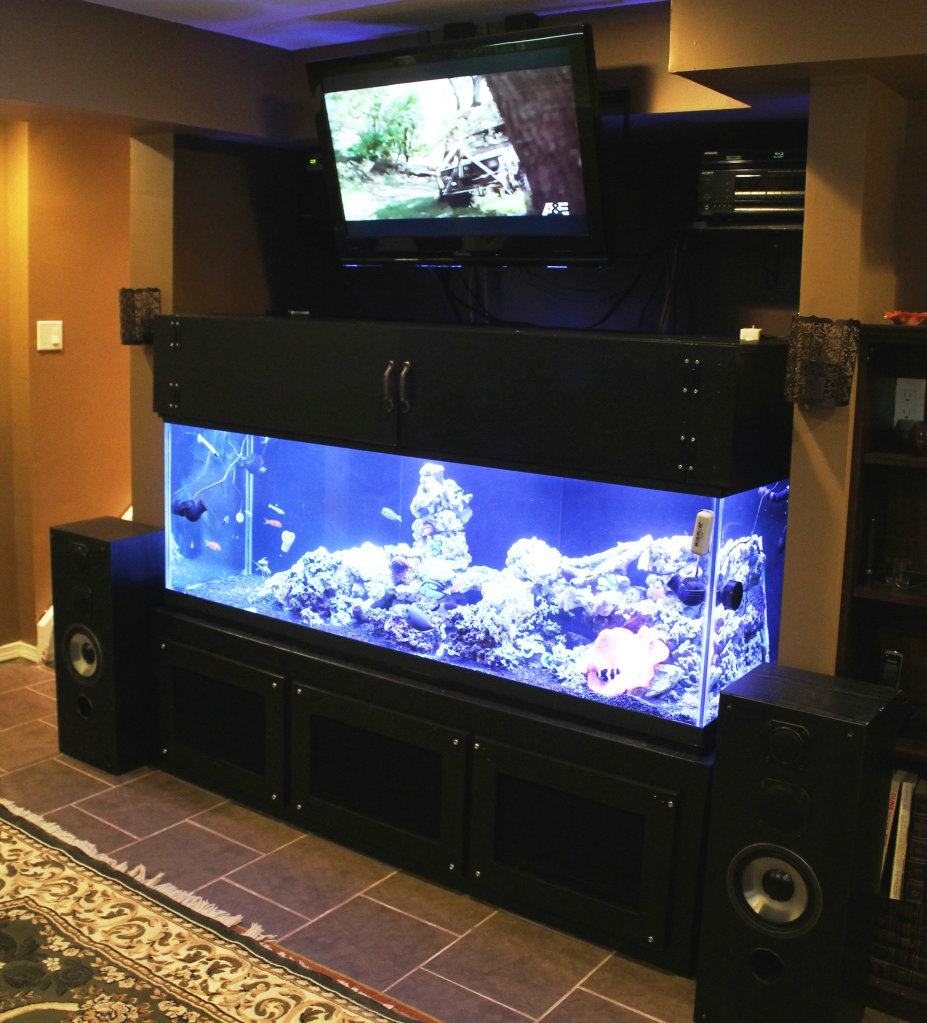
I had a few requests to write up ideas with pictures of how to build a aquarium canopy.I thought I would just show and explain how I built some of the canopies that I have used in the past. The first two examples are based on a canopy that I had seen on a 190 gallon aquarium owned by a fellow hobbyist and friend.
Before building your canopy, I would recommend that you first have your lighting you are going to use on the aquarium. You will need to know how far above the aquarium you will want to use your lighting, how thick the lighting fixture is, and how long the lighting fixture is. Sometimes it is helpful if you can use your lighting on the aquarium for a while so you can try out the lighting and confirm how high you want the lighting from the top of the aquarium.
Canopy Example #1
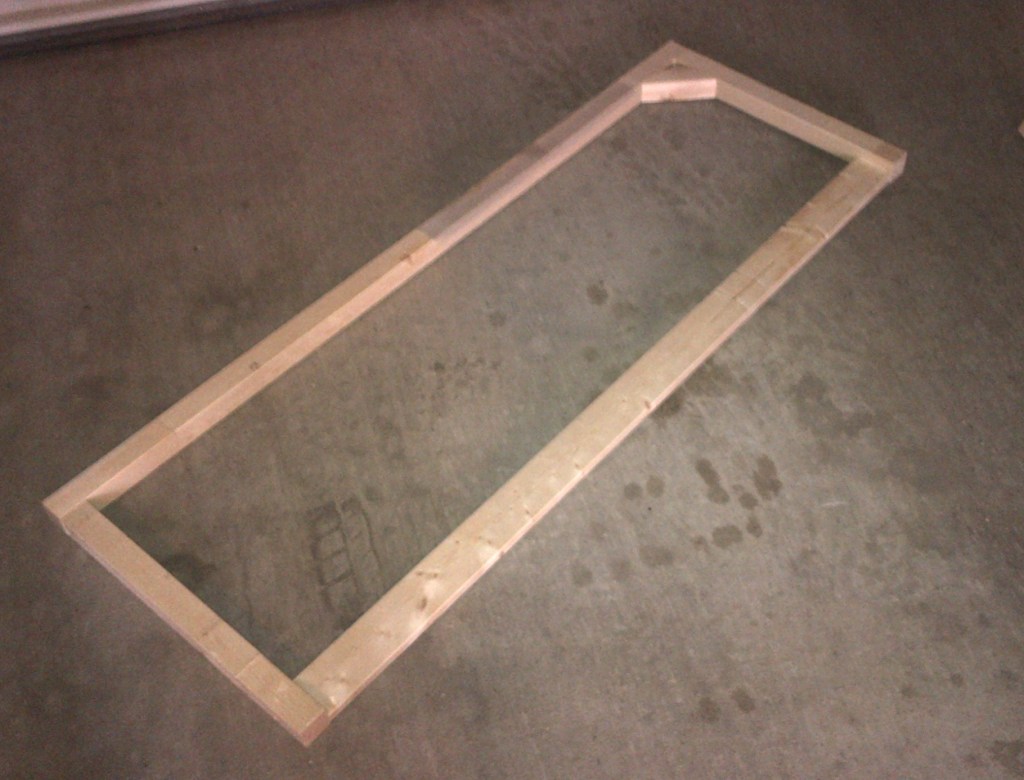
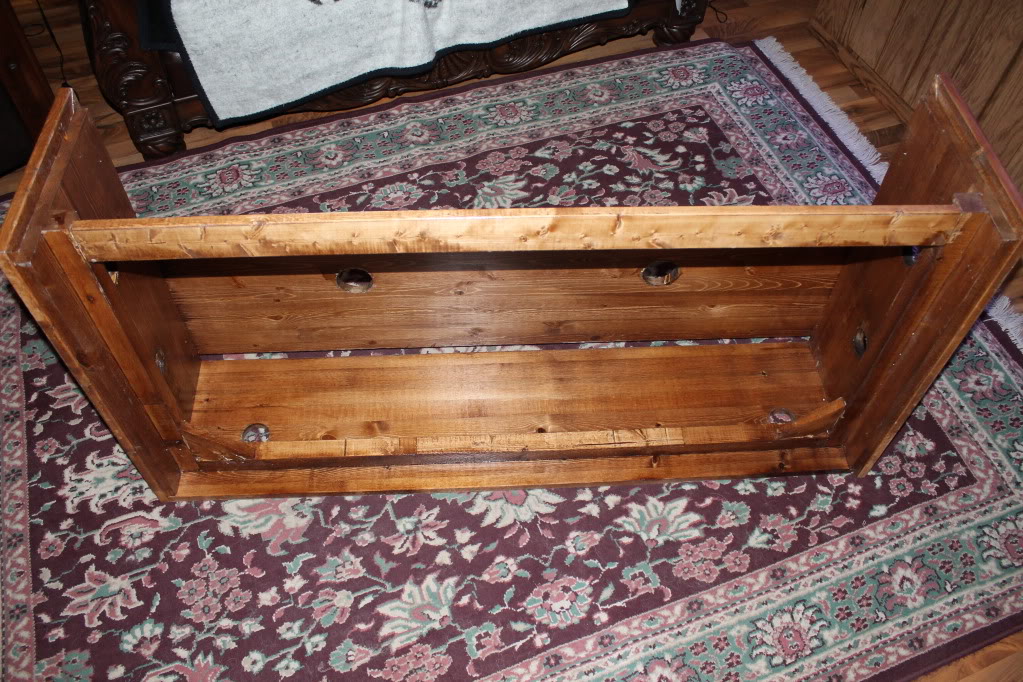
This first example is a canopy that I built for a four foot 90 gallon aquarium.I started by building the frame that sits on top of the tank. The outside measurements of this frame are the same as the outside measurement of the aquarium. My lighting will not be wider than the aquarium so I can use those dimensions for this build. I used 2X2 inch lengths of solid pine for the back and sides and a ¾ by 4 inch length of solid pine for the front.I used construction grade wood screws and generous amounts of wood glue to attach the frame pieces together.
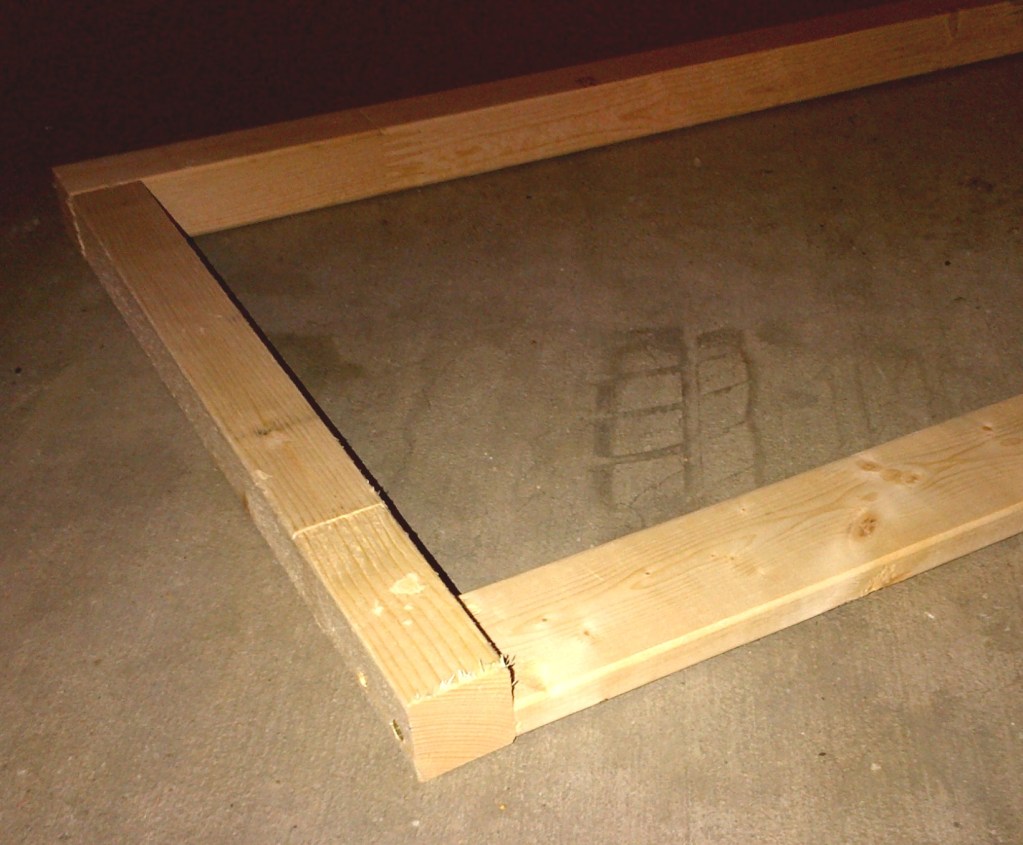
On this frame piece you will only see one angled support on the right hand side back corner.I could not add angled supports on both back corners as the aquarium has an internal overflow on the back left hand corner and I wanted to leave as much room as I could for access to the overflow. If the aquarium did not have an internal overflow, I would have added angled supports to both back corners
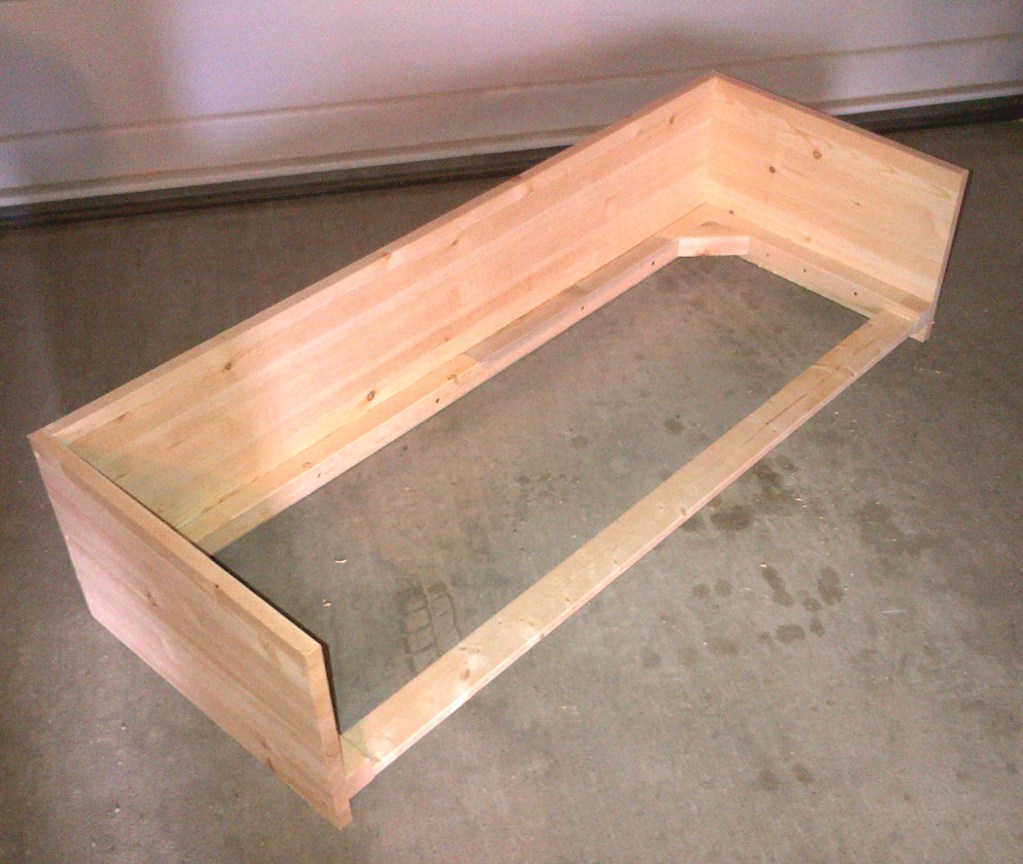
I then added the back piece to the frame (using wood glue and screws). The paneling that I used for this was ¾” solid pine. I pre-drilled holes for the screws to help ensure I did not split the wood. When working with wood 2 inches and less in thickness, I always prefer to pre-drill before using construction grade screws. When working with a softer wood like pine, you may not have to pre-drill your holes.This is just my preference
The sides were added next.As you can see from the below and above pictures, I attached the sides and back from the inside of the canopy and not from the outside were ever possible. That way, the screw heads will not be visible from the outside of the stand so I don’t have to spend as much time filling the holes to hide them later on. The back and side pieces also go 2 inches down past the frame to allow the sides and back to fit around the aquarium preventing the canopy from being accidentally knocked off the aquarium. This also covers the black trim of the aquarium giving it a nicer or at least a more consistent look
As I am using LED lighting I knew that I wanted to have them 6 to 8 inches above the aquarium, and the LED fixtures are 2 inches thick with 1 to 2 inch thick mounting bar (depending on the exact type that I choose to use). I left 10 inches of space above the frame to allow enough space inside the canopy for my lighting and air circulation around the lighting
That is why I used 14 inch wide boards for the back and sides: 10 inches of space above the frame, 2 inches of space for the frame, and 2 inches of space below the frame
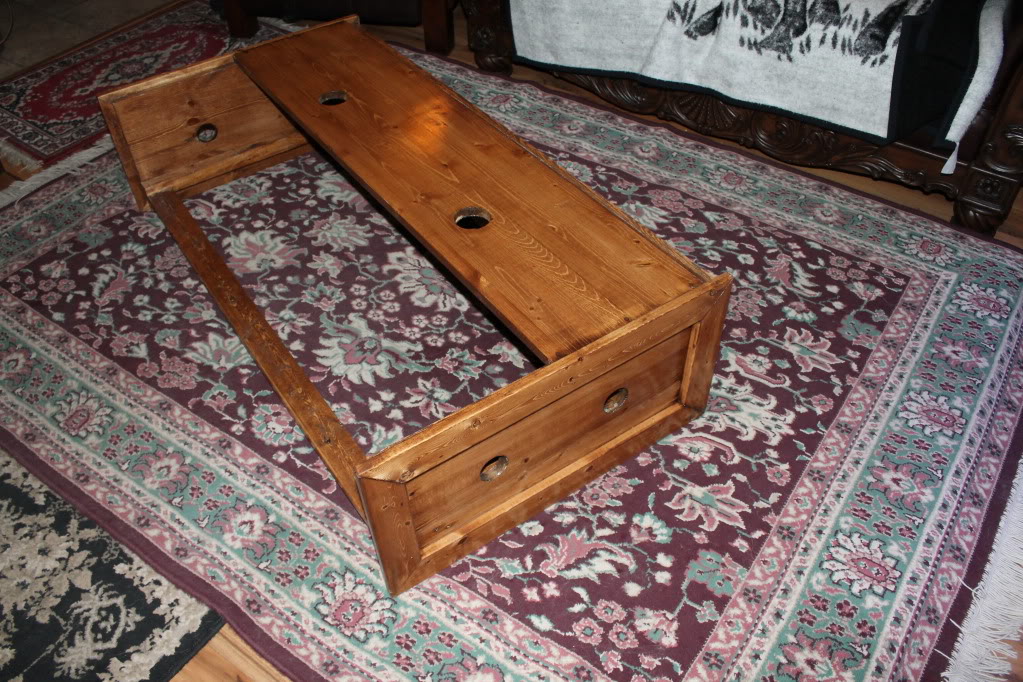
I then cut and attached a piece of wood that covered about 80% of the top of the canopy, leaving about 20% of the top open at the front.
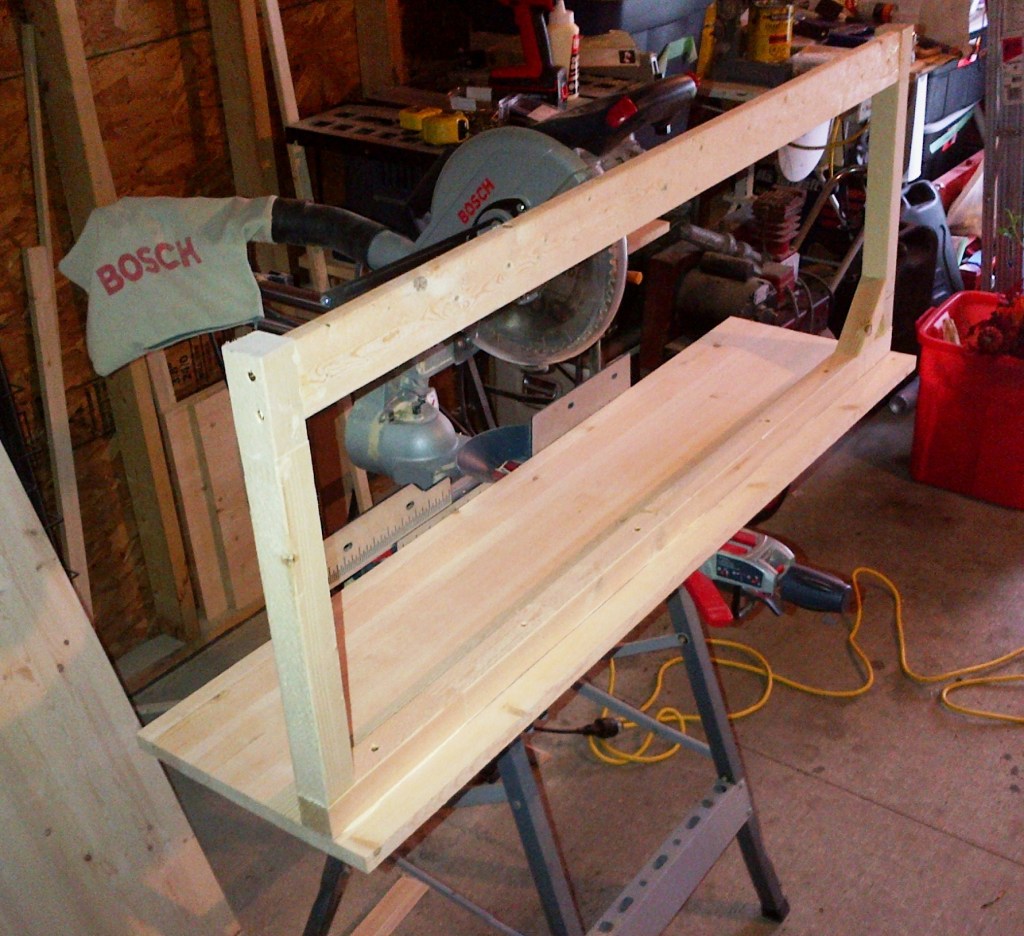
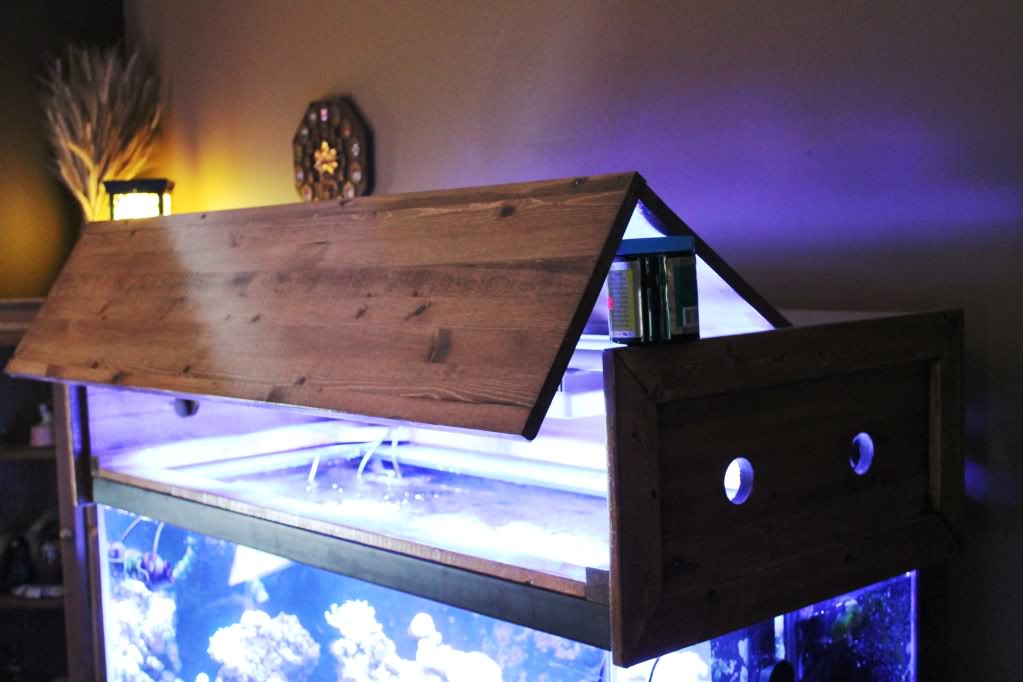
I built the lid next and dry fit it to make sure I got it right. I built an “L” shaped lid so the hinge will sit on the top of the canopy were it will be out of sight. The front of the door drops down 2 inches past the frame so it will match the sides and back of the canopy.
As you can see by the below picture, I used four angled supports to re-enforce the two pieces of the lid.
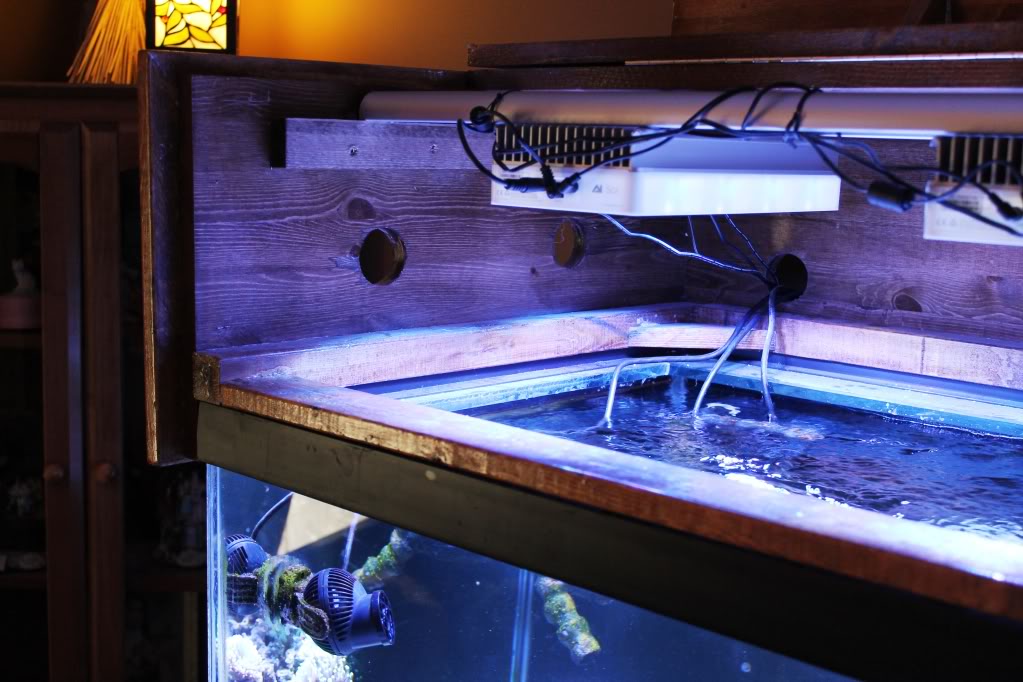
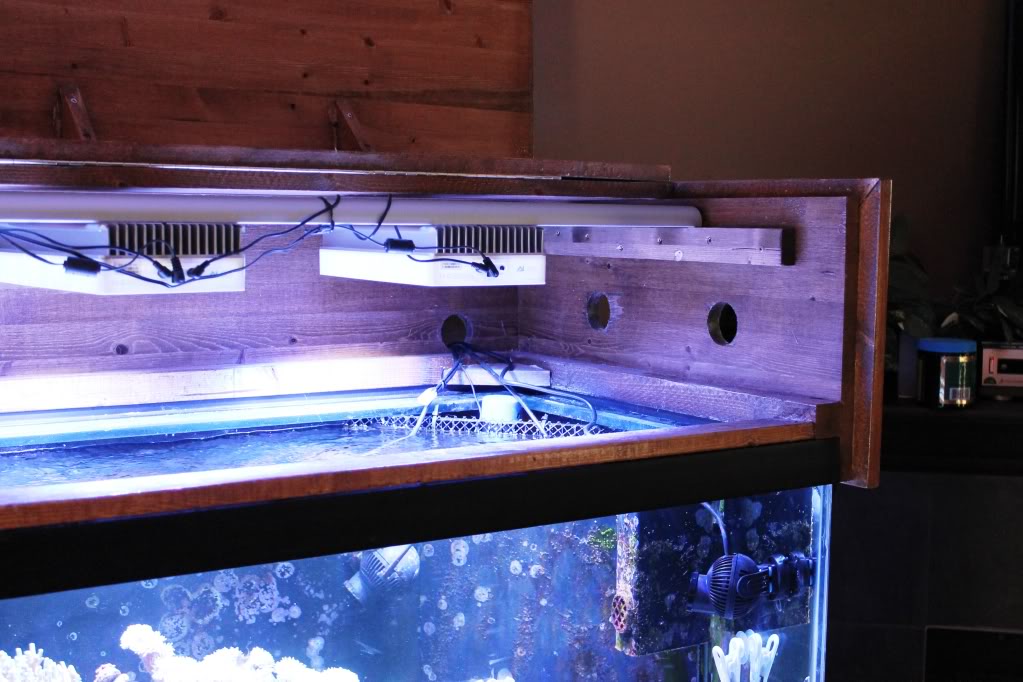
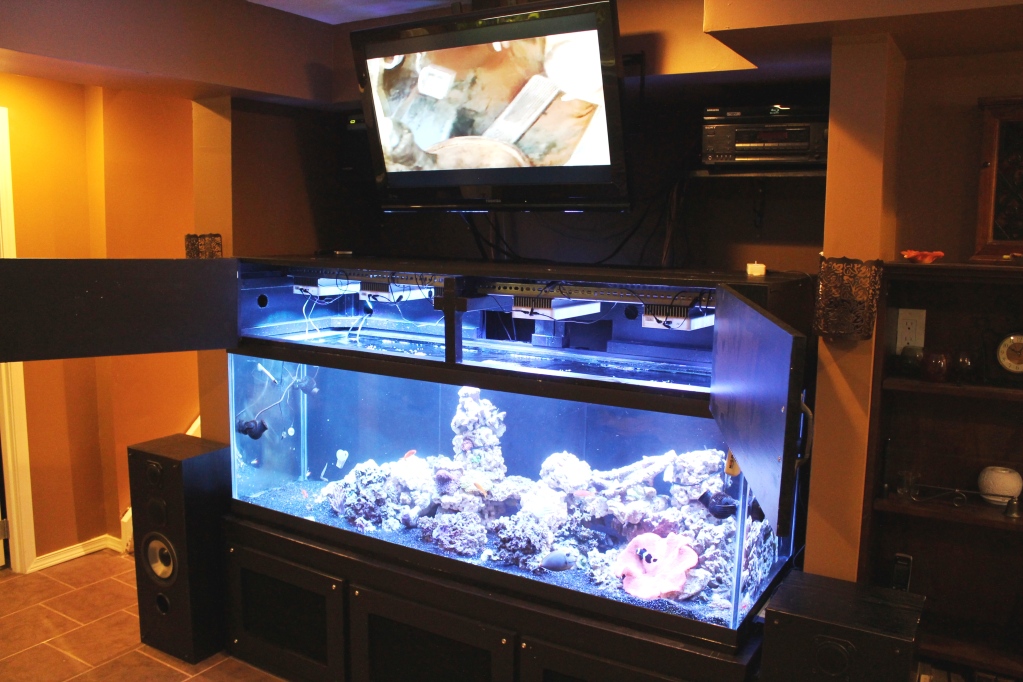
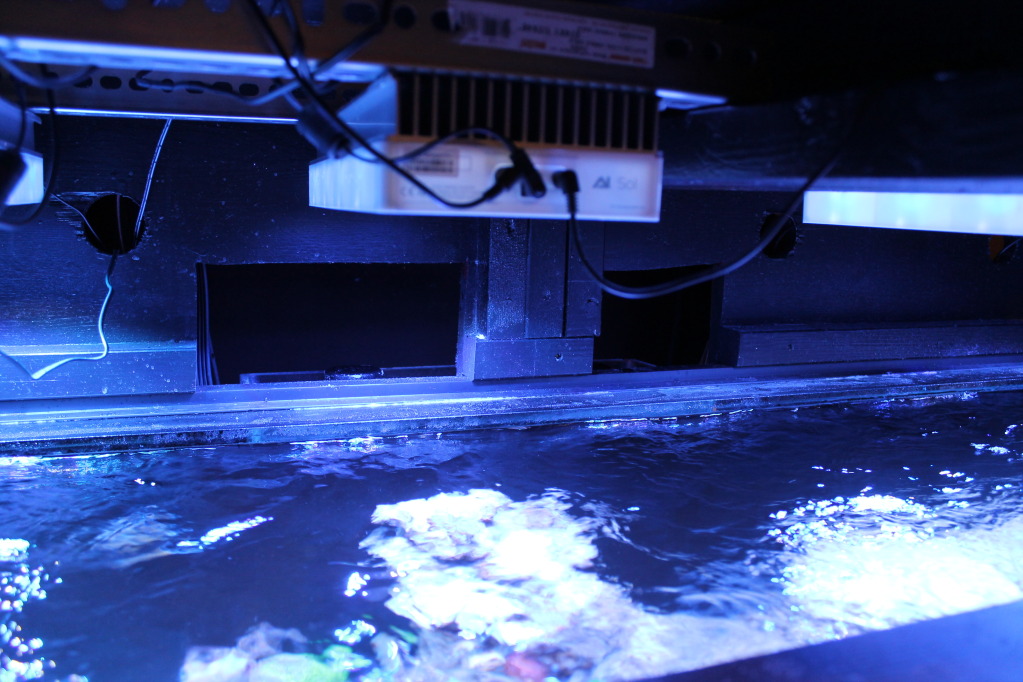
The next step was to drill the vent holes on the sides, top and back, and put in the rails for the LED mount bar I made. I also added a little trim to the sides to give it a little better look. The inside rails can also be used for a T5 light fixture as well. The second example that I have in this article shows these rails in better detail.
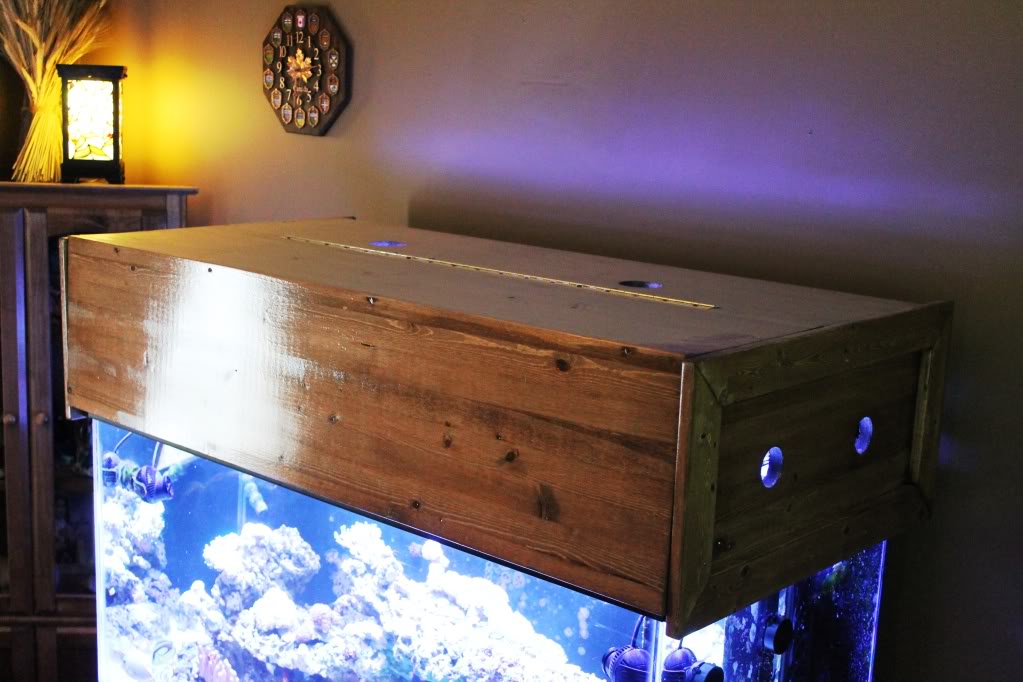
After some wood filler, two coats of a good quality primer & sealer, and 3 coats of a marine based paint, the canopy was complete. You can also use a very good quality primer and sealer followed by a very good quality exterior paint if you do not want to use a marine based paint. I had to let the paint cure before I put it on the aquarium. I painted the inside with the same black paint as I did not want to buy two different colors of marine paint
I chose to paint this canopy black so it would match the stand the aquarium was sitting on. I like to give my set-ups a more consistent look as well as matching with the rest of the furniture in the room, but that is just my preference. You can finish your canopy to suit your tastes.
Here are a few pictures of the finished product.
Canopy Example #2
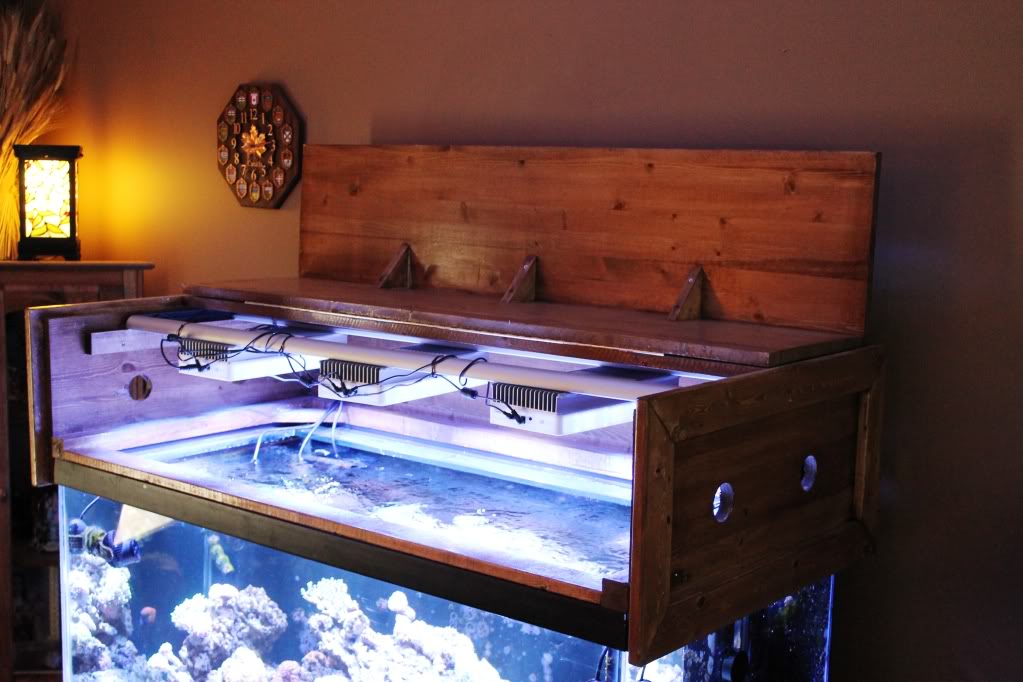
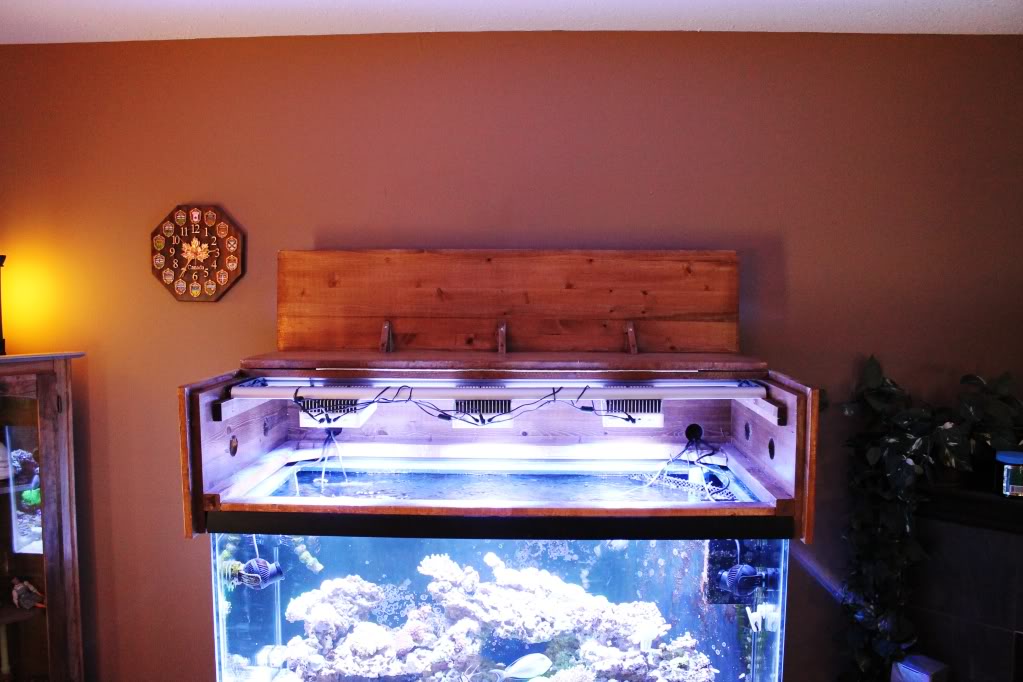
The second example that I am showing here is one that I built for a four foot 120 gallon aquarium that I have. I wish I had taken more photos while I was building it, but this will give you a pretty good idea. I followed the basic same design as the first canopy that I showed in this article. The biggest difference is that I stained and urethaned this canopy and extended the top of the door to the center of the top of the canopy to allow for more room to reach into the tank to complete routine maintenance when needed. The only drawback to this is that it makes the door heavier as compared to the door in the first example.
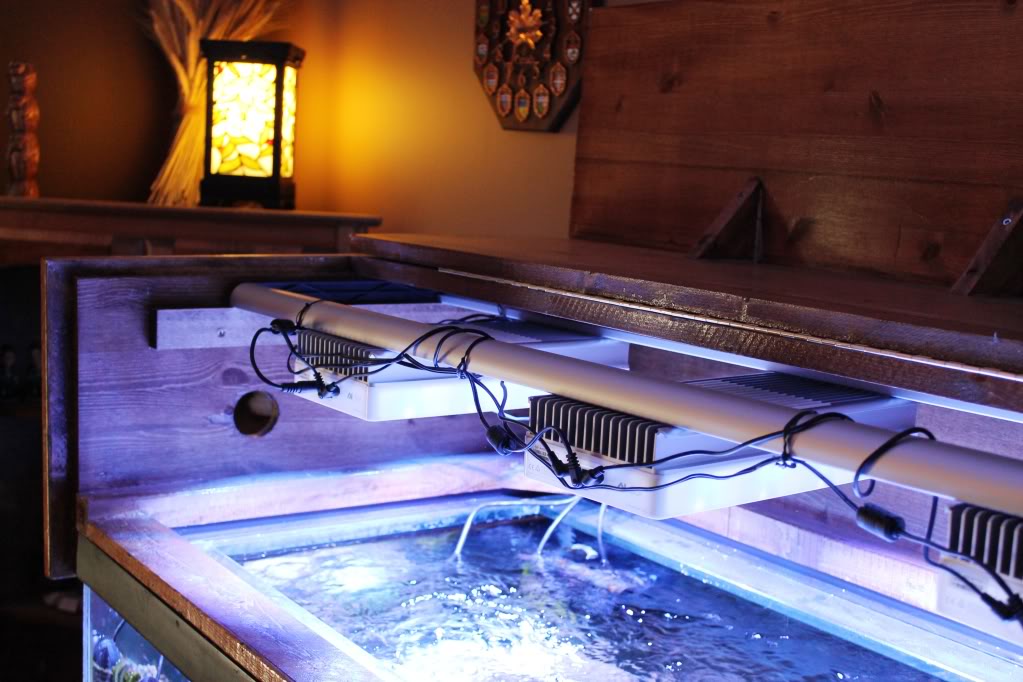
In these pictures you will see a little more detail on a few features not shown very well on the first example. I also drilled two air holes on each side of the back piece near the corner to run cables through for the poweheads, lighting, and what not. I made these holes a little larger than the rest of the air hole to make it easier when running cable through them. You can also see the vent holes that were drilled on the top of the canopy for additional air circulation.
Just as with the first canopy, I used the same thickness of solid pine and I glued and screwed everything together in the same way. I stained this canopy to match the stand and furniture in the room followed by several coats of urethane (4 or 5 if I am remembering correctly).
One of the last things that I had done was to add two pieces of wood on the inside of each side for the mounting bar of my LED lighting to sit on. You can also adjust the height of this wooden rail to allow for a T5HO fixture.
I had to make sure the angled supports on the back corners of the frame would not extend further past the top bracing of the aquarium or they would restrict my access to the internal overflow.You can also see the side trim pieces that I added to give the canopy a more finished look and to also hide any light that might come through around the door.
If you are using T5HO or MH lighting I would certainly recommend more and larger vent holes and possibly adding a built in vent fan or two. I would also design the canopy for extra space inside the canopy for better air movement to help the lighting stay cool. You will have to be extremely careful using MH lighting in a canopy due to the very high levels of heat produced by an average MH fixture. As I use LEDs in my canopies I do not need that many vent holes as they produce low amounts of heat.
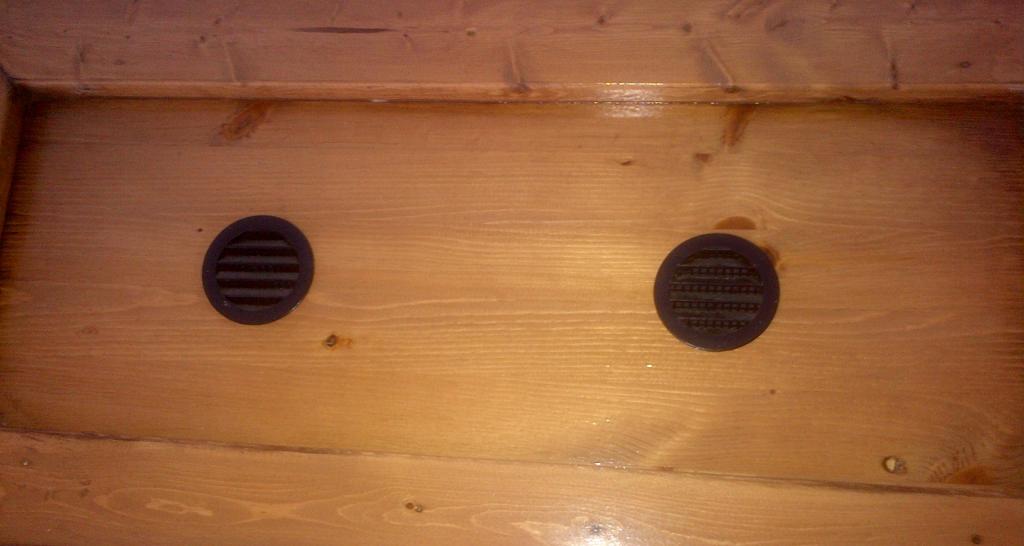
The below is a picture showing the air vent covers that I added to the sides once the store got more in. These can be found in most home improvement and hardware stores were they keep the roofing products.These vent covers are actually meant to cover roof ventilation holes in the soffits of most homes. I like using them on my canopys as they allow for very good airflow while preventing a lot of light from getting through.
Canopy Example #3
The third example is a canopy that I built for a six foot 180 gallon aquarium.The frame, sides and back were built the same as in the first two examples.I did add additional framing in the middle of the canopy to support the 6 foot span of the top of the canopy. As you can see by the below picture, I had added two sets of mounting rails as I was planning to use two sets of hanging bars for the LED lighting to be used on this aquarium.
The biggest difference with this canopy is that the doors open out from the center of the front of the canopy and are hinged on each side of the front. The top piece that sits in the opening pictured in the above picture is not actually attached to the top of the canopy making it removable for easy aquarium maintenance when required.The below pictures better illustrate what I am talking about.
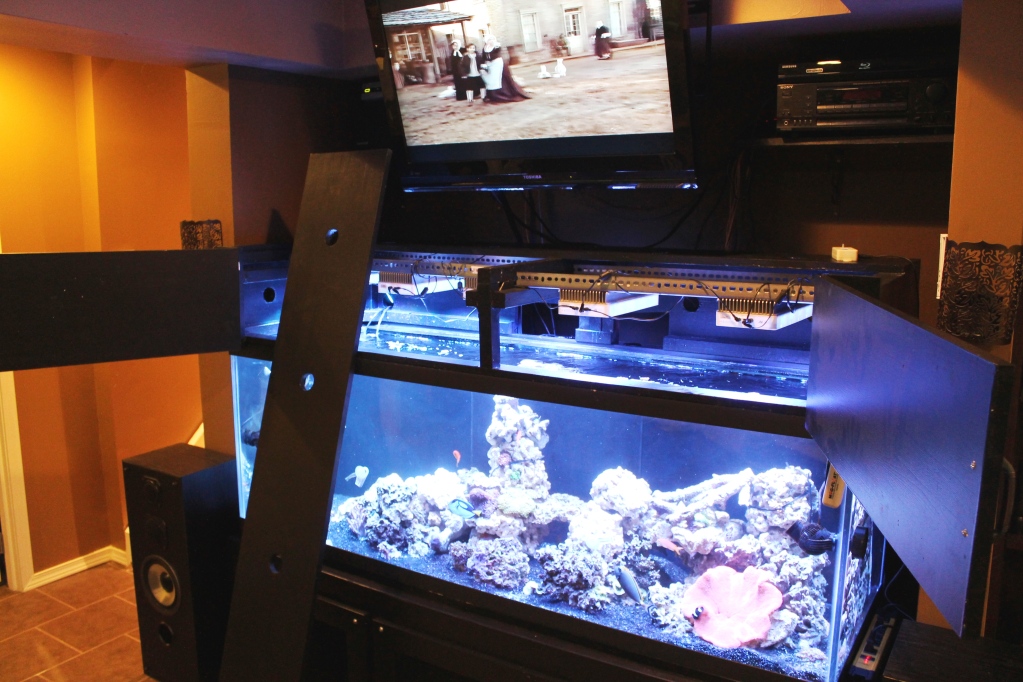
As this aquarium has an external overflow on the back of the aquarium, I had cut out two access holes in the back of the canopy above the overflows for easier access/maintenance to the duriso stand pipes in the overflow without having to remove the canopy to get to them. I had cut this out after I finished building the stand to make things a little easier
Aquarium Plumbing Valves
I have received a lot of questions about using valves on aquarium set-ups. This article is meant to provide a little more detailed information to supplement the already posted Aquarium Plumbing Article here for those people who would like more detailed information on the commonly used valves on sumped marine aquariums.
https://www.reefaquarium.com/2012/aquarium-plumbing-basics/
There are many different types of valves used in the hobby today.In the article I am only covering the most common types of products used. All the information listed below is some accurate but you should assume there are many different variables can effect product performance making it very hard to develop a hard fast rule that applies in very situation. Use the below as guidelines. In additional, products made outside North America not have been manufactured up to ASTM, (American Society for Testing and Materials)or CSA (Canadian Standards Association) standards making those product specifications hard to determine.That is why I always prefer to ensure the plumbing products that I purchase are manufactured to either ASTM or CSA standards to ensure the specifications will be consistent.
Please keep in mind, there are seemingly hundreds of different types of plumbing companies but it is important that you choose one of the best plumbing companies who has the right knowledge.The valves that I am referring to in this article are the ones that I have come across that can be made with materials that are aquarium safe and are also suited for the typical sumped aquarium set-up.
Regular Valves
I would refer to any valve that is used to regulate or completely shut off (stop) flow as a regular valve.The below valves are the most common valves that I have found in the hobby so far.
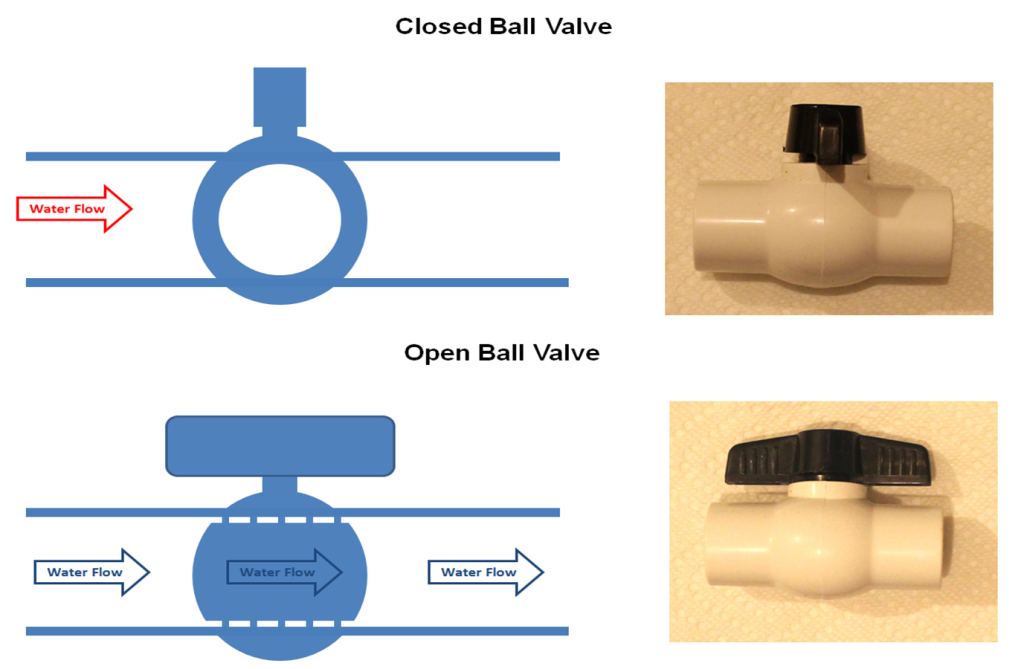
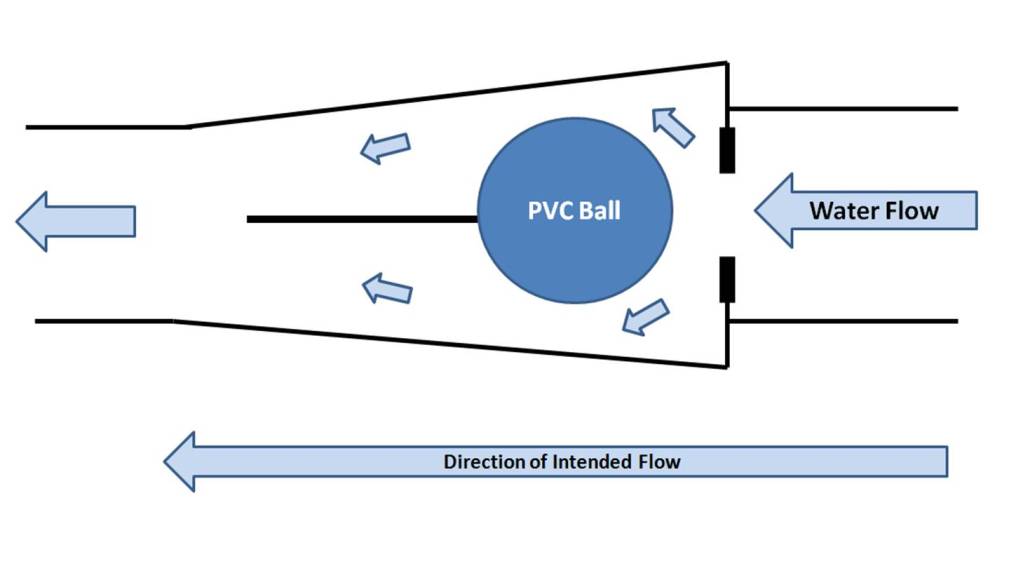
Ball Valves
These are about the most common style of valve that you will find in use in the aquarium hobby.They are very easy to find in most hardware and plumbing supply stores in models that are made with materials that are safe for aquarium use.The models that are made of PVC material range in size for ½ to 6 inches.You can get them in SCH 40 and SCH 80 PVC which will have the same tolerances and specifications as the same PVC pipe and fittings. Ball valves are also available in screwed or socket weld (glued) connections depending on how you want to connect this valve into your system.This is my preferred valve to use in any type of plumbing set-up.The reason for this is that ball valves will restrict the flow going through the valve the least of any type and they are also the least likely to fail or leak.The only drawback to using these valves in PVC is that they are not the best suited for high pressure and high heat unless you have a ball valve made of PVC SCH 80.
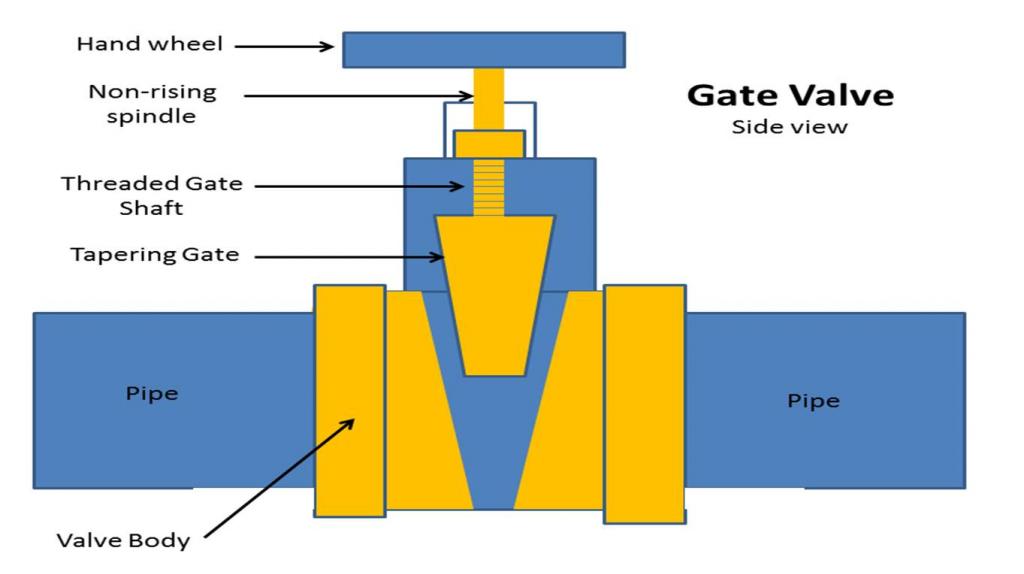
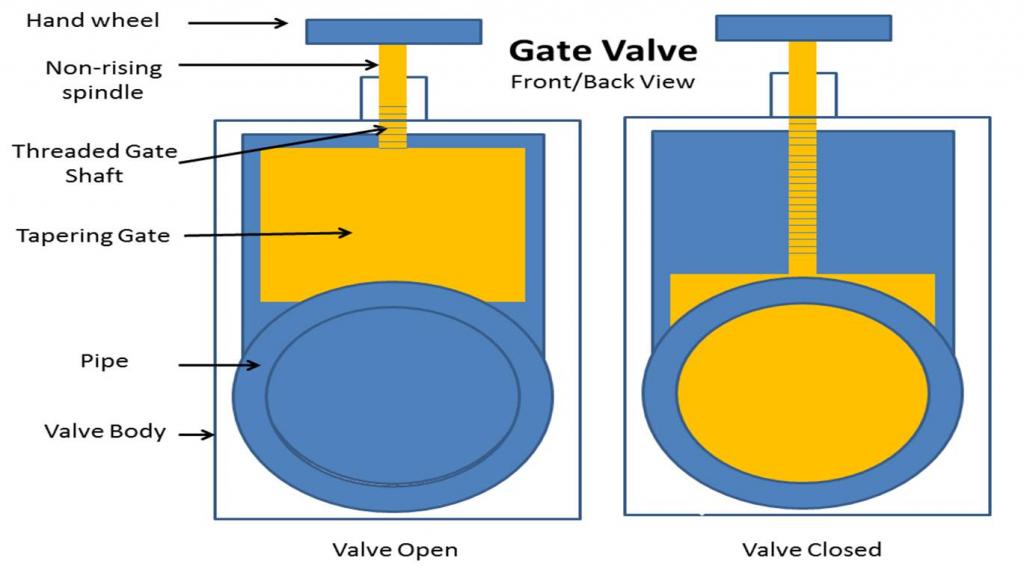
Gate Valves
These valves are somewhat common to find in the hobby.They will reduce the flow going through them more than compared to a ball valve. Gate valves made in PVC are harder to find, mostly being found in plumbing supply stores or some on-line aquarium supply stores. The can also com in PVC SHC 40 and PVC SCH 80 material but are more common to find in SCH 80 as the valve is intended to be used on higher pressure applications. The benefit of gate valves is they will be able to withstand more pressure than ball valves and can be used for more finer adjustments. In most aquarium set-ups, this valve would be overkill, unless you have a very large system that has a single return pump applying very high flow rates and high levels of pressure.
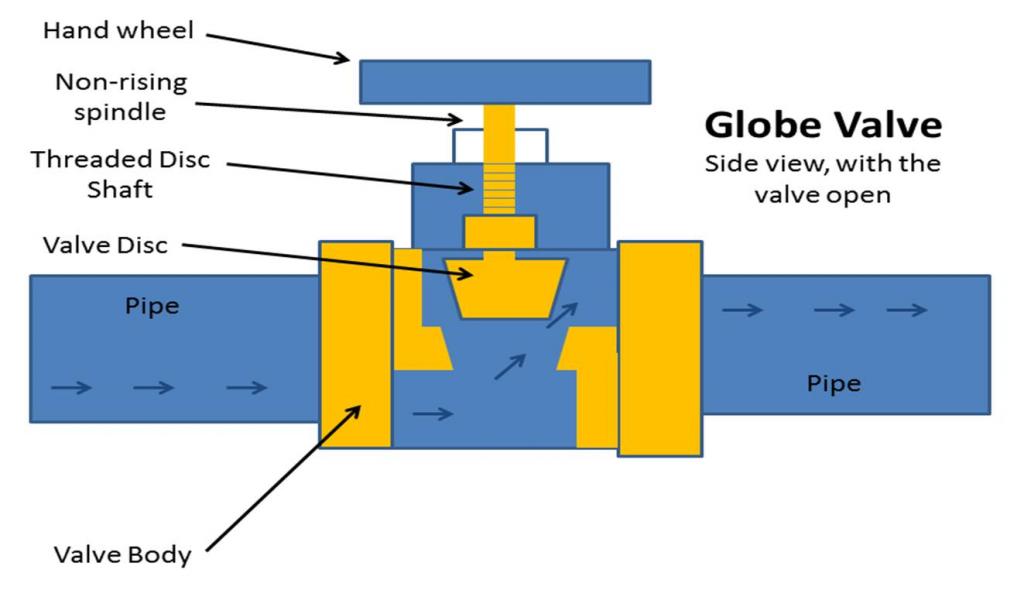
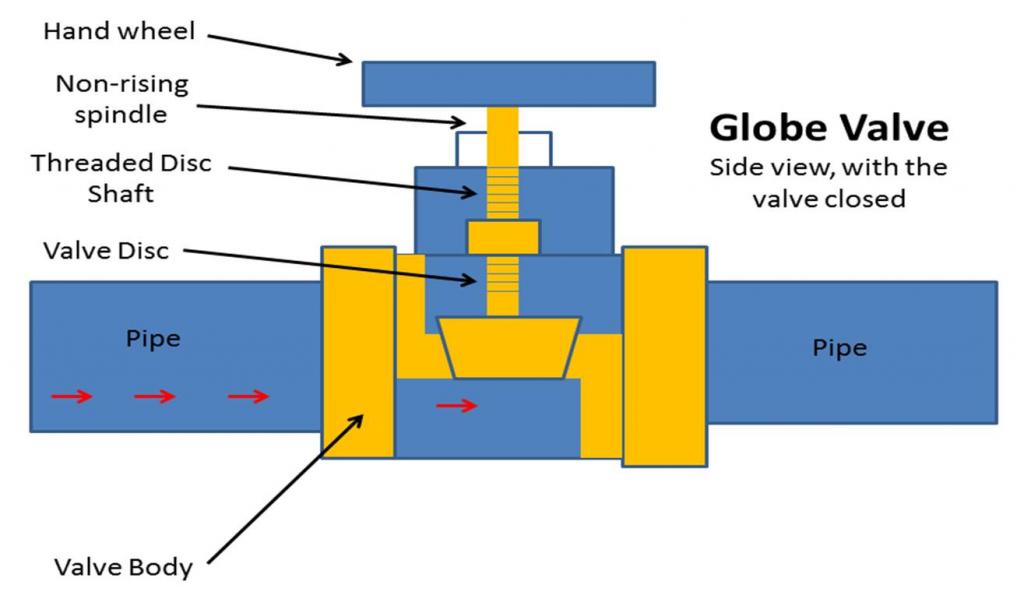
Globe Valves
These valves are the least common to find in the hobby.They can be more difficult to find globe valves made entirely out of aquarium safe materials and would most likely have to be order in by a plumbing supply company or purchased from a on-line aquarium supply company. They typically can withstand the most pressure and temperature of these three mentioned valves, but they will also restrict the water flow through it the most as well.Gate valves would be considered specialty valves to be used in very specific situations were a ball or gate valve cannot handle the pressure being put through the line.
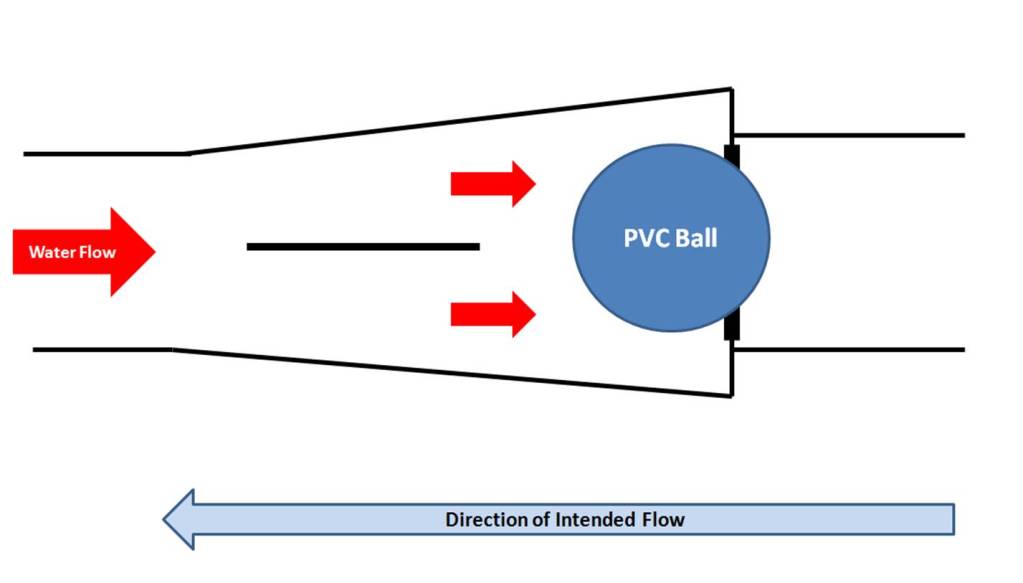
Check Valves
Check valves are a type of valve that will only allow liquid to flow in one direction.You can not use them to control the flow of water through them.They are commonly used on return line to prevent water draining back from the display tank into the sump when the return pump is no working.When the pump is shut off, the pressure product by the water flow is removed and the valve closes preventing water from draining back.When the pump is turned back on, the pressure of the pump moving the water through the valve will open the valve returning to normal flow through the valve.The below are the two most common types of check valves used in the hobby today.
Swing Check Valve
These are the most common to find. They will restrict the flow of liquid moving through them a little.They are commonly available from on-line aquarium supply stores and maybe even plumbing supply stores. You have to be very careful when picking out a swing check valve.Lower cost valve will use a metal spring on the disc to help close the valve when the pressure / flow is removed. For that reason I do not like using swing check valves in set-ups that I want to use a check valve.
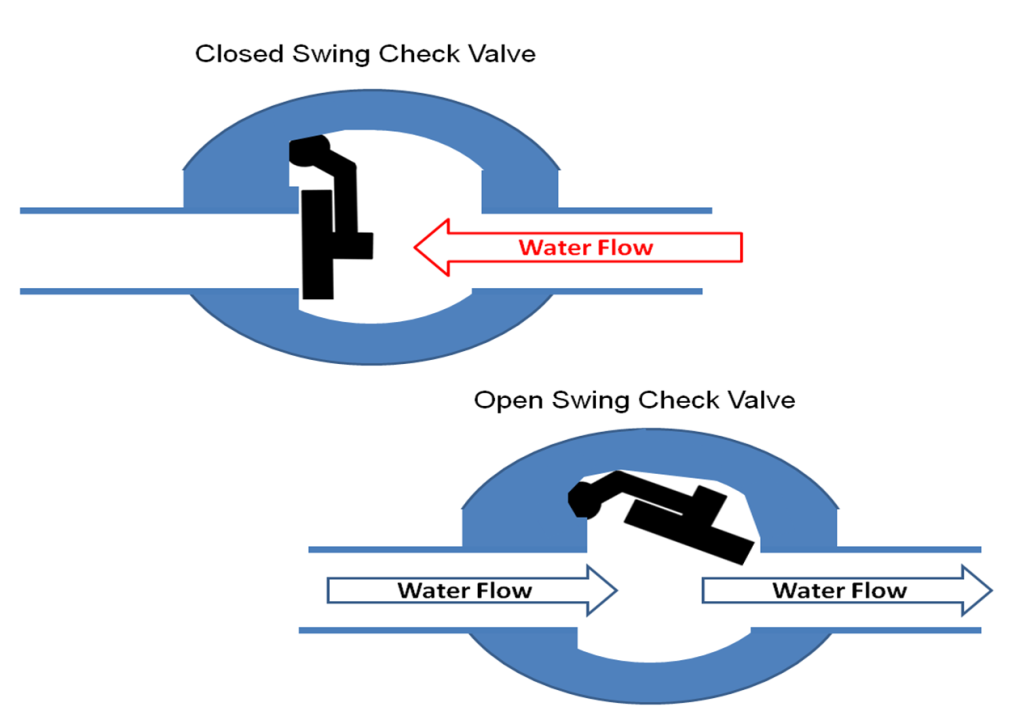
Note: there are many different designs for a swing check valve.I am only showing one of the more common swing check valve designs that come in aquarium safe material (all PVC construction).The check valves that are very slim (looking more similar to a PVC coupling) are the ones that commonly have metal spring inside. Make sure you verify they type of check valve you have before you install it on to your set-up
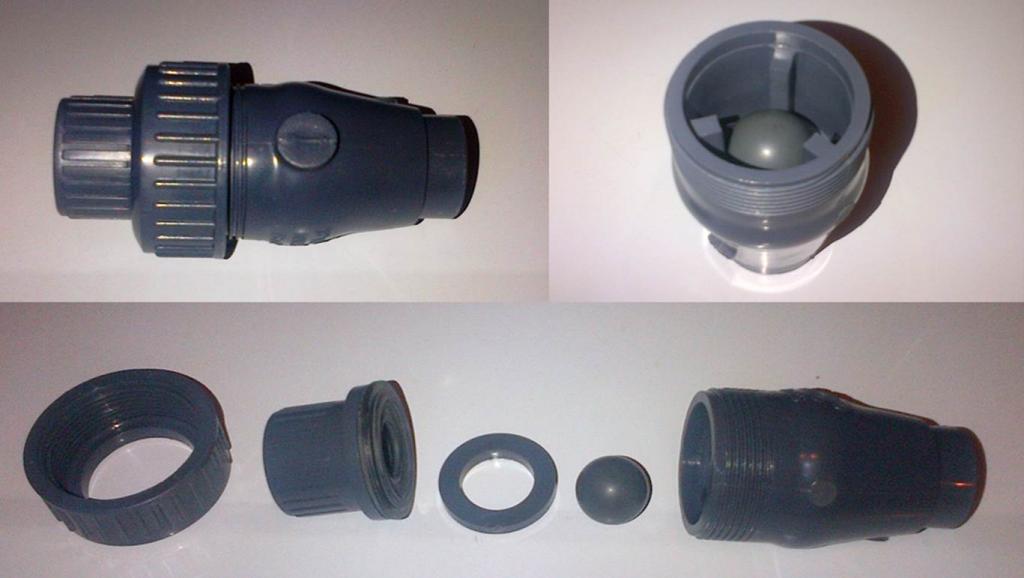
Ball Check Valve
These are less common valves and can be harder to find. You typically will have to go to a specialty plumbing supply store or a on-line aquarium supply store.They work on the same principle as a wing check valve.The only difference is that they flow pushes a ball up the body of the valve allowing water to pass around it.When the pressure/flow is removed, the ball falls onto a rubber seat and prevents water from flow backwards through the valve.They are the safest type of check valve to use as they will be made entirely of PVC material (mostly SCH 80) and they can be taken apart for cleaning and routine inspection make sure they are working properly.The only drawback ball check valves will restrict the flow of liquid moving through it more than compared to a swing check valve.
Aquarium Plumbing Pipe and Fittings
I have received many questions about which type of plumbing pipe and fittings would work best on a aquarium set-up. This article is meant to provide a little more detailed information to supplement the already posted Aquarium Plumbing Article here for those people who would like more detailed information on the commonly used tubing, pipe, and fittings used on sumped marine aquariums.
https://www.reefaquarium.com/2012/aquarium-plumbing-basics/
There are many different types of tubing, pipes, and fittings used in the hobby today.In this article I am only covering the most common types of products used.All the data listed below going to be fairly accurate, but you should assume there is a 10% variance (plus or minus) as many different variables can effect product performance making it very hard to develop a hard fast rule that applies in very situation. Use the below data a guidelines. In additional, products made outside North America may not have been manufactured up to ASTM (American Society for Testing and Materials)or CSA (Canadian Standards Association) standards making those product specifications hard to determine.That is why I always prefer to ensure the plumbing products that I purchase are manufactured to either ASTM or CSA standards to ensure the specifications will be consistent.
And just to clarify the information/data below:
-All measurements are in inches
-All pressure data is listed in PSI (pounds per square inch)
-All information on flow is listed as GHP (gallons per hour)
-Low temperature applications would include all temperatures between 30F/0C and
-Moderate temperature applications would include all temperatures between 80F/26C and 100F/38C
-High temperature applications would include temperatures higher than 100F/38C
-Schedule 40 = standard wall thickness
-Schedule 80 = extra heavy wall thickness
-Stated maximum pressures is assumed to be at maximum temperature
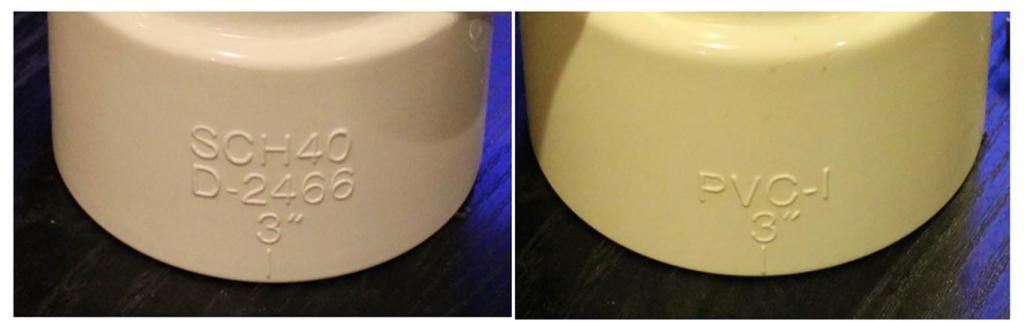
The below listed specifications are based on the pipe of the material type as the fittings designed to be used with each type of pipe will have slightly higher tolerances as compared with the pipe, you can find out more from The CleanUP Guys. In addition,the colors listed are the most common ones, but this can vary in Provence to Provence and State to State based on local building codes.Always read the printing on the pipe and information stamped on to the fittings to verify the type of material you have.
Clear PVC (polyvinyl chloride)Tubing
![]()
This is a clear and flexible plastic looking tube that is used in more of a general purpose application. It is very common to find in most hardware and plumbing supply stores.In the aquarium hobby, it is a very affordable option for low pressure and low temperature applications such as a supply and return line for a media reactor, or a low GHP return pump line. The below charts shows the specifications for clear PVC tubing.
![]()
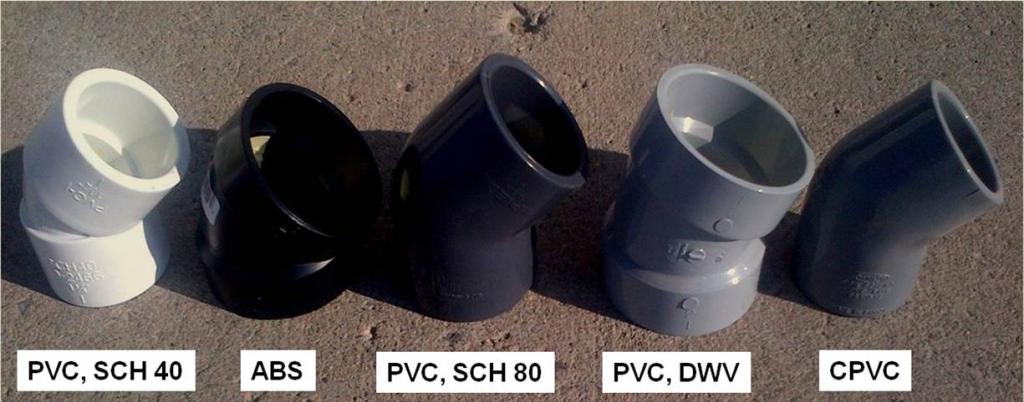
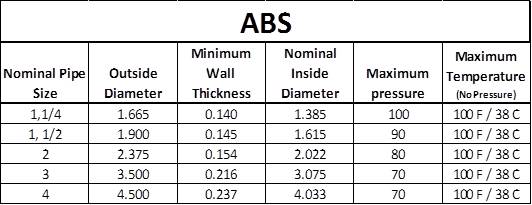
ABS (Acrylonitile Butadiene-Styrene)
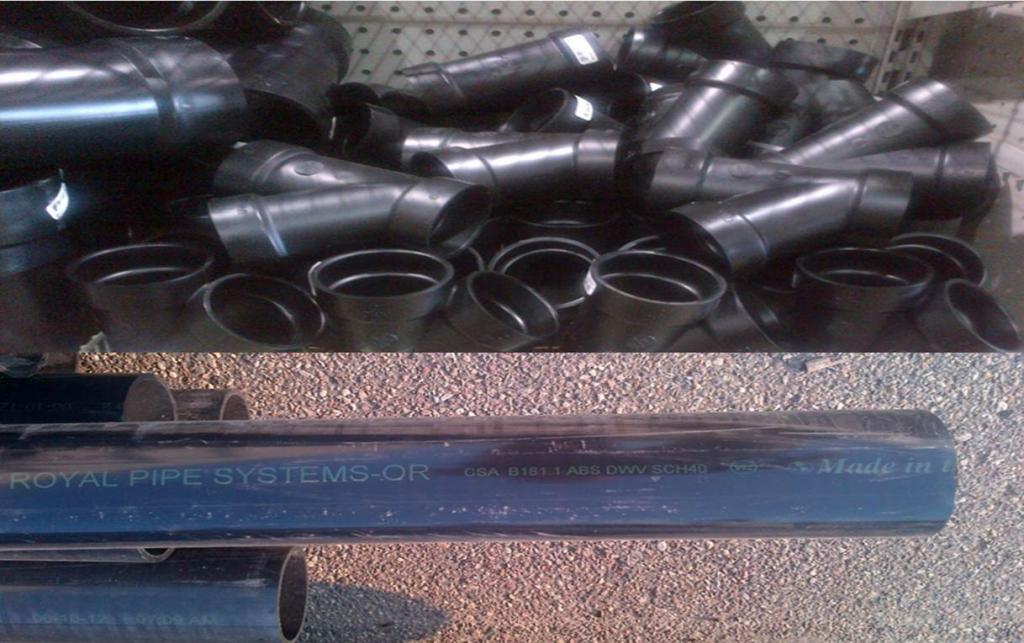
This is a black ridge tube.It is most commonly used as drainage lines in many single family residential home in North America.>It is very common to find in hardware stores and plumbing supply stores. In the aquarium hobby, it is best suited to be used on drain lines from a main tank to a sump where there are higher flow rates at lower temperatures and lower pressures involved.This typically includes drain lines were the GHP is less than 1,500 to 1,800 GHP. The below chart shows some of the specifications for ABS pipe.
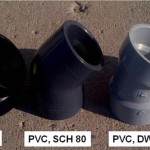
PVC DWV (polyvinyl chloride, Drain-Waste-Vent)
As an alternative to ABS, you can also use PVC DWV.This product is also used in the drainage systems for commercial and residential construction were there will be higher heat levels with minimal pressure. It is more commonly found in a littler gray color. PVC DWV will be a lot more expensive as compared to ABS and you will mostly find these products for sale in plumbing supply stores. It has very similar properties as ABS but is designed to be able to withstand higher heat levels.PVC DWV is also best suited for the same type of aquarium drain lines as ABS. The below chart will show you some of the specifications for PVC DWV pipe.
Flexible PVC (polyvinyl chloride)
This is a flexible and re-enforced PVC tubing product.It is most commonly white in color but is also made in a few other colors like gray and black.The most common application for this is for the re circulation lines on hot tubs and jetted tubs.In the aquarium hobby, you will find this product typically used on drain lines from the main tank to a sump were you need a little bit of flexibility to avoid used a rigid pipe and fitting to help reduce a loss of flow.The smaller diameters (one inch and below) can also be used on return lines were the GPH will not exceed 1,500.Flexible PVC hose is also best used for low temperature applications.This would be my preferred product for moderate flow applications. Flexible PVC tubing is designed to be used with standard (Sch 40) PVC fittings and glue. You will find some of the specifications for flexible PVC in the below chart.
PVC (polyvinyl chloride), Schedule 40
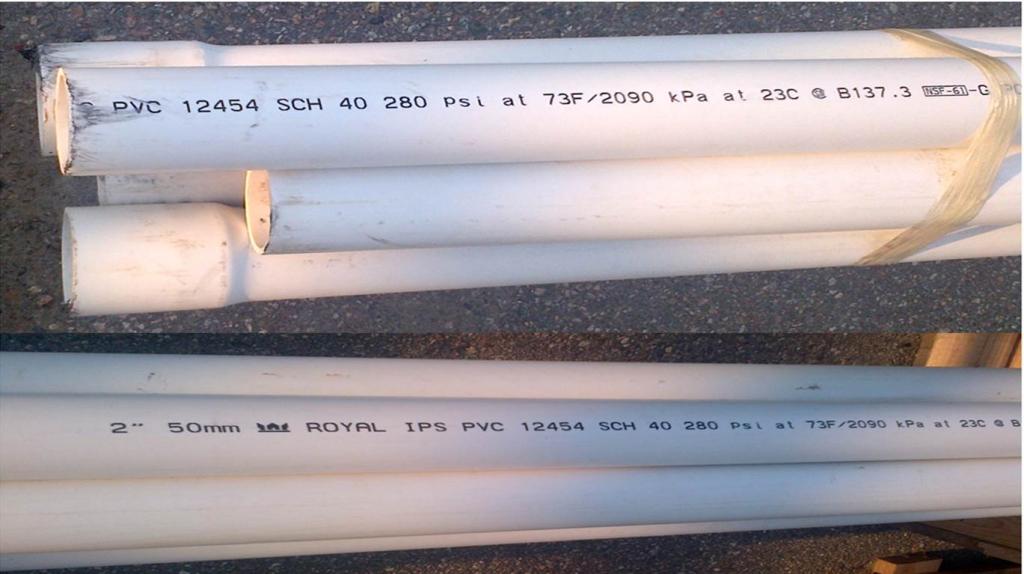
PVC is commonly used for residential and commercial water supply and water drainage applications with low to moderate heat and moderate pressures. It is a very common product to find in most hardware stores and plumbing supply stores and is most commonly found in solid white color. PVC would be about the most common product to find being used on sumped aquarium set-ups due to the fact it can be used for a drain or return line in almost any type of set-up.This too would be my preferred product for drain and return lines for higher and lower flow set-ups.It is about the best product to use for a peace of mind. PVC SCH 40 specifications are listed in the below chart.

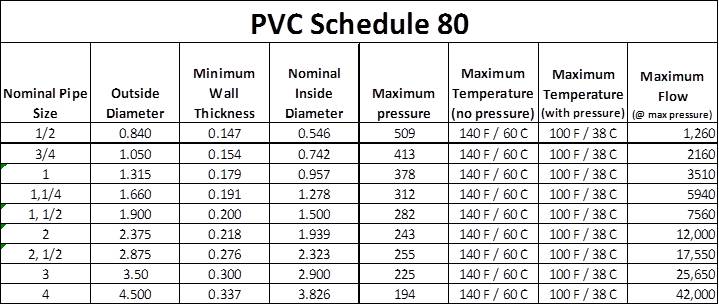
PVC (polyvinyl chloride), Schedule 80

This is just a heavy duty version of PVC SCH 40. It is a little harder to find as compared the PVC SCH 40. As this product is more commonly used in commercial applications with higher pressure and lower temperatures conditions exist. This type of PVC is commonly found in a darker gray color. It can be somewhat hard to find in most hardware stores.Typically you might need to go to a plumbing store to find a good selection of PVC SCH 80 pipe and fittings.This also is a lot more expensive than PVC SCH 40.In the aquarium hobby, you would use this product in very high flow applications that would also have higher pressures as well. You will find some of the specifications for PVC SCH 80 in the below chart.
CPCV (Chlorinated polyvinyl chloride) Schedule 40
This product is very similar to PVC SCH 40 but is indented to be used in moderate and high heat applications. It is most commonly found in a lighter gray color very similar to PVC DWV. Typically you would see this being used on hot water supply lines and some drainage applications.In the aquarium hobby you can use this product just as you would PVC, however, it will cost you a little more to do it. The below chart has some of the specifications for CPVC.

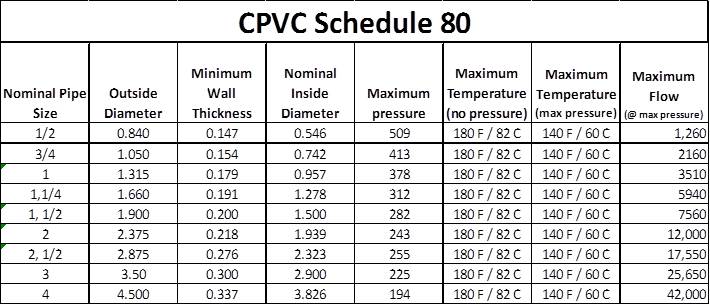
CPCV (Chlorinated polyvinyl chloride) Schedule 80
This product is very similar to PVC SCH 80 but will be able to withstand higher temperature ranges at the higher pressure levels.This product is most commonly used as hot water supply lines in commercial applications.I cannot imagine a set-up that would have high levels of heat and pressure requiring this product.You can use CPVC SCH 80 on a drain line or return line of a sumped marine aquarium, but it will cost you more money to use this product. The below charts shows some product specifications for extra heavy CPVC.
Fittings
There are a seemingly endless number of different types of fittings, each with their purpose. However, all of the fittings can be placed into one of the below 8 categories.
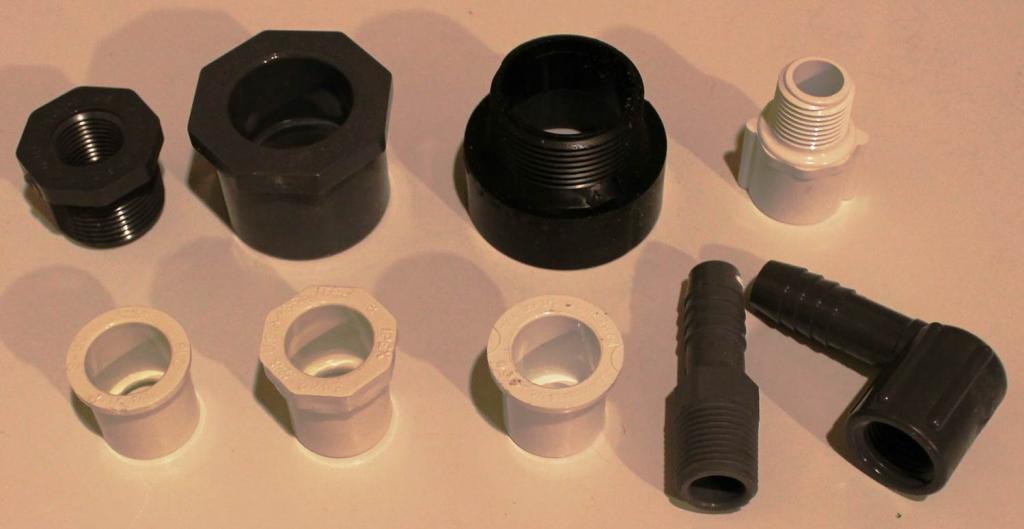
1) Adapters. Adapters are commonly used to go from threaded to solvent end, or solvent end to threaded ends, all available in both male/female ends.You can also get adapters to transition between different material types
2) Bushings. These are used to transition from one size of pipe to another. Bushing will also come in combinations of threaded and solvent ends as well to suit your specific needs/plans
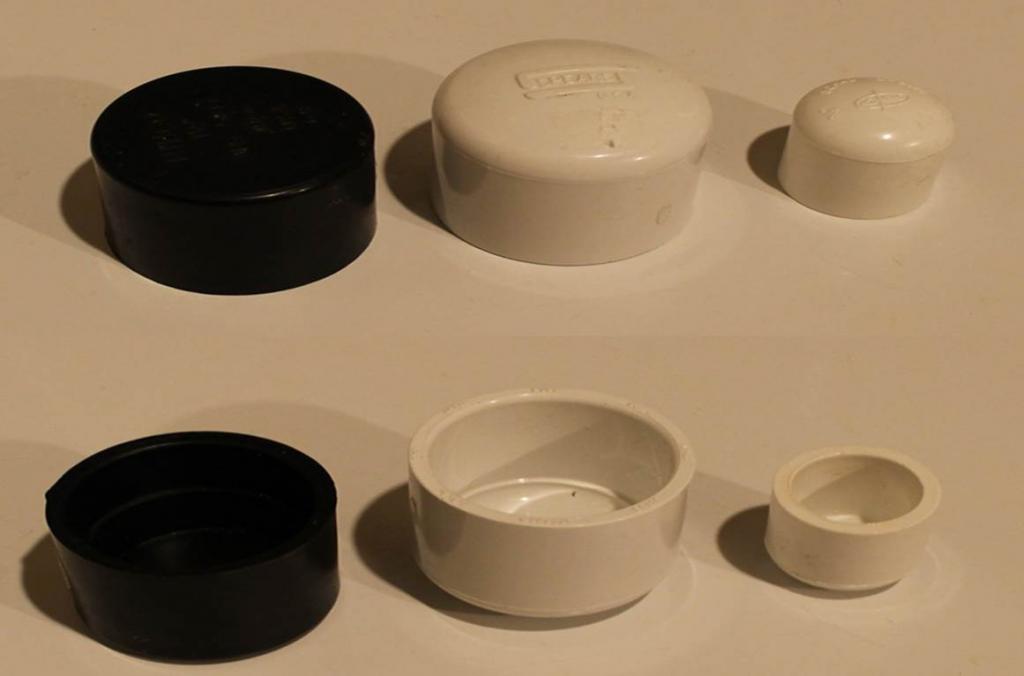
3) Caps/plugs. These are used to close off a pipe or fitting
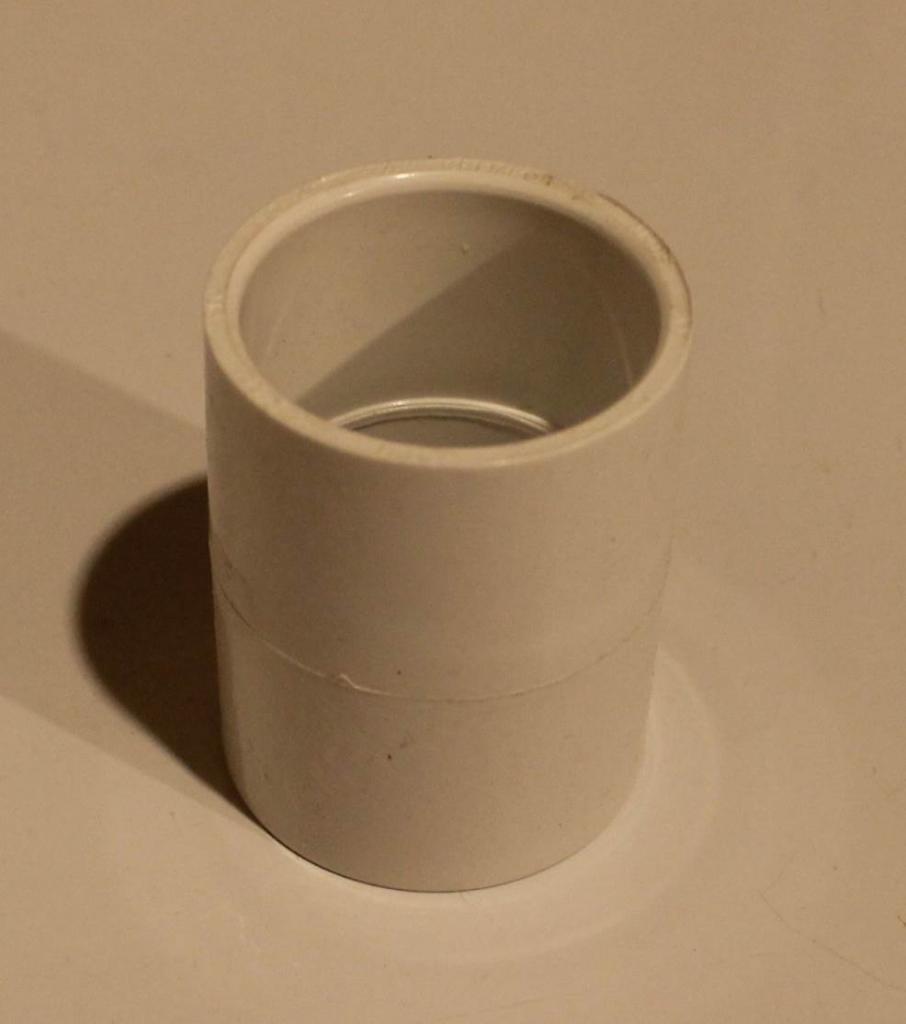
4) Couplings. These are used to connect two smaller pieces of pip together to make a longer run of pipe
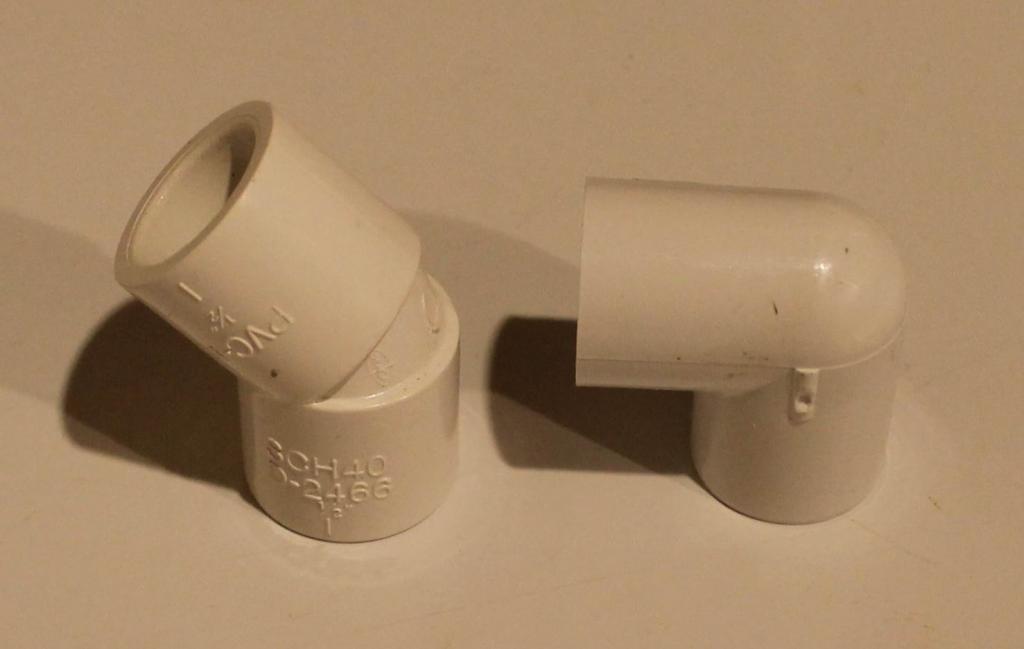
5) Elbows. Just as the name suggests, they are to change the direct of the pipe in a range of angles from 22 degrees to 90 degrees. You can also get them in combinations of threaded/solvent end and male/female ends as well.
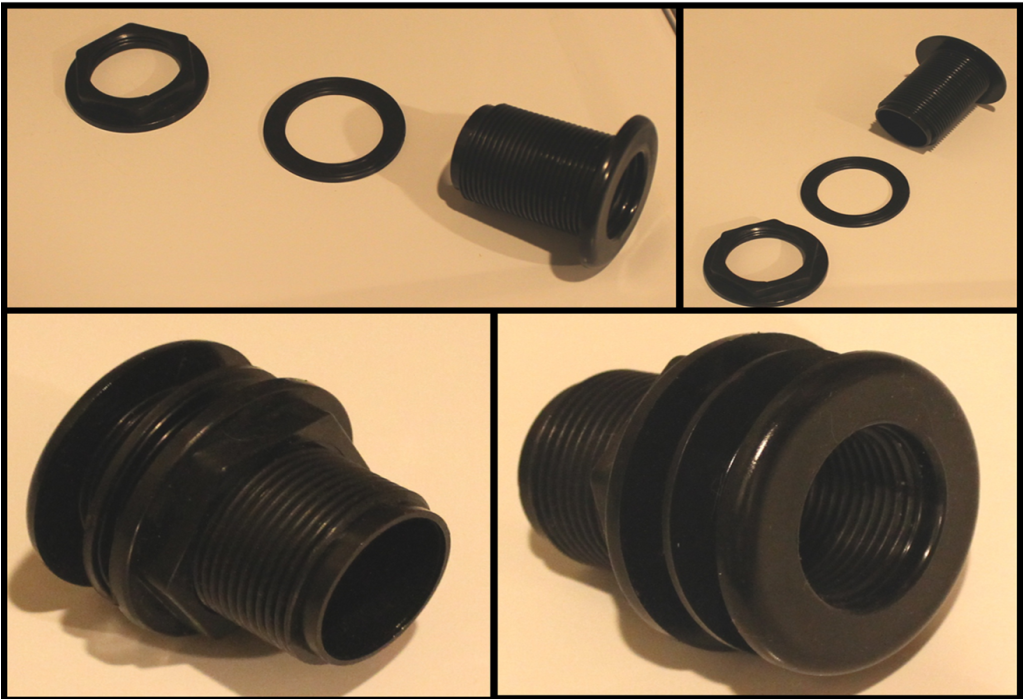
6) Flanges. These are commonly used to connect pipe to a flat surface such as the glass of a aquarium or sump, or a larger valve. These too will come in combinations of threaded and solvent applications and may also be left or right hand threaded.
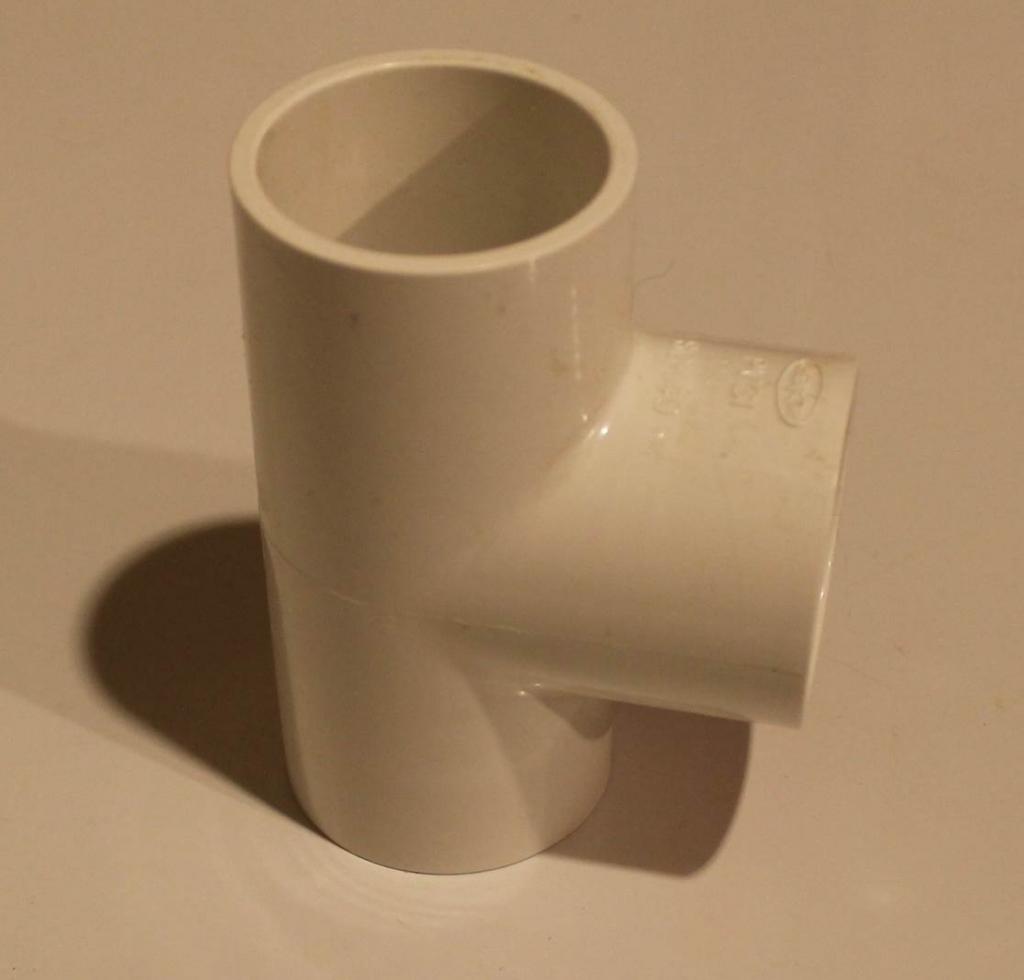
7) Tees. These are used to split the direct of a pipe in two or more directions
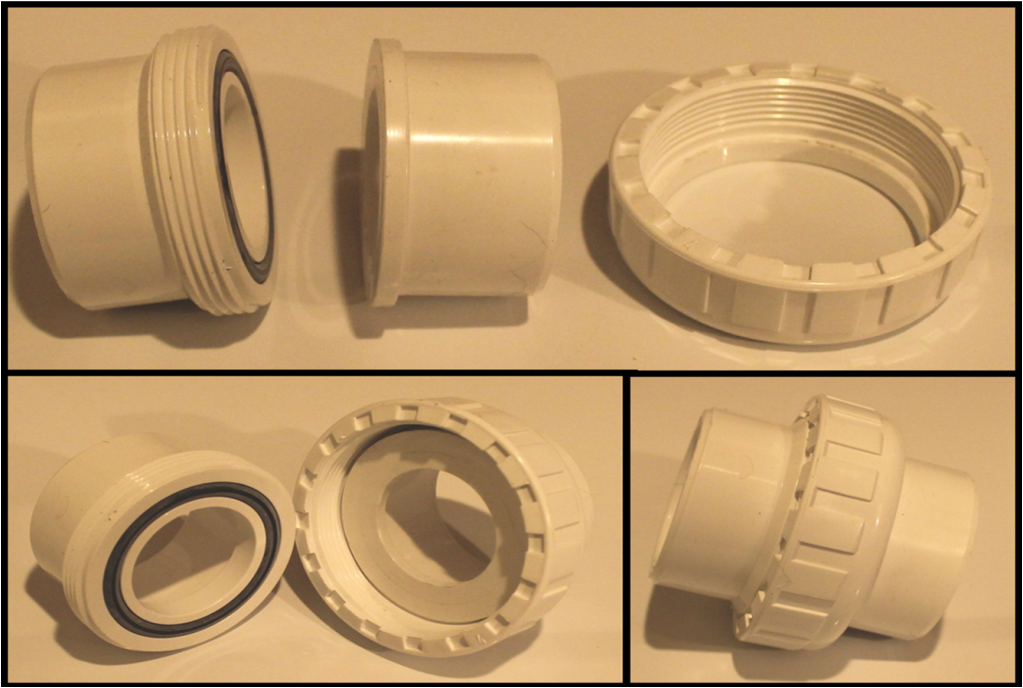
8) Unions-. These are type of couplings that are made of two halves with thread together. They allow you to quickly and easily disconnect a part of plumbing set-up and put it back together again. They also come in threaded and solvent combinations
Connecting fittings and pipe.
When using screwed fittings, it is always best to use a Teflon thread tape. This non-adhesive tape will fill in any potential gaps between the threads allowing the threaded connection to remain water tight and avoid any leaks. There are many different types of thread tape, each designed to be used with different types of materials and different applications. The most common type of thread tape that can be used in all the above listed materials will commonly be white in color and will be the most commonly found thread tape in just about any hardware store. This tape is also safe for aquarium use.
When using solvents to “glue” fittings and pipe together, please keep in mind there is a specific solvent designed to be used with each of the different material types listed above. Make sure to double check and ensure you are using the correct solvent for the type of material you are using. Using the wrong solvent can result in the joint developing a leak or even failing over time. Go ahead and check out this post to get informed on the best aquarium filters on the market.
As you may have noticed, all of the outside dimensions of the pipe listed about are all the same (as detailed in the applicable ASTM and CSA standards). If you choose to use combination of different material types you must ensure you are using the correct type of transition solvent designed to be used with both of types of materials. You can commonly find ABS/PVC DVW and PVC/CPVC transition solvents as well as a few other combinations. If you cannot find a transition solvent for both of the material types that you want to use, then you must assume you cannot use them together. When using two different material types, plan your set-up around the lower of the two specifications for the materials you are using.
Adapters. and Bushings.
Caps/plugs.
Couplings.
Elbows.
Tees
Flanges.
Unions
You can find a lot of other different plumbing products made of many different types of material, such as: Aqua-rise, Corzan PVC, Duraplas ABS, Aquatherm, and XFR PVC.Each of these have very specific uses which make them (in my opinion) not suitable for use in a sumped aquarium from a cost point of view.There are also companies that are starting to develop and market their own pipe products for use in the hobby.The below link shows an example of this.These manufactures state these products are PVC SCH 40 and can be used with regular PVC SCH 40 fittings.I cannot verify if these new products are in fact manufactured up to ASTM or CSA standards so I cannot validate the specifications these products are manufactured to.
http://reefbuilders.com/2013/08/19/pimp-aquarium-colored-pvc/
Acclimating Corals
In my experience, corals need to be acclimated, just as fish or inverts would need to be when adding them to your aquarium.The below process is what I would typically follow when acclimating corals to my tank.Although I do not quarantine my corals, I will give them a preventative treatment dip to rid them of potential hitch hikers.I also carefully inspect any coral before purchasing it when I buy it from a store or even from another hobbyist.If I do notice hitch hikers on the coral, or the tank the coral doesn’t look healthy to me, I will not buy the coral.This is also the reason why I do not like to buy corals on-line as I want to personally inspect the coral before I decide to buy it. If you do choose to quarantine your corals, I would suggest to use the below process to acclimate the coral to your quarantine tank repeating the same process when you move the coral to your display tank.
Step 1 – Float the bag
I will keep the bag I got the coral in closed and let it float in tank water for about 30 to 45 minutes allowing the temp of the water in the bag to become the same as the tank water.If I am floating the bag in the tank, I will lower the lighting level to about 10% of normal.Most of the time I will float the bag in the sump were the lighting level will be very low just so I do not have to change the lighting in my tank more than what I have to
Step 2 – Remove the coral and water
Once I am confident the temp of the water in the bag matches the tank water, I will remove the coral and the tank/bag water from the store and place them both in a separate container. I have a few different sized containers that I use to accommodate different sizes of corals and different amounts of water.
Step 3 – Acclimate the coral to your water parameters
Now that I have the coral in a different container with the tank water from the store, I will start adding tank water to this container. I will typically add about ½ cup of water about every five minutes or so. Once the container has become full, I will remove and discard about half the water from the container so I can continue adding water from my tank to this container. I will repeat this about three times or until I am comfortable that I have replaced all of the water from the store with water from my tank
Step – 4 Observation
While I am adding water from my tank to the container with the new coral in it, I will be carefully watching the coral for any hitchhikers.
Step -5 Treatment dip
I will always give the corals a preventative treatment with a coral dip before placing them in my display tank.The below is the coral dip that I like to use. Just make sure that whatever coral treatment dip you choose that you careful follow the instructions on the bottle.If I noticed any hitch-hikers while acclimating the coral to the tank water, I will ensure they are removed / killed off by the coral treatment dip.If I see any harmful SPS crabs, I will get a pair of tweezers and manually remove them as these crabs are very hardy and some of them can survive the coral treatment dip.
I can not stress the importance of using a coral treatment dip enough. I once skipped this step and introduced flat worms into my tank. It took me a very very long time and a lot of effort to get the flat worms under control.I will never make that mistake again.So far, I have been very successful keeping hitch hikers out of my tank by using a coral dip.
Step 6 – Add the coral to the tank
Once I am confident the treatment has removed any potential hitch hikers, I will lower the lighting level in the tank to about 1/3 of normal (if not already lowered). Next I will remove the coral from the current container and place it in a second container of water that I just removed from my display tank.The reason for this is to remove any trace amounts of the coral treatment before placing the coral in my tank.I will gently swish it around a little in this second container before removing the coral by hand and placing it in my display tank.All corals will initially be placed on the bottom of my tank
Step 7 – Acclimate the coral to my tank lighting
Now that the new coral is in the tank at a lower lighting level, I will leave the lighting at this current level for a few hours.I will slowly increase the lighting level back to its normal level over the next 2 or 3 hours.Before switching to LEDs, I would place 4 or 5 layers plain of white paper on top of the tank lids to block out some of the light and slowly remove one layer at a time allowing more and more light to get to the tank.
The next day, once the tank lights are on at their normal setting, I will place the coral in its intended spot.If the coral is a sensitive or high light demanding coral requiring it to be placed higher in the tank (closer to the lights), I will take a few days to move it up to its intended spot, placing it a little higher on the rocks until it has reached its intended spot.
NOTE: I will never add any of the water that I used to acclimate a coral back into my tank.Once I am done acclimating the coral, I will top up my tank with some freshly made salt water to replace what I had removed during the acclimation process. I will always discard all water used to acclimate a coral.
Responsible Fish Keeping
There certainly can be many conflicting opinions whether or not you can keep certain marine fish (most notably tangs) in certain sized aquariums. This can even become an emotional topic for many hobbyists. However, as the plural of anecdotal is not “fact”, I would challenge some of the commonly accepted facts / opinions that you read about on-line and further suggest to you to research these topics for yourself. In my opinion, completing your own research from credible sources is the only way to demonstrate responsible fish keeping though focusing on the facts. The below is a few examples of how I will approach keeping tangs to help give you better understanding of what I am talking about.
1) Proper Sized Aquarium
Don’t be fooled, conventional rules of thumb on tank size should not be considered a hard fast rules, but only used as a starting point to determine proper tanks size. That is why most people state tank sizes as “minimum aquarium size” and not as “ideal aquarium size”. I have seen tangs which appeared to do well in a 120 gallon tank for many years, and yet I have seen the same type of tang suffer to the point of eventually dyeing in a 230 gallon tank. So which tank is was the correctly sized one? And just to make matters a little more complex, different tangs have different requirements so you do have to keep in mind, not all tangs will have the same needs. How long and wide a tank is along combined with how much swimming space they would need is what you will need to determine in order to find a properly sized tank for the specific tang you would like to keep. I have always found the amount of open swimming space was one of the most critical factors to think about. Having a tang in properly sized tank will do no good if you use up the space in the tank by placing large amounts of rock and/or large amounts of tall corals. In the example I just mentioned above, the 230 gallon aquarium had far too much rock in it (at least in my opinion) and had a lot of extremely large SPS corals which limited the amount of swimming space to less than what was in the 120 gallon tank. That is why I choose to stock based on the open swimming space (open water area) within the tank after I have all my planned rock and corals in there. I will typically refer to published research papers and books written by credible authors in the field when determining the proper aquarium size and swimming space required.
2) So how big will my tang get?
Many sites will list the maximum scientifically measured size of a fish as their adult size. I think it is more realistic to look at the average size of a fish. After all, the tallest person in the world was well over 9 feet tall, yet all of the doorways into our homes we build today are around 7 feet with around 8 to 9 foot tall ceilings inside the home. This doesn’t mean you or I were stunted by our home, just that we are closer to average height as compared to the tallest person in the world. There are a few other factors that also make the average size of a fish size as a better approach to use
– In the wild the more dominant male, or “super male” will tend to get larger than normal which will not occur within a home aquarium
– Fish will not get as large in captivity as they do in the wild. I have read studies that showed fish in captivity typically get to between 66 and 80% of the normal or average size in the wild. These same studies also concluded these same fish were not stunted due to their: healthy appearance, normal behaviors, and long life span.
Once again, I will typically refer to published research papers and books written by credible authors in the field when determining how big a fish will become over time.
3) What about keeping multiple tangs?
For long term success, you should either keep a single tang, or a group of around 5 or more assuming your tank size and filtration can accommodate them. Many different types of tangs will typically not tolerate other tangs of the same species or a species that look very similar to themselves, while others can be just plain bullies. You will always have at least a small element of risk with keeping multiple tangs as these fish can be a lot like people, each with their own personality and disposition. Sometimes you can complete more than enough research but you just won’t know for sure how it will work out until you try it. Just be prepared to watch carefully and react quickly should things not work out the way you expected. Once appropriate tank size, fish size, and swimming space has been validated, you will need to determine what type of territorial needs each fish has if you are keeping more than one, and what would be the best approach to take when adding these fish to your set-up. I would include all fish (and not just tangs) into this part of the process.
Many have suggested keeping tangs in odd numbers, like 5 or 7. I have often wondered about how important this actually is, after all, can tangs count? I would guess the most critical element would be to keep them in higher numbers, the more the better (assuming you are not overstocking the tank as already mentioned). However, I will typically refer to published research papers and books written by credible authors in the field when considering keeping multiple tangs in a single aquarium.
4)Are there other things to consider ?
Putting all personal opinions aside, we can all agree that good aquarium husbandry will be just about the most important aspect of keep in any fish. The two other critical elements that will also have to be considered are:
1) Water parameters
2) Diet
This can be just about the easiest part of your research to complete. As the tangs that I keep come from the in or near our coral reef, I try to keep the water parameters as close as that of the coral reefs as I can. The below link can explain that in a little more detail. The proper diet is also fairly easy to identify with a little research from published research papers and books written by credible authors in the field.
https://www.reefaquarium.com/2013/the-basics-of-marine-aquarium-water-parameters/
5) How do I know when I have made the correct choices?
When you have completed the proper research, things should be going great and you will be enjoying your aquarium for years to come. So, what does it look like when things are going good? Basically, you should have a healthy fish that looks and acts normal. The below list are just a few things that will give you a indication when things are going well:
-No signs of chronic disease.
-No signs of abnormal coloring or body shape.
-No signs of abnormal behavior.
-Strong appetite when offered a proper diet.
-No signs of abnormal stress, which is typically shown as higher than normal respiration rates.
There can be many different signs to watch for which can be a indication that you may not be providing a proper home for your tang, or any other type of fish as well. You can take the list above and watch for the opposite. However, there are a few other things to watch for that could be a indication your fish is in a aquarium that is too small. These things can include:
-Bruised nose.
-Bent or torn fins.
-Shortened life span.
I’m not trying to make things seem more complicated for you when trying to determine proper aquarium size and environment for your planned fish. I just want to give you some guidelines to think about when completing this research for yourself based on what I have learned completing my own research along the way. There is a lot of information available on line and in forums, but not all of it is good. You need to be able to find credible information from experienced people and start form there. The better quality information that you find, the easier the research will become and you will have a better and healthier aquarium because of it.
Some additional references:
http://coralmagazine-us.com/content/arrested-tang-police-i-refuse-confess
http://microcosmaqx.typepad.com/jay_hemdal/2009/01/beware-the-tang-police.html
http://www.tfhmagazine.com/saltwater-reef/feature-articles/putting-fish-back-into-the-reef-tank.htm
CSC 450 in Sump Skimmer – Product Review
Rating Overview: 4.5 out of 5

Details of my ratings along with the manufacture’s specifications are contained below.
Manufacture Specifications
The below is taken directly from the distributor’s website for this skimmer:
http://www.aqua-digital.com/skimz/
SKIMZ specializes in designing and building the most advanced marine equipments for professionals and hobbyists. Their are committed to bringing you the widest range of excellent equipments at an affordable price for your marine and reef aquariums.
SKIMZ Singapore LLP begun in early 2000, focusing the initial years in aggressive product research and development, with the aim of bringing the best possible marine equipment to professionals and hobbyists. Today, Skimz carry the widest range of outstanding equipment to suit your needs. They even customized a whole range of equipment for aquaculture farms and the marine industry.
SKIMZ uses the best material and latest technology in the manufacturing of their equipment. The result: To bring to you equipment of the finest quality! All SKIMZ protein skimmers undergo the prestigious TÜV Rheinland testing, a testimony of quality products meeting the highest technical requirements. SKIMZ strives for continual improvements to our products. Lots of useful information are available on the Skimz website.
|
Technical Data: Technical Data: two SICCE PSK1200 needle wheel pumps (110V/60Hz) 0.938A/52W Dimension: Volumn rating 500 gallons This skimmer is made from taking a Skimz SK251 skimmer (link below) and replacing the original pumps with Sicci PSK1200 pumps. http://www.skimz.sg/products/protein_skimmers/kone_subpage/sk251.html |
The below is my own assessment using a CSC 450 in sump skimmer
Price Point (4 out of 5):
While this skimmer is still reasonably priced for a skimmer of this size, it is a little bit lower priced than other skimmers that perform just as well or at least close to the CSC 450 skimmer. You can typically find these skimmers brand new ranging anywhere between $650.00 and $800.00 throughout Canada and the USA.
Ease of Use and Set-up (4 out of 5)
This is not exactly “plug-n-play”, but it is not that hard to set-up and use. The instructions are clear and this skimmer should take you less than 5 minutes to assemble even if you have never assembled a skimmer before. There are a few pictures showing some of the steps involved in stepping up and maintaining this skimmer at the end of this review.
Overall Size (5 out of 5)
This is one of the qualities that I really like about the CSC 450 skimmer. It has a very small foot print as well as being shorter than most other skimmers with similar capacities.
Noise Level (5 out of 5)
This is another good aspect of the CSC 450 skimmer. It makes very little noise when running and I would even say it would be the quietest of the skimmers with this type of capacity, but that is only my opinion.
Ease of on-going Maintenance (4 out of 5)
The one thing that I both like and dislike at the same time is how the CSC 450 skimmer is designed to be taken apart. I do really like how easy it is for everything to come apart and be cleaned very well, but I do not like the amount of screws that are needed to remove in order to take it apart. I find the large size of the cup to be of great benefit to this skimmer. I have it set for a thinner skimate and I have to empty the cup every 2 to 3 days.
Effectiveness of Operation (5 out of 5)
The CSC 450 comes with two Sicci PSK1200 needle wheel pumps which very efficient and top rated skimmer pumps. They can produce a very fine and thick layer of bubbles once the air intake is adjusted correctly. This skimmer is a 6 out of 5 in my books. The only draw-back to this skimmer that I have come across so far is the length of time it took to break in. My skimmer took about 2 weeks to break in and another 2 weeks for me to find the best depth of water for this skimmer to sit in. It can be a very touchy skimmer to set-up, but when it`s broken in and you have it set for your tank, it will perform amazingly well.
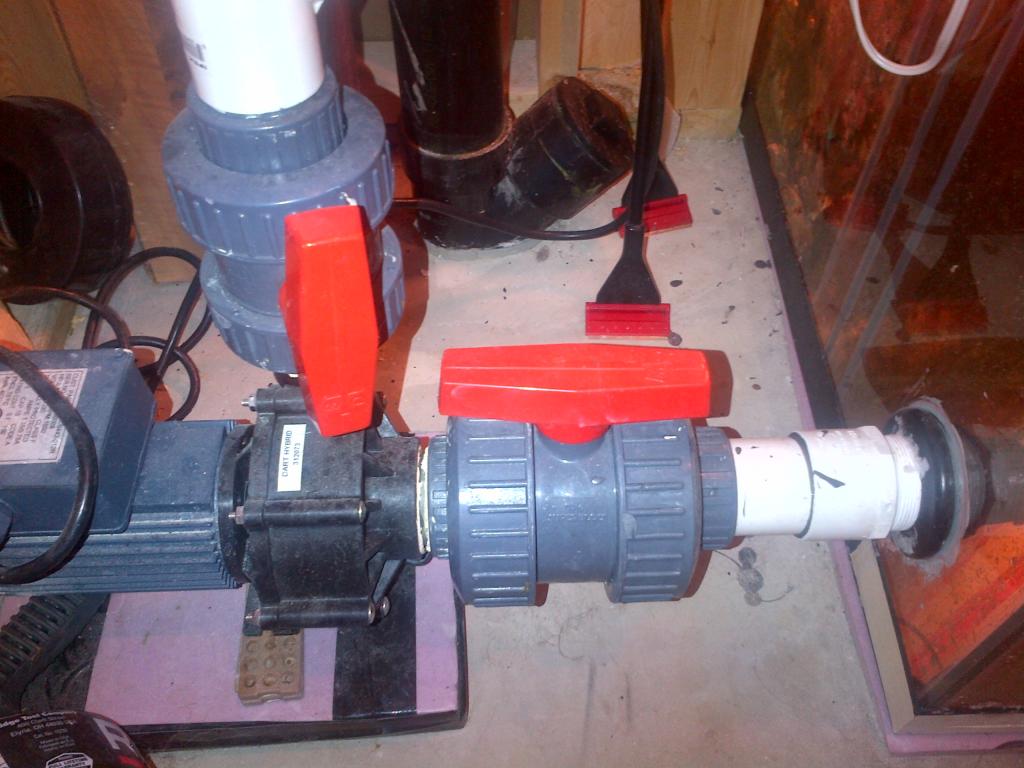
I found the best place to start this process is to have the skimmer in 7 inches of water with the gate valve 80% open and both air valves 100% open. After a week of running, adjust the gate valve slowly closing it until you get a good amount of skimate in the cup. If you want a thicker skimate, raise the skimmer slightly so it is sitting in less water. This skimmer safely run in as little as 6 inches of water, and will produce a very thick skimate in lower levels like that.
Likeliness of Recommending this Skimmer to Others (4 out of 5)
This would be one of the true ways to really assess how well this skimmer preformed for anyone. In short, this is among the best of the larger skimmers that I have used and I typically recommend this skimmer to people that have enough room in their budget for one. This is also one of the few skimmers that I would at least somewhat agree with the manufactures recommend tank size for use. I have been using this skimmer on my heavy stocked 180 gallon aquarium with a 100 gallon sump and I am very happy with the performance and resulting water quality. I feel this skimmer would be capable of a handling a larger set-up with a much larger bioload.
Below are a few pictures of when I had set-up my CSC 450 skimmer


And the below picture was taken 3 or 4 days after a skimmer cup cleaning

Vampire Tang
Common Name: Vampire tang, Lieutenant Tang, Doubleband Surgeonfish
Scientific Name: Acanthurus Tennenti
Reef Safe: Yes
Temperament: Semi Aggressive
Care Level: Moderate
Max Size: 10 inches (8 to 9 inches is more common)
Appearance:
The vampire tang will range in color from light tan to white with an almost black border around the edges of the body. They are also known to have a really nice blue outline around the head and fins. Once the vampire tang reaches adult size, the tailfin will also develop some very nice blue and white coloring and take on a lyre shape. And of course, there are the two dark blue to black markings on the shoulder area just behind the head. As juveniles, they will have a horse shoe shaped marking on their side which will separate into the two dark marking once they start to reach adulthood. These adult markings will also have a very vibrant blue outline to them.
May people find these marking to look like vampire teeth while others will believe the markings look closer to the rank insignia for an army lieutenant. This is how the two most common names for this fish had developed.
Below are a few pictures of my vampire tang. I would guess he is fully grown as he has reached 9 inches in length and has stayed that way for about 2 to 3 years now. My photography skills do not allow me to truly show you how nice this fish really looks. The body on my vampire tang is almost white in color making it hard to me to get a good picture as his body reflects the blue tones of the aquarium lighting which gets picked up by the camera.


Environment and Temperament
Vampire tangs can become semi-aggressive when kept with other tangs of a similar shape, size, and color to them and can also become aggressive with other vampire tangs in the same aquarium. This behavior would be fairly common with most tangs. The vampire tang however is a great fish for a community tank as they will peacefully co-exist with any other types of fish. They are also completely reef safe.
The vampire tang would need an aquarium size of 150 gallons, but would do best in a 180 gallon (or larger) aquarium. The reason for that recommendation is not only based on their average adult size of around 10 inches (give or take), but on their typical behavior as well. They are a very active fish requiring a lot of open swimming space in the tank. This can also make the vampire tang a very entertaining fish to have in a properly sized set-up.
The vampire tang will do best when there are a few suitable hiding spots so they can claim one as their own. As with most tangs, they like to go a hide when they get scared or startled. Having a good amount of live rock in your tank will not only help you to maintain good water parameters, but also provide a more natural environment for the vampire tang.
Recommended water conditions / parameters:
I would refer you to the below article for the typical water conditions that vampire tangs will do best in:
https://www.reefaquarium.com/2013/the-basics-of-marine-aquarium-water-parameters/
Diet
As with most tangs, the vampire tang will accept almost any food you may offer it. However, they are herbivores and will require a diet consisting mostly of sea algaes with some other verities of food on occasion. A good quality flake or pellet food meant for marine herbivores is also a good option for the vampire tang’s main diet.
A reference to consider
https://www.reefaquarium.com/2013/responsible-fish-keeping/
Orange Shoulder Tang
Common Name: Orange Shoulder Tang. Orange Spot Tang, Orange Epaulette Tang, Orangeband Surgeonfish
Scientific Name: Acanthurus Olivaceous
Reef Safe: Yes
Temperament: Peaceful to Semi aggressive
Care Level: Easy
Max Size: 12 inches (9 to 10 inches is more common)
Appearance:
The orange shoulder tang will have a different appearance as a juvenile. When in this stage, they will be mostly yellow in color with very subtle and faint blue highlights. The bar shaped marking on the side of their body will be a shade of orange to brown. Once they have reached adulthood, the front half of their body will turn a very light grey color while the back half will be a darker shade of grey. Their tail will develop a lyre shape to it over time as well. The bar marking on the side will turn to a vibrant orange color as well as developing a blue border around it. They will also develop blue and orange highlights around the edges of their body and fins.
The below pictures are of my orange shoulder tang. I would guess he has reached his fully grown adult size of about 10 inches as he has not grown at all in the past 3 or 4 years


Environment and Temperament
Orange shoulder tangs are the least likely to become semi-aggressive when kept with other tangs of a similar shape, size, and color to them. However, there still is a small risk they can become aggressive with other orange shoulder tangs in the same aquarium if not added at the same time and as juveniles. The orange shoulder tang is the least aggressive tang amount all of the larger bodied tangs common in the hobby. They are also a great fish for a community tank as they will peacefully co-exist with any other types of fish. They are typically reef safe when they are kept well fed.
The orange shoulder tang would to best in a tank size of 180 gallons or more. I would not suggest keeping one in an aquarium smaller than 180 gallons. The reason for that recommendation is not only based on their average adult size of around 10 inches (give or take), but on their typical behavior as well. They are a very active fish requiring a lot of open swimming space in the tank.
The orange shoulder tang will require a few suitable hiding spots so they can claim one as their own if spooked or startled. Having a good amount of live rock in your tank will not only help you to maintain good water parameters, but also provide a more natural environment for the orange shoulder tang as they like to pick at algae as it develops on your live rocks. If you are interested you can check this live rock for sale online.
Recommended water conditions / parameters:
I would refer you to the below article for the typical water conditions that orange shoulder tangs will do best in:
https://www.reefaquarium.com/2013/the-basics-of-marine-aquarium-water-parameters/
Diet
As with most tangs, the orange shoulder tang will accept almost any food you may offer it. However, they are herbivores and will require a diet consisting primarily of sea algaes with some other verities of food on occasion. A good quality flake or pellet food meant for marine herbivores is also a good option for the orange shoulder tang’s main diet.
I have read about people offering lettuce to orange shoulder tangs as a part of their diet. I would not recommend this practice. Although the orange shoulder tang will eat it, lettuce will not offer the same required nutrients as compared to marine algaes.
A reference for you consideration
https://www.reefaquarium.com/2013/responsible-fish-keeping/
Building a Aquarium Stand
Many hobbyists who are also handy with do it yourself projects will build their own aquarium stands allowing for the exact features, measurements, and overall look they want.
I have always built my stands so I could get a larger sump as well as better internal height for more skimmer options. Below are a few aquarium stands that I have built over the years. If you are somewhat handy at wood working and wood finishing, this should be an easy project for you.
Just a few key things to remember
1 – Make sure the complete edge of the aquarium is supported by the frame of the stand.
2 – Make sure there is direct wood to wood contact from the floor directly straight up to the aquarium.
3 – Assemble the frame together using wood screws and wood glue.
4 – Assemble your stand frame on flooring that you know is level and flat.
5 – Always place a peace of ½ to 1 inch thick rigid foam between the aquarium and the stand.
6 – Carefully plan the height of your stand so you can fit all the equipment inside the stand that you may want.
7- Double check the size / opening for the doors to make sure all the equipment you are planning to up in the stand will fit through the doors.
8- Use the below examples and links at the end of this article to help you plan how to build your tank to ensure it can hold the weight of your full aquarium
As these stands need to hold a lot of weight and must be safe, I do tend to over build them at least a little.
My First Example
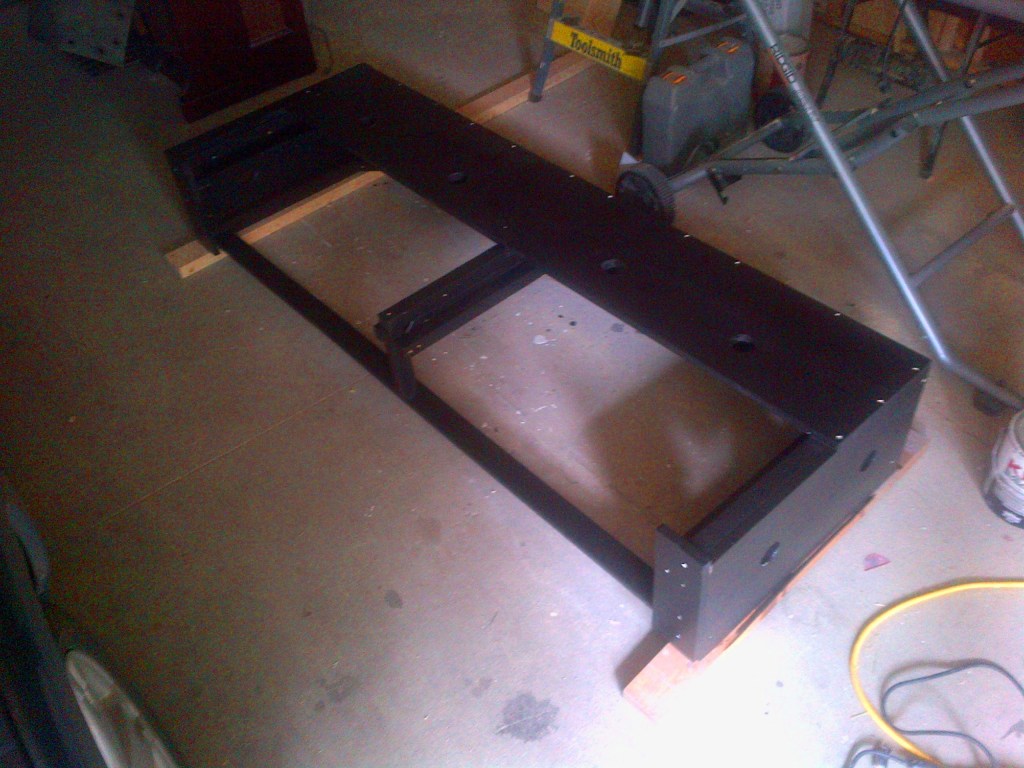
The below stand is one that I built for a four foot long 120 gallon aquarium. As I wanted to use a 4 foot long 55 gallon aquarium for the sump, I had to make the stand a few inches longer than four feet. That is why when you look at the below picture of the frame, it will look like it was double framed at both ends.
This is a picture of the frame I built with 2 X 4 peace’s of pine lumber. There were glued together with construction adhesive and screwed with 2 ½ inch construction screws. This is a good example to show what I am referring to when I say direct wood to wood contact from the aquarium frame directly straight down to the floor.

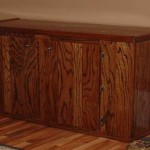
My next step was to cover the frame I made. As I wanted this aquarium stand to match the flooring in the room it was going to sit in, I wanted to cover the frame in ¾ oak. I cut the wood to fit and glued and nailed it to the frame. You can see the openings that I left in the front of the stand for doors to access the sump. The opening on the left hand side is to allow me to remove the sump easily without having to take the tank off the stand. There will also be a door for this end of the stand as well. I left the back of the stand open to allow for greater room when plumbing the sump to the aquarium. I also added some trim to the stand and stained it to match the rest of the furniture in the room it will sit in.


Next I built the all three doors out of the same oak and stained them as well. The whole stand also got 6 coats of the best quality urethane that I could use indoors. I wanted to make sure the wood will be as best protected from moisture that it can be.

Next I moved the stand into place and set-up the entire system.

Once all plumbed and tested, I put the doors on and started to enjoy the aquarium. That stand has now been in use for over two years and has been standing up to the ~1,400 lbs sitting on it as well as the moisture.


I also built a stand for a fresh water sump-less set-up in almost the same way as this first example above. Below are a few pictures of that stand. The biggest difference on the below stand is that I made a solid wood top out of 3/4 inch plywood.


I also used that same design for a stand I built for a older 36 gallon Hagen aquarium that I had a few years back.

As well as using the same stand design for a 33 gallon set-up I put together for my father.

My Second Example
I took a little different approach for my 180 gallon aquarium stand. I doubled up the 2X4s for extra strength. As my sump for this aquarium was going to be in another room, I had no internal height goals to meet, nor did I even need any doors.
The below picture shows the basic frame that I had built. I even added some cross bracing on the up rights along the back and sides of the stand to re enforce the stability.

Next I had to use wood filler on all of the screw holes followed by a lot of sanding. Once sanded, 2 coats of primer and 5 coats of paint were applied before the stand was ready. You can even see the peace of rigid styrofoam on the stand for the tank to sit on.

I then placed the aquarium on the stand, moved it in place, and attached the wood and cloth covers to the openings in the stand. This gave me the look I was wanting. This stand has now been in use for well over a year now and has been able to handle the ~2,200lbs of weight that is sitting on it.


My Third Example
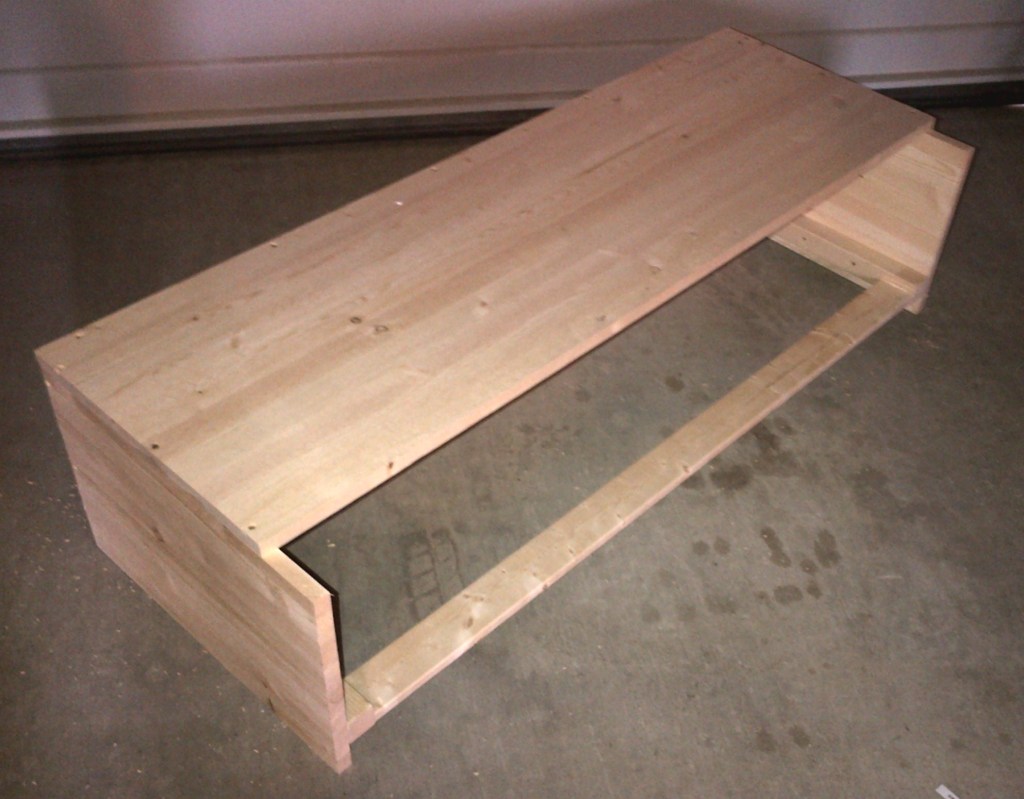
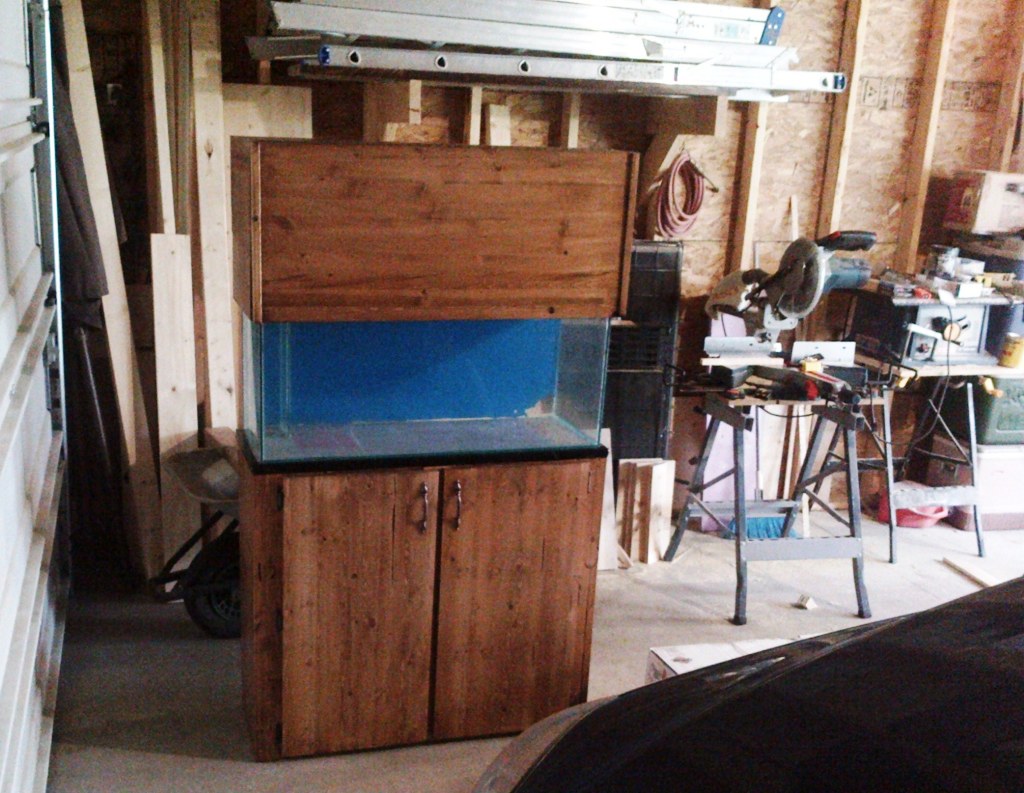
I ran into a very odd challenge with setting up a four foot long, 120 gallon aquarium in our basement. Due to two tight corners, I was limited to the size of stand that I could safety fit through these corners. The problem that I had was that a stand with the required height and width for my sump and skimmer would not fit around those corners. With the hight of the stand being taller than the hight of the aquarium, I could safely move the aquarium down the stairs but not the stand. After giving this a lot of thought, I decided to build a two peace stand that will be held together by a top brace. This would allow me to move the stand down my stairs in two peaces.
I started off by framing each half of the stand. These next two pictures are of the framing. The back of the stand is facing the car in the picture.


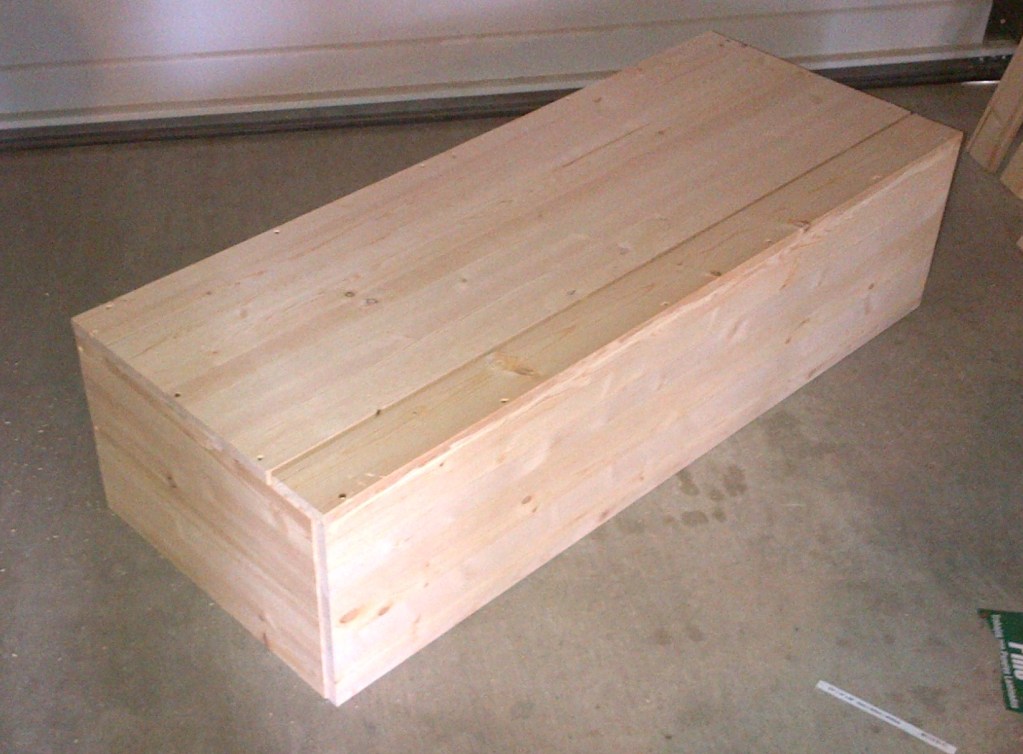
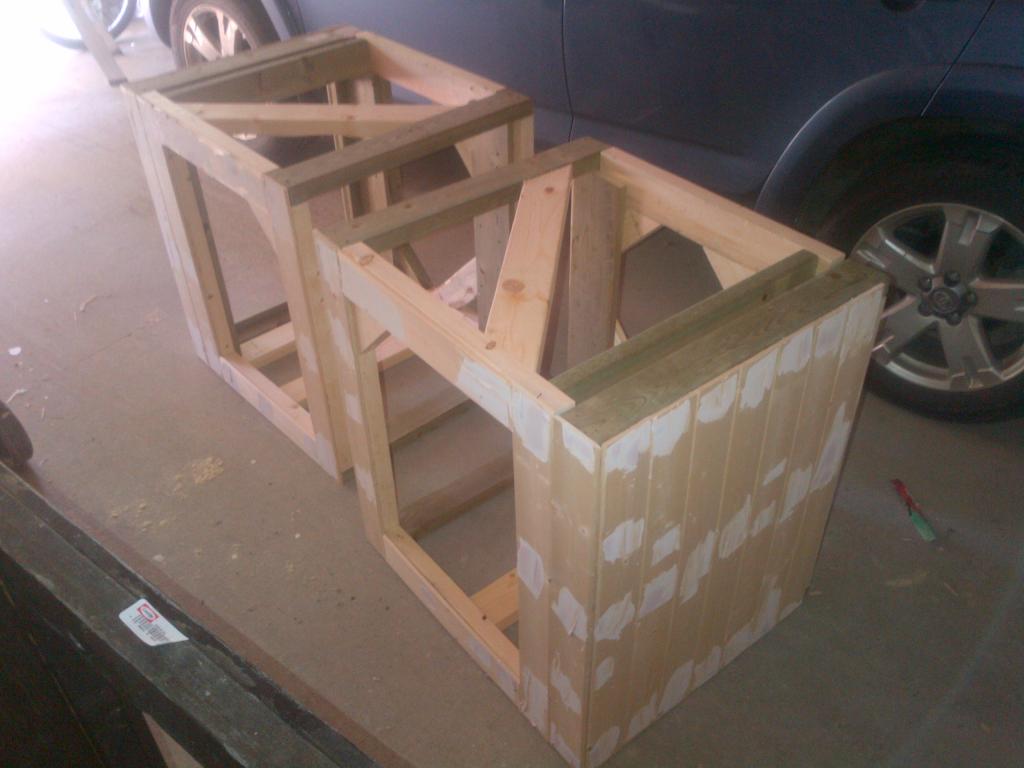
The next two are pictures are of the stand after I sheeted it in pine. As I want this stand to have a black finish, I use paint-able wood filler on all the hole and knots in the wood. The opening on the left hand side of the stand is for a large door to remove the sump if I ever need to.

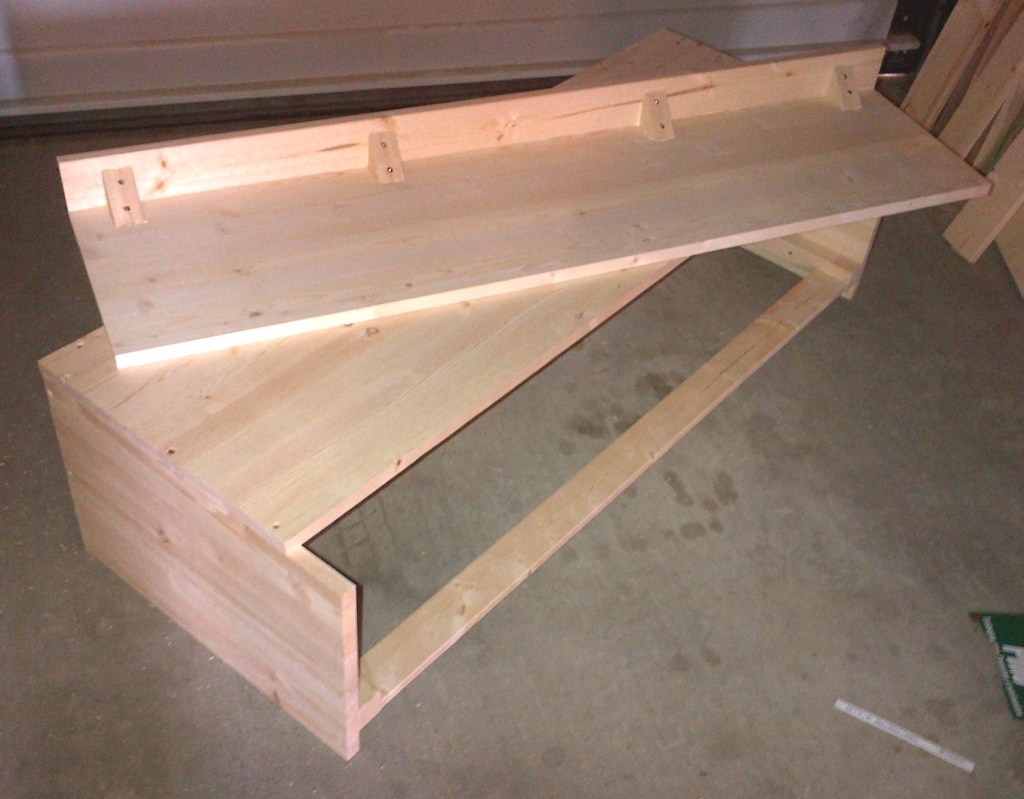
After getting the stand all sanded, primed and painted so I decided to get the top brace peaces cut and make the doors. The below pic shows the top brace peaces sitting in place. The ones on the end were glued & screwed to the top. The ones that run the length of the stand are the ones that hold both pcs of the stand in place
I had to leave a cut out on the back right corner for the drain line. That still leaves 1.75 inches of frame to support the tank in that corner which is more than enough to support the ~1,400 lbs the tank weights. I also wanted a little extra room should I ever need access to the bulk head flange

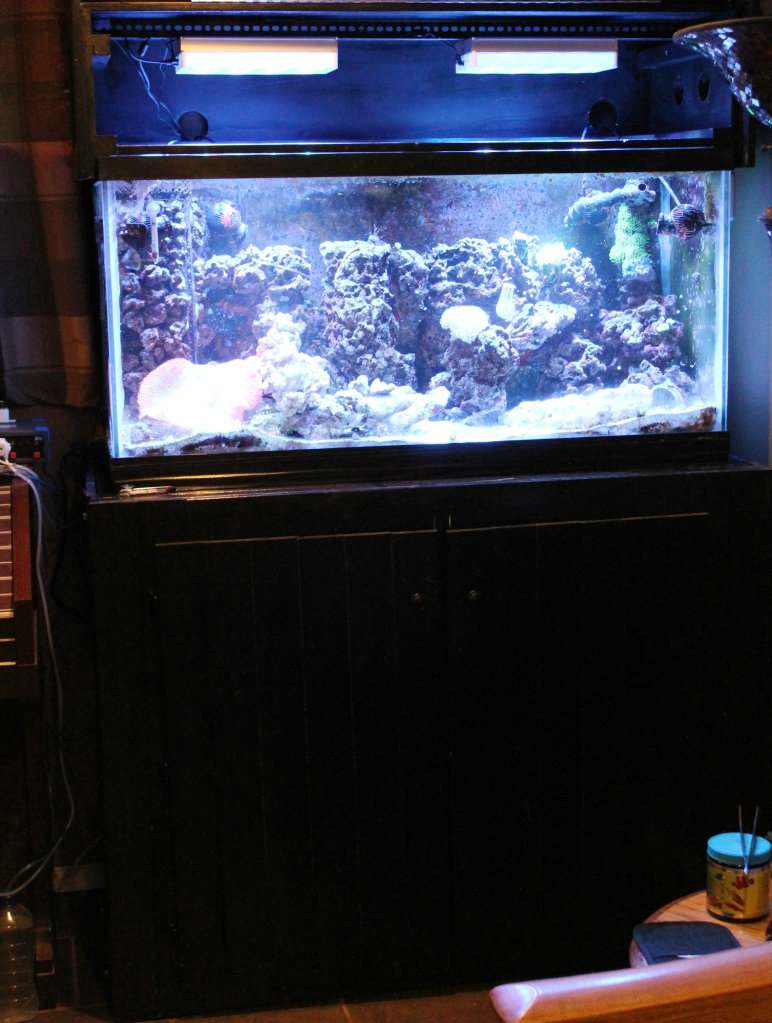
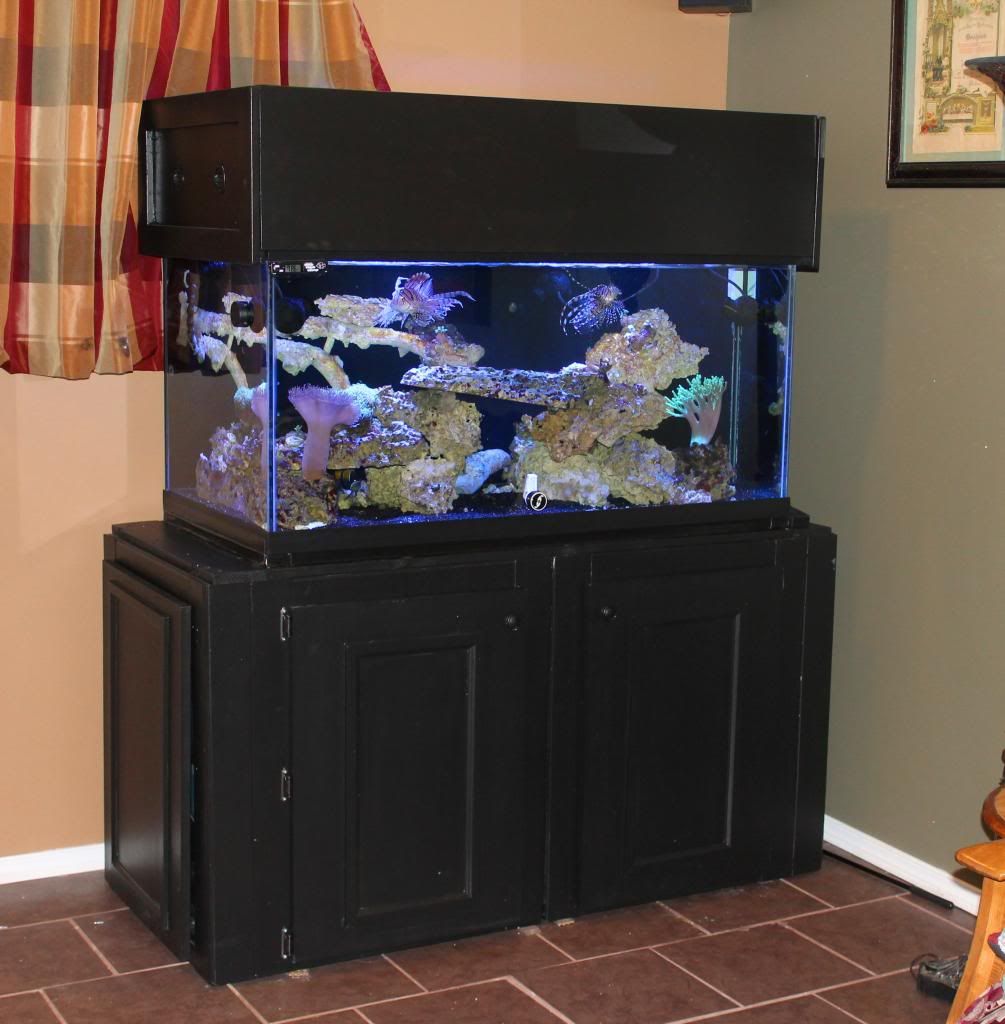
And one of this stand inplace and in use
The below links can also help you design and plan a aquarium stand
http://www.fishandtips.com/index.php
http://www.knottyplans.com/index.php?page=1001
Some References
http://diyfishkeepers.com/forum/showthread.php?1081-DIY-aquarium-stand
http://www.cichlid-forum.com/articles/diy_stand.php
http://www.aquariumlife.net/projects/diy-aquarium-stand/75.asp
http://www.reefkeeping.com/joomla/index.php/current-issue/article/29-building-an-aquarium-stand