Monthly Archives: April 2013
Vertex IN180 in Sump Skimmer Product Review
Rating Overview:
Overall product rating of: 4 out of 5

Details of my ratings along with the manufacture’s specifications are contained below.
The below is taken directly from the manufacture’s website:
http://www.vertexaquaristik.com/Products/ProteinSkimmers/InternalSkimmers/INSeries/IN180/tabid/148/language/en-US/Default.aspx
Amongst the many progresses in Marine Aquaria, the use of Protein Skimmers was, by far, one of the greatest milestones. Since their inception, there has been much advancement in the design and functionality of Protein Skimming. The Vertex™ IN-Series utilize these technologies to their greatest effect while offering you the best value for your investment.
Superior Performance
Powerful motor pumps drive precision Needle Wheel Rotors to introduce large amounts of air and water into the skimmer body. This is done without compromising continuous delivery and velocity due to the turbulence reducing bubble plate chamber. The result is a consistent foam head and nutrient extraction.
Silent
Vertex™ IN-Series Skimmers represent the Ultimate solution to noise reduction. Rotors engineered with the incredible strength of Rare Earth Phosphor Magnets and the frictionless ride of ceramic shafts, polished to an exceptionally high gloss, ensure that the entire impeller assembly spins with amazingly nominal resistance and vibration.
Easy
Removal of the collection cup has never been as effortless. Messy union locks and twist caps used by other competing products have been replaced by a Slip-Lock seal; minimalism simplifying your routine.
Plug and Play
Every Vertex™ IN-Series Skimmers is packaged ready-in-box for immediate use in your system.
Exclusive Features
- Quality cast-acrylic construction for long life.
- Advanced pin-wheel design for maximum performance.
- Effective conical reaction chamber.
- Turbulence reducing bubble plate sits low in skimmer body, increase reaction chamber volume.
- Easy to use Slip-Lock neck connection.
- Hassle-free, built in skimmate drain.
- Advanced air-silencer draws only moist air to keep the venturi clog free.
- Effortless adjustment; truly set and forget.
Technical Data
- Footprint 14″ x 10½”
- Height 24½”
- Diameter 8″
- 720 lph @ 32W
- Rated up to 180gal
The below is my own assessment of this skimmer after using it on a few different set-up over the past few years.
Price Point:
This is a very reasonably priced skimmer. You can typically find these skimmers brand new ranging anywhere between $200.00 and $300.00 throughout Canada and the USA. Certainly worth the money you will pay for this skimmer. Repair parts also seem very common to find and well priced, however, I have never needed to purchase any.
Ease of Use and Set-up
The Vertex IN180 skimmer was one of the easiest skimmers to set-up that I have used. Both of the Vertex IN180s that I have bought took about 4 to 8 days to break in before the skimmer started to work as it should pulling lots of gunk out of the water. There are no screws, bolts, nuts, or tools of any kind required to set it up with easy to follow instructions. Certainly a great “plug-and-play” design. Adjusting the air mixture is also very easy to do as you just need to turn the air intake pipe until you have the correct mixture for your set-up.
What I personally do not like is that this skimmer can require slight adjusting over time. I typically need to adjust it every 2 months or so which is not a very big deal. After completing a very detailed cleaning of the skimmer you will need to complete a few extra adjustments for the first 3 or 4 days until the skimmer is working well again. While this can be very common for most skimmers, I feel the Vertex IN180 is a little bit more sensitive to changes in the water as compared to other skimmers that are of comparable quality and value to the vertex.
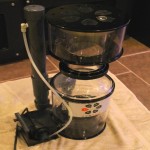
There are some pictures at the end of this product review that show more details of how easy it is to put this skimmer together. The below picture is the first Vertex IN180 that I had purchased and was taken about 3 days after having it running in the sump.

Overall Size
This is the biggest negative aspect (in my opinion) of the Vertex IN180. It is taller than most comparable skimmers. As the Vertex IN180 is designed to have the pump on the outside of the skimmer body, it does have a larger foot print as compared to some other skimmers.
Noise Level
This is a very positive aspect of the Vertex IN180 skimmer. It is a very quite skimmer. When placed in a sump that is in an aquarium stand, you will only hear a very slight and low humming noise. The 120 gallon aquarium that I am currently using a Vertex IN180 on is right beside the couch in our living room. I can’t even hear the skimmer running when sitting on the couch watching the TV which is across the room from both the couch and the aquarium.
Ease of on-going Maintenance
As the Vertex IN180 has a very good plug-and-play design, it can be easily taken apart for a good cleaning and routine maintenance. There are two aspects of routine maintenance that I do not like. The first slip-lock skimmer cup / skimmer neck connection. The cup sits very tightly in the neck I personally do not like. While this helps to ensure effective performance, it can also make the skimmer cup a little difficult to remove. However, the larger sized skimmer cup does help to reduce the number of times you need to remove and empty/clean the cup. The second aspect that I do not like is that it is difficult to clean the bubble plate and inside of the bottom half of the body as the skimmer body is not designed to come apart.
I like to have my skimmers set to pull a thick skimmate out of the water. When using that approach, I have found that I need to empty and clean the skimmer once every 7 to 10 days and perform a very detailed cleaning of the rest of the skimmer once every 4 to 5 months.
Effectiveness of Operation
The Needle Wheel Rotor design that Vertex has developed in the IN180 skimmer seems to be very effective producing a very fine and thick layer of bubbles once the air intake is adjusted correctly. This skimmer has continued to work great for me over the past few years. Once I had it broken in and adjusted correctly, it started taking a lot of crud out of the water and it did not put micro bubbles into the water either. After a few years of use, it is still working well. In all three of the set-ups that I have used this skimmer on, it had proven it’s self to be a very critical part to the aquariums overall filtration. If you maintain this skimmer when required and keep it adjusted correctly, it will also provide you with years of very good performance. The below is after 2 or 3 days of use on a moderatly stocked 120 gallon set-up

Likeliness of Recommending this Skimmer to Others
In short, very strong likeliness of me is continuing to recommend this skimmer to others. This would be one of the true ways to really assess how well this skimmer preformed for anyone. I have used two different Vertex IN180 skimmers over the past few years. One in a 90 gallon SPS aquarium with a 55 gallon sump, and a second in a 120 gallon mixed reef tank with a 55 gallon sump, which was later taken down and converted to a FOWLR set-up. In all three situations this skimmer preformed well overall. I would recommend this skimmer for lightly stocked reef or FOWLR aquariums up to 130 gallons in size (combined display tank and sump water volume) or moderately to heavy stocked aquariums up to 110 gallons (combined display tank and sump water volume). The only time I may not recommend this skimmer for aquariums like this would be if there was any potential size limitations of the skimmer compartment in the sump or the internal height of the tank stand if going under the tank.
Some additional Information
As I never did think to take any pictures when I purchased this skimmer new, I thought I would take a few pictures after I completed a very detailed cleaning of my Vertex IN180 skimmer. The needle wheel is easily removed by unlocking the cover plate a pulling out the shaft. No tools required. This makes routine pump cleanings very easy. When you buy a Vertex IN180 skimmer, the pump is assembled with the needle wheel already in place.


Below is what you will get out of the box when you buy a Vertx IN180. This is a picture of my skimmer taken apart after a detailed cleaning

To assemble you have to first mount the pump to the pump mounting bracket so it will sit flat when place on the skimmer body. The “L” shapped skimmer bracket is already on my pump pictured below.

Next to push the pump output nozzel into the pump port on the skimmer body

Assemble the simmer out-put assemble and connect the airline port and the venturi attachement to the pump


And finally the cup and lid

On-going adjustments are easily done by turning the upper part of the skimmer output which will either restrict or increase the flow of water out of the skimmer body which will affect/adjust the production of foam inside the skimmer.

When picking out a skimmer for your set-up, I would refer you to the below article which may help you select the correct skimmer for your aquarium
https://www.reefaquarium.com/2013/selecting-a-new-skimmer/
Skimz SK181 in Sump Skimmer – Product Review
Rating Overview: 4.5 out of 5

Details of my ratings along with the manufacture’s specifications are contained below.
Manufacture Specifications
The below is taken directly from the manufacture’s website:
http://www.skimz.sg/products/protein_skimmers/kone_subpage/sk181.html
Skimz E-Series SK181 Protein Skimmer features the highly efficient Skimz ES2000 needlewheel pump, suitable for aquariums up to 750 litres. With the combination of the conical body and bubble plate, it is the most effective skimmer in its class by significantly reducing turbulence, bubble bursting and surface agitation.
|
The SK181 protein skimmer draws an air intake of 540 litres per hour. Low power consumption and superior performance makes the SK181 an excellent choice for reefers looking for a value-for-money, attractive yet powerful protein skimmer. No feed pump required. Skimz Sk181 draws water directly from sump. |
|
Technical Data: Skimmer pump: 1 Skimz ES2000 needlewheel |
The below is my own assessment after a few years of using a SKIMZ SK181 in sump skimmer
Price Point (4 out of 5):
While this skimmer is still reasonably priced, it is a little bit higher priced than other skimmers that perform just as well or at least close to the SK181 skimmer. You can typically find these skimmers brand new ranging anywhere between $375.00 and $475.00 throughout Canada and the USA.
Ease of Use and Set-up (4 out of 5)
This is not exactly “plug-n-play”, but it is not that hard to set-up and use. The instruction are clear and this skimmer should take you less than 5 minutes to assemble even if you have never assembled a skimmer before. When following the instructions to adjust this skimmer, you should have it dialed into your set-up after about 15 to 20 minutes of minor adjustments and abservation. I do like the fact that once you have your skimmer adjusted correctly, it will need almost no routine or even minor adjustments from that point on. The Skimz SK181 also started pulling some pretty nasty looking crub out of my water within about 2 to 4 hours of taking it out of the box and setting it up. There are a few pictures showing some of the steps involved in stepping up and maintaining this skimmer at the end of this review.
Overall Size (5 out of 5)
This is one of the qualities that I really like about the Skimz SKS181 skimmer. It has a very small foot print as well as being shorter than most other skimmers with similar capacities.
Noise Level (5 out of 5)
This is another good aspect of the Skimz SKS 181 skimmer. It makes very little noise when running and I would even say it would be among the quietest of the skimmers with this type of capacity.
Ease of on-going Maintenance (4 out of 5)
The one thing that I both like and dislike at the same time is how the Skimz SKS181 skimmer is designed to be taken apart. I do really like how easy it is for everything to come apart and be cleaned very well, but I do not like the amount of screws that are needed to remove in order to take it apart. I find the cup to be on the small size. I have it set for a thicker skimmate and I have to empty the cup every 5 to 7 days. However, these are very minor complaints when compared to the other aspect of this skimmer.
Effectiveness of Operation (5 out of 5)
The Skimz SK181 needle wheel pump design is very efficient, producing a very fine and thick layer of bubbles once the air intake is adjusted correctly. It comes with the Skimz ES2000 needlewheel pump in it. This skimmer is a 6 out of 5 in my books. Within hours of taking this skimmer out of the box, it started removing a lot of gunk from the water and it just kept getting better from there. Even after a few years of use, it is still removing an amazing amount of stuff from the water. The below picture is what I get in the cup after around 36 hours of use, even after running this skimmer for a few years.

Likeliness of Recommending this Skimmer to Others (4 out of 5)
This would be one of the true ways to really assess how well this skimmer preformed for anyone. In short, this is among the best skimmers that I have used and I typically recommend this skimmer to people that have enough room in their budget for one. This is also one of the few skimmers that I would at least somewhat agree with the manufactures recommend tank size for use. I have been using this skimmer on my moderate to heavy stocked 180 gallon aquarium with a 100 gallon sump and I am very happy with the performance and resulting water quality. Although I do feel that is seriously pushing the limits of this skimmer with my set-up, this is not the only form of filtration and nutrient export that I have on that set-up. I would have absolutely no concerns using this skimmer on heavily stocked set-ups up to 150 gallons in size (combined display tank and sump water volume) or lighter stocked tanks slightly larger.
This skimmer is also an excellent choice for a smaller or limited size sumps due to the small foot print taken up by the skimmer and its relatively shorter height.
Some Additional Information:
The skimmer pump can be maintained by removing the four screws (two on each side of the pump) from the front plate allowing you to remove the front plate and then the needle wheel assembly for cleaning. When you purchase a Skimz Skimmer the motor will come fully assembled.


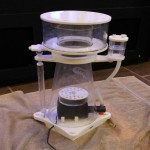
The below shows all the parts of the skimmer as you would unpack them when you purchase this skimmer. I never did think to take any pictures before assembling my skimmer when I purchase it new. These are pictures taken after a detialed cleaning a did a little while ago.

Start by adding the bubble plate chamber to the pump


Slide the pump onto the skimmer base. It will lock into place.

Attach the skimmer body to the skimmer base

Attach the micro adjustable valve to the skimmer body

Attach the air intake assembly to the skimmer body and the skimmer pump

This only leaves the skimmer cup and skimmer cup lid and you are done.


When picking out a skimmer for your set-up, I would refer you to the below article which may help you select the correct skimmer for your aquarium
Fu Manchu Lionfish
Common Name: Fu Manchu Lionfish, Ocellated Lionfish, Twinspot Lionfish
Scientific Name: Dendrochirus Biocellatus
Reef Safe: Yes
Temperament: Predator, but peaceful in the right set-up
Care Level: Moderate to difficult
Max Size: 4 inches
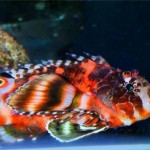
Appearance:
The Fu Manchu is among the more interesting and beautiful of the dwarf lionfish. It has very vibrant and contrasting colors of black brown, red and white. The Fu Manchu also has a unique feeler like tentacles at the corners of it’s mouth.


Temperament
They will do perfectly fine with other fish of similar size and can be a very peaceful community fish when kept with the correct tank mates. They can be a very shy fish that will not do well with other semi-aggressive fish. However, when kept with fish that have a body size of about ½ of the lionfish’s body size; it will only be a matter of time before the Fu Manchu lionfish will try to eat it. They are among the better predators common in the hobby. Although you can keep multiple Lionfish in the same aquarium, you should use caution when doing so. You would need to ensure they are both a very similar size and added at the same time to increase your chances of success. One of the Lionfish can become very dominant and will bully the others steeling all the food when you feed the tank.
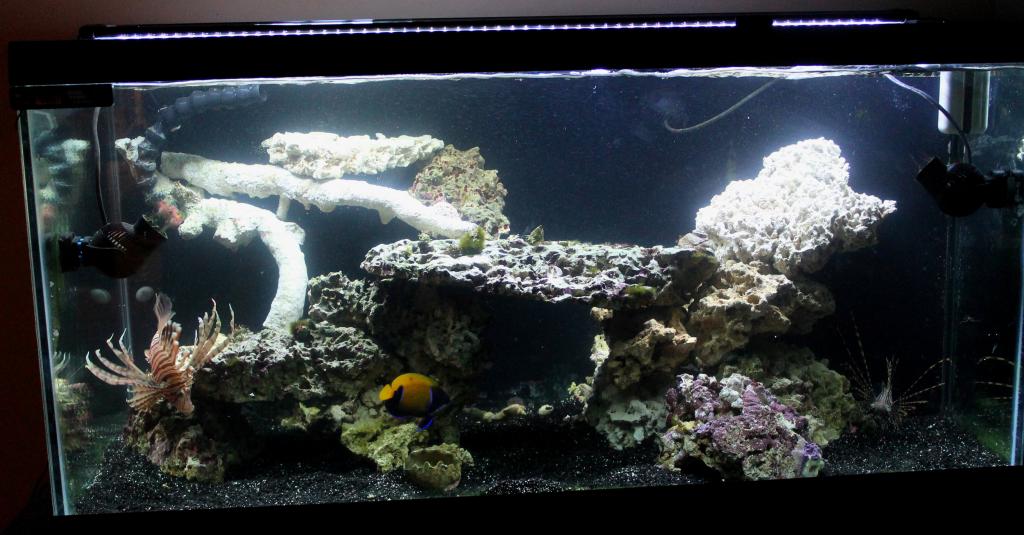
Environment
I would suggest a 36 inch long, 30 gallon aquarium would be the minimum size for the Fu Manchu lionfish based on its potential fully grown size. They need swimming space both around rocks and out in the open. They do best when provided shelf like structures which they can hang up-side from as well as cave structures they can sit in. This lionfish can be kept with corals. They have been known to eat smaller fish and shrimp (members of a tank’s cleanup crew) which cause many people not to add them to a reef aquarium.

Recommended water conditions:
I would refer you to the below article for the typical water conditions that a Fu Manchu lionfish will do best in. As a more difficult fish to keep, the Fu Manchu will also need both good and stable water parameters for long term success.
https://www.reefaquarium.com/2013/the-basics-of-marine-aquarium-water-parameters/
Diet
These predators are naturally carnivores. Getting this Lionfish to eat a healthy diet for it’s long term health is one of the biggest reasons for hobbyist having difficulties keeping lionfish. As the Fu Manchu lionfish is a predator, they are used to eating live fish that are anywhere about ½ their body size or less. It can be difficult to get them to switch to eating meaty frozen foods and/or pellets for marine carnivores.
I have had great success by using a very long pair of tweezers to take a smaller and longer peace of frozen food and wiggling it in the aquarium near the lionfish. This makes it look alive and the lionfish will typically eat it after a few days to a week of trying. Other hobbyist has also had great success with this approach by sticking the food on a small wood stick (like you use to make shish kabob). Once they are eating the wiggling food and have gotten used to it, I will start to wiggle the food less and less slowly getting them used to eating food that doesn’t look alive. Once they are at this point, you can just add the food to the tank and they will “hunt” it down and eat it. This is why I always suggest buying a lionfish that is already eating frozen foods so the above process will be a lot easier for you.
The above process is a proven one that works. Many people get frustrated and give up trying only to offer the lionfish live foods like small feeder goldfish. I do not recommend feeding your lionfish feeder goldfish for two reasons; 1) freshwater fish to not have the same mineral and fatty tissues that marine fish have which will not provide the lionfish with the proper nutrients it will need for long-term health, and 2) The lionfish will always favor live food over frozen as that is instinctive to them. This will set-back your efforts to get the lionfish to eat frozen foods. I would not even offer a lionfish live foods as the occasional treat.
Once you get your lionfish eating frozen foods, they will need a variety of different meaty foods like: prawns, large Mysis shrimp. The below thread will give you some better ideas for feeding a lionfish a diet that will help them have along and healthy life in your tank.
Be careful not to overfeed a lionfish as they have been known to overeat to the point of creating an internal blockage if given the chance. Just feed enough until you see a slight bulge in their stomach. Feed every second day as juveniles and about three times a week as adults.
https://www.reefaquarium.com/2012/feeding-high-quality-froozen-foods/
Special considerations
1) Feeding by hand
I never recommend feeding your lionfish by hand. Although they will readily take the food form you, over time they will learn to associate your hand with feeding. When you try to put your hands in the tank for reasons other than feeding, the lionfish will still think they are about to get fed and swim up very close to your hand. That can put you at some risk of getting bit or stung depending on the exact personality of your lionfish
2) Venomous Spins
The long dorsal fin of the lionfish contains venomous spins. If you get stung by one, it is going the hurt a lot like a very bad bee sting, or at least that is what I have heard. If you get stung by one, soak the stung part in hot water (as hot as you can stand it) for about 15 or 20 minutes. If you see any signs of a allergic reaction, seek medical attention immediately. I have found the best way not to get stung (accidentally or otherwise) is to make sure you do not spook or corner the lionfish when you put your hands in the tank
Volitan Lionfish
Common Name: Volitan Lionfish, Colored. Black Volitan Lionfish
Scientific Name: Pterois volitans
Reef Safe: Yes
Temperament: Predator, but peaceful in the right set-up
Care Level: Moderate
Max Size: 11 to 14 inches (refers to the body size excluding the fins, around 12 inches is more common)
Appearance:
This is one of bigger of the larger bodied lionfish. They have all the typical fins as with any of the larger lionfish. The coloring of their stripes will be brown to dark brown in color. It can be easy to mistake a Russels Lionfish with a volitan lionfish if you do not know what to look for. There are three key differences to look for. 1) The tailfin will have spots on it while the Russels will not2) The Russels bottom jaw and chin will also be white which while the volitan will have a color pattern on the bottom jaw 3) The spins along the dorsal, pectoral and anal fins on a russels lionfish are not banded and more fleshly in appearance while these same fins on a volitan are more sleek in appearance and will have dark colored banding on them.
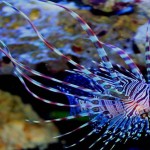
The below pictures are of my black volitan lionfish about 5 months after I added him to my tank


The below pictures are of the same lionfish 3 years later


Temperament
They will do perfectly fine with other fish of similar size and can be a very peaceful community fish when kept with the correct tankmates. However, when kept with fish that have a body size of about ½ of the lionfish’s body size; it will only be a matter of time before the volitan lionfish will try to eat it. They are among the better predators common in the hobby. Although you can keep multiple Lionfish in the same aquarium, you should use caution when doing so. You would need to ensure they are both a very similar size and added at the same time to increase your chances of success. One of the Lionfish can become very dominant and will bully the others steeling all the food when you feed the tank.
Environment
I would suggest a 120 gallon aquarium (24 inches wide) would be the minimum size for the volitan lionfish based on its potential fully grown size. They need swimming space both around rocks and out in the open. They do best when provided shelf like structures which they can hang up-side from as well as cave structures they can sit in. The below is an example of both. Lionfish can be kept with corals. They have been known to eat smaller fish and shrimp (members of a tank’s cleanup crew) which causes many people not to add them to a reef aquarium.

Recommended water conditions:
I would refer you to the below article for the typical water conditions that a volitan lionfish will do best in:
https://www.reefaquarium.com/2013/the-basics-of-marine-aquarium-water-parameters/
Diet
These predators are naturally carnivores. Getting this Lionfish to eat a healthy diet for it’s long term health is one of the biggest reasons for hobbyist having difficulties keeping lionfish. As the volitan lionfish is a predator, they are used to eating live fish that are anywhere about ½ their body size or less. It can be difficult to get them to switch to eating meaty frozen foods and/or pellets for marine carnivores.
I have had great success by using a very long pair of tweezers to take a smaller and longer peace of frozen food and wiggling it in the aquarium near the lionfish. This makes it look alive and the lionfish will typically eat it after a few days to a week of trying. Other hobbyist has also had great success with this approach by sticking the food on a small wood stick (like you use to make shish kabob). Once they are eating the wiggling food and have gotten used to it, I will start to wiggle the food less and less slowly getting them used to eating food that doesn’t look alive. Once they are at this point, you can just add the food to the tank and they will “hunt” it down and eat it. This is why I always suggest buying a lionfish that is already eating frozen foods so the above process will be a lot easier for you.
The above process is a proven one that works. Many people get frustrated and give up trying only to offer the lionfish live foods like feeder goldfish. I do not recommend feeding your lionfish feeder goldfish for two reasons; 1) freshwater fish to not have the same mineral and fatty tissues that marine fish have which will not provide the lionfish with the proper nutrients it will need for long-term health, and 2) The lionfish will always favor live food over frozen as that is instinctive to them. This will set-back your efforts to get the lionfish to eat frozen foods. I would not even offer a lionfish live foods as the occasional treat.
Once you get your lionfish eating frozen foods, they will need a variety of different meaty foods like: prawns, large Mysis shrimp. The below thread will give you some better ideas for feeding a lionfish a diet that will help them have along and healthy life in your tank.
https://www.reefaquarium.com/2012/feeding-high-quality-froozen-foods/
Be careful not to overfeed a lionfish as they have been known to overeat to the point of creating an internal blockage if given the chance. Just feed enough until you see a slight bulge in their stomach. Feed every second day as juveniles and about three times a week as adults.
Special Considerations
1) Feeding by hand
I never recommend feeding your lionfish by hand. Although they will readily take the food form you, over time they will learn to associate your hand with feeding. When you try to put your hands in the tank for reasons other than feeding, the lionfish will still think they are about to get fed and swim up very close to your hand. That can put you at some risk of getting bit or stung depending on the exact personality of your lionfish
2) Venomous Spins
The long dorsal fin of the lionfish contains venomous spins. If you get stung by one, it is going the hurt a lot like a very bad bee sting, or at least that is what I have heard. If you get stung by one, soak the stung part in hot water (as hot as you can stand it) for about 15 or 20 minutes. If you see any signs of a allergic reaction, seek medical attention immediately. I have found the best way not to get stung (accidently or otherwise) is to make sure you do not spook or corner the lionfish when you put your hands in the tan
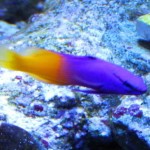
Royal Gramma
Common Name: Royal Gramma, Royal Gramma Basslet
Scientific Name: Gramma Loreto
Reef Safe: Yes
Temperament: Peaceful
Care Level: Easy
Max Size: 3 inches
Appearance:
The royal gramma is a very colorful little fish and will bring a lot of color and activity to any adequately set-up aquarium. The front half of the fish is a very bright purple color while the back half of the fish is a vibrant yellow color. The royal gramma will also have some dark markings near it’s eyes.


Temperament
Royal grammas are a very peaceful fish to have in an aquarium. You can keep them with any other peaceful fish . It is not recommended that you keep more than one royal gramma in your aquarium as they will get territorial and aggressive towards other royal grammas.
Environment
I would suggest the best minimum aquarium size for a royal gramma would be a standard 36 inch long 30 gallon tank Some hobbyists have claimed long term success keeping a royal gramma in a 29 gallon bio-cube. As they will need hiding spots, I would suggest an aquarium with a good amount of live rock which can provide them with at least a few cave like spots to hide in.
Recommended water conditions:
I would refer you to the below article for the typical water conditions that a royal gramma will do best in:
https://www.reefaquarium.com/2013/the-basics-of-marine-aquarium-water-parameters/
Diet
Royal grammas are carnivores, A diet consisting of a verity of meaty foods such as brine shrimp or mysis shrimp (as two examples) would be good options. The royal gramma would also benefit from a good quality marine flake food for carnivores.
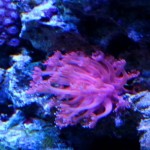
Flower Pot Coral
Scientific Name: Goniopora Sp.
Common Name: Flower Pot Coral, Goniopora, Sunflower Coral
Type of Coral: LPS (Large Polyp Stony Coral)
Lighting: Moderate
Flow: Moderate
Care Level: Moderate to Moderate / Difficult
Temperament: Peaceful to Semi-aggressive
Appearance
As the name suggests, the flower pot coral can look like a bouquet of flowers when all of it’s polyps are open and extended. The base of the colony will be rounded and the polyps will extend far beyond the base. The polyps will also have small tentacles on the ends giving the coral its flower like appearance. They can also have a verity of colors from greens, reds, and even yellows as examples.


Water Conditions
The below link highlights typical water conditions flower pot corals, just as with most LPS, will require. As this is a moderately difficult coral to keep, you should ensure your dKH, Cal and Mag levels are maintained at all times with minimal nitrate and phosphate levels. As this coral also has a calcified skeleton (or base), it will consume at least some calcium from your water. In set-ups with a good amount of LPS corals, it is not uncommon to have to dose dKH and Cal in order to keep the water parameters in line. With only a few LPS corals, a good water change schedule may be enough to maintain your parameters as well as replenishing trace elements. Some studies have also suggested the flower pot coral may to better (long term) with slightly elevated nitrate levels between 1 and 5 ppm.
https://www.reefaquarium.com/2013/the-basics-of-marine-aquarium-water-parameters/
General Information
Flower pot corals should be added to mature aquariums. Provided all their requirements are met, they colony can grow to about 7 to 9 inches. This is a not a very aggressive LPS coral but it still can sting other corals. A distance of 3 or 4 inches from other corals would be a good idea.
Clownfish have also been known to host in flower pot corals in aquariums that do not have anemones. Although this will not harm the clownfish, this can sometimes stress the coral to the point where it could become damaged and prone to infections.
These corals can also benefit from the occasional feeding of micro-planton. Although the below link shows how to spot feed clams, the same process can be applied to spot feeding flower pot corals.
https://www.reefaquarium.com/2012/spot-feeding-marine-clams/
As with all corals, the exterior slime coating can be a skin irritant or even highly toxic to humans so please, handle all corals with care. I would recommend wearing rubber gloves whenever you handle corals
Fragging
Flower pot corals can be fragged.
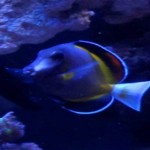
Powder Brown Tang
The below profile is on another one of the interesting tangs that I have kept. This information Powder brown Tangs is based on what I have learned and observed.
Common Name: Powder Brown Tang
Scientific Name: Acanthurus Japonicus
Reef Safe: Yes
Temperament: Peaceful for the most part
Care Level: Moderate
Max Size: 8 inches (around 6 inches is more common)
Appearance:
The powder brown tang has the typical oval shaped body, just as with most other tangs. As the common name suggests, it has brown coloring on its body. There are white marks on both cheeks as well as near the eyes and mouth. The fins are typically a darker shade of brown when compared to the brown on the body. The fins will also have a lighter blue colored highlights around the edges. The tail fin will have a little different coloring having a strong blue undertone to it as well as a yellow vertical bar. There will also be a yellow strip along the body separating the body and fins.


Environment and Temperament
Powder brown tangs can become semi-aggressive when kept with other tangs of a similar shape, size, and color to them and can also become aggressive with other powder brown tangs in the same aquarium. This behavior can actually be fairly common with most tangs. The powder brown tang however is a great fish for a community tank as they will peacefully co-exist with any other types of fish. They are also completely reef safe.
The Powder brown tang would to best in a tank size of 75 to 90 gallons or more. The reason for that recommendation is not only based on their average adult size of around 6 inches (give or take), but on their typical behavior as well. They are a very active fish requiring a lot of open swimming space in the tank. This makes the powder brown tang a very entertaining fish to have in a properly sized set-up.
The Powder brown tang will require suitable hiding spots so they can claim one as their own. It is typical for a Powder brown tang to find a spot they can hide in among the aquarium live rock and go there whenever they get spooked, scared, or stressed. The Powder brown tang really needs this “safe spot” to go to or they can become even more stressed reducing the effectiveness of their immune system and making them more susceptible to disease or parasites.
Recommended water conditions / parameters:
I would refer you to the below article for the typical water conditions that powder brown tangs will do best in:
https://www.reefaquarium.com/2013/the-basics-of-marine-aquarium-water-parameters/
Diet
As with most tangs, the powder brown tang will accept almost any food you may offer it. However, they are herbivores and will require a diet consisting mostly of sea algaes with some other verities of food on occasion. A good quality flake or pellet food meant for marine herbivores is also a good option for the Powder brown tang’s main diet.
A reference for your consideration
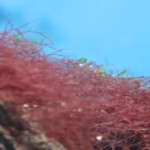
Red Hair Algae
Scientific Name: Centroceras clavulatum.
Classification: Macro Algae
Common Names: Red hair algae,
Reproduction: Non-sexual
Color: Red to Dark Red
Growth Rate: Moderate
Lighting: Moderate
Flow: Low / Moderate to High
Care level: Easy to Moderate
Appearance
Red hair algae, as the name suggest, is a type of hair algae. Due to the very nice red coloring, some hobbyist to try to keep it in there aquariums. As this is not a fast growing algae, many other types of algaes can out compete it for nutrients.


Lighting Requirements
Red hair algae will do well with moderate levels of light at the 6500K color temperature range. However, stronger levels of lighting with lower color temperatures can accelerate growth provided all other conditions / requirements are met. I have obtained very good results with high levels of CFL lighting in the 3000K range. I have also had the best results with a 18 hour photo period followed by a 6 hour period of no light.
Water Conditions
As this is a more difficult algae that will good and stable water conditions, maintaining your water parameters as described in the below link will help to ensure this algae will grow well. Red hair algae will also do best in a set-up that normally produces around 5ppm of nitrate which is the exception to the information in the below link. This macro algae will not do well with lower levels of nutrients. You may also need to consider dosing iodine if you experience difficulty keeping this algae healthy and growing
https://www.reefaquarium.com/2013/the-basics-of-marine-aquarium-water-parameters/
General Care
It is very important to maintain the correct flow, lighting and water parameters for this macro algae. This can also be a tasty treat for most crabs and tangs so it is important to make sure your current or future tank inhabitants are not known to eat macro algaes
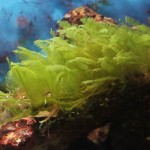
Caulerpa Macro Algae
Scientific Name: Caulerpa sp.
Classification: Macro Algae
Common Names: feather algae, green feather algae
Reproduction: Sexual and non-sexual
Color: Green
Growth Rate: Fast
Lighting: Moderate
Flow: Low / Moderate to High
Care level: Very Easy
Appearance:
Caulerpa is a fast growing macro algae. It is a green algae which sends out runners and will grow leaf like structures that will look more like features. The ‘leaves’ can grow as large as 4 inches long and ¾ of a inch wide. I find it to be very nice looking macro algae. But don’t be fooled by its looks. It can quickly spread across your rock and substrate, even chocking out corals or other forms of algae making it a rather invasive macro algae for a display tank depending on your cleanup crew and fish. Caulerpa is a great algae to grow in a sump or refugium for nutrient removal as it will quickly remove nitrates and phosphates from the water out competing many other forms of algae for these same nutrients.


Lighting Requirements
Caulerpa macro algae will do will with moderate levels of light at the 6500K color temperature range. However, stronger levels of lighting with lower color temperatures will accelerate growth. I have even used almost pure red lighting with great results. I have obtained very good results with high levels of CFL lighting in the 3000K range. I have also had the best results with a 18 hour photo period followed by 6 hours of no light.
Water Conditions
This is a very hardly algae that will grow in almost any conditions. However, maintaining your water parameters as described in the below link will help to ensure this algae will grow well. Caulerpa will also do best in a set-up that normally produces around 5ppm of nitrate which would be the exception to the below information.
https://www.reefaquarium.com/2013/the-basics-of-marine-aquarium-water-parameters/
General Care
As this macro algae can reproduce sexually, it is best to heavy trim it back on a regular basis to help prevent this macro algae from spawning in your set-up. This also will help when using Caulerpa in a sump or refugium as removing some of the algae will also remove the nutrients absorbed by the algae and promote more growth continuing the cycle.
Caulerpa can be a tasty treat for most crabs and tangs so it is important to make sure your current or future tank inhabitants are not known to eat macro algaes.
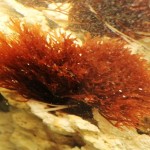
Scinaia Macro Algae
Scientific Name: Scinaia complanata
Classification: Macro Algae
Common Names: Red leaf macro algae
Reproduction: Non-sexual
Color: Red to Pink
Growth Rate: Moderate
Lighting: Moderate
Flow: Low / Moderate
Care level: Moderate to difficult
Appearance
Scinaia will have a very nice red to redish pink coloring. It will typically grow in clumps of smaller leaf like structures which get wider the closer you get to the top. These leaf like structure will also have somewhat inconsistent shapes. The clumps of scinaia will attch themselves to rocks or other objects in your aquarium. They can grow as large as 5 inches tall and 4 to 5 inches wide. This macro algae is a great addition to any display tank. Just make sure you do not have herbivorous fish or invertebrates that will typically eat macro algaes.


Lighting requirements
Scinaia will do best with moderate levels of light in the 6500K to 6700K color temperature range. However, I have obtained very good results with moderate to high levels of CFL lighting in the 3000K to 4000K color temperature range. I have also had the best results with a 18 hour photo period followed by 6 hours of no light.
Water Conditions
As this is a more difficult algae that will good and stable water conditions, maintaining your water parameters as described in the below link will help to ensure this algae will grow well. Scinaia will also do best in a set-up that normally produces around 5ppm of nitrate which is the exception to the information in the below link. This macro algae will not do well with lower levels of nutrients. You may also need to consider dosing iodine if you experience difficulty keeping this algae healthy and growing.
https://www.reefaquarium.com/2013/the-basics-of-marine-aquarium-water-parameters/
General Care
It is very important to maintain the correct flow, lighting and water parameters for this macro algae. It can be a more fragile algae so handling it is not recommended, just place it in a spot in your tank and leave it there. Mishandling or frequent handling can cause scinaia to die-off very quickly. You may experience a few set-backs with keeping Scinaia for the first time, but as this is such a beautiful macro algae it can be worth trying and sticking with it.
As Scinaia can be a tasty treat for most crabs and tangs so it is important to make sure your current or future tank inhabitants are not known to eat macro algaes